Tag: Mother’s Day

Mother’s Day Jewelry Box DIY

We have a special Mother’s Day Treat for you…
Mothers Day Promo

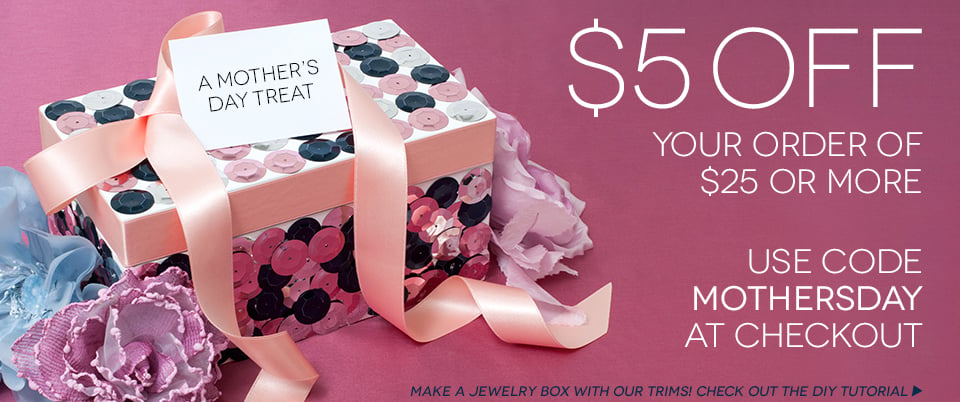
Mother’s Day is dedicated to celebrating moms everywhere. What could be better than showing mom you truly care than creating something especially for her. Take your childhood skills up a notch with this swoon worthy jewelry box DIY. Moms everywhere will be wondering where they can get one.

SUPPLIES:

DSC_0609

Jewelry Box (The Container Store)

Magna Tac Glue

20MM Cup Loose Sequin-NAVY

20MM Cup Loose Sequin-PINK

20MM Cup Loose Sequin-SILVER

20MM Cup Loose Sequin- WHITE OPAQUE

STEPS:

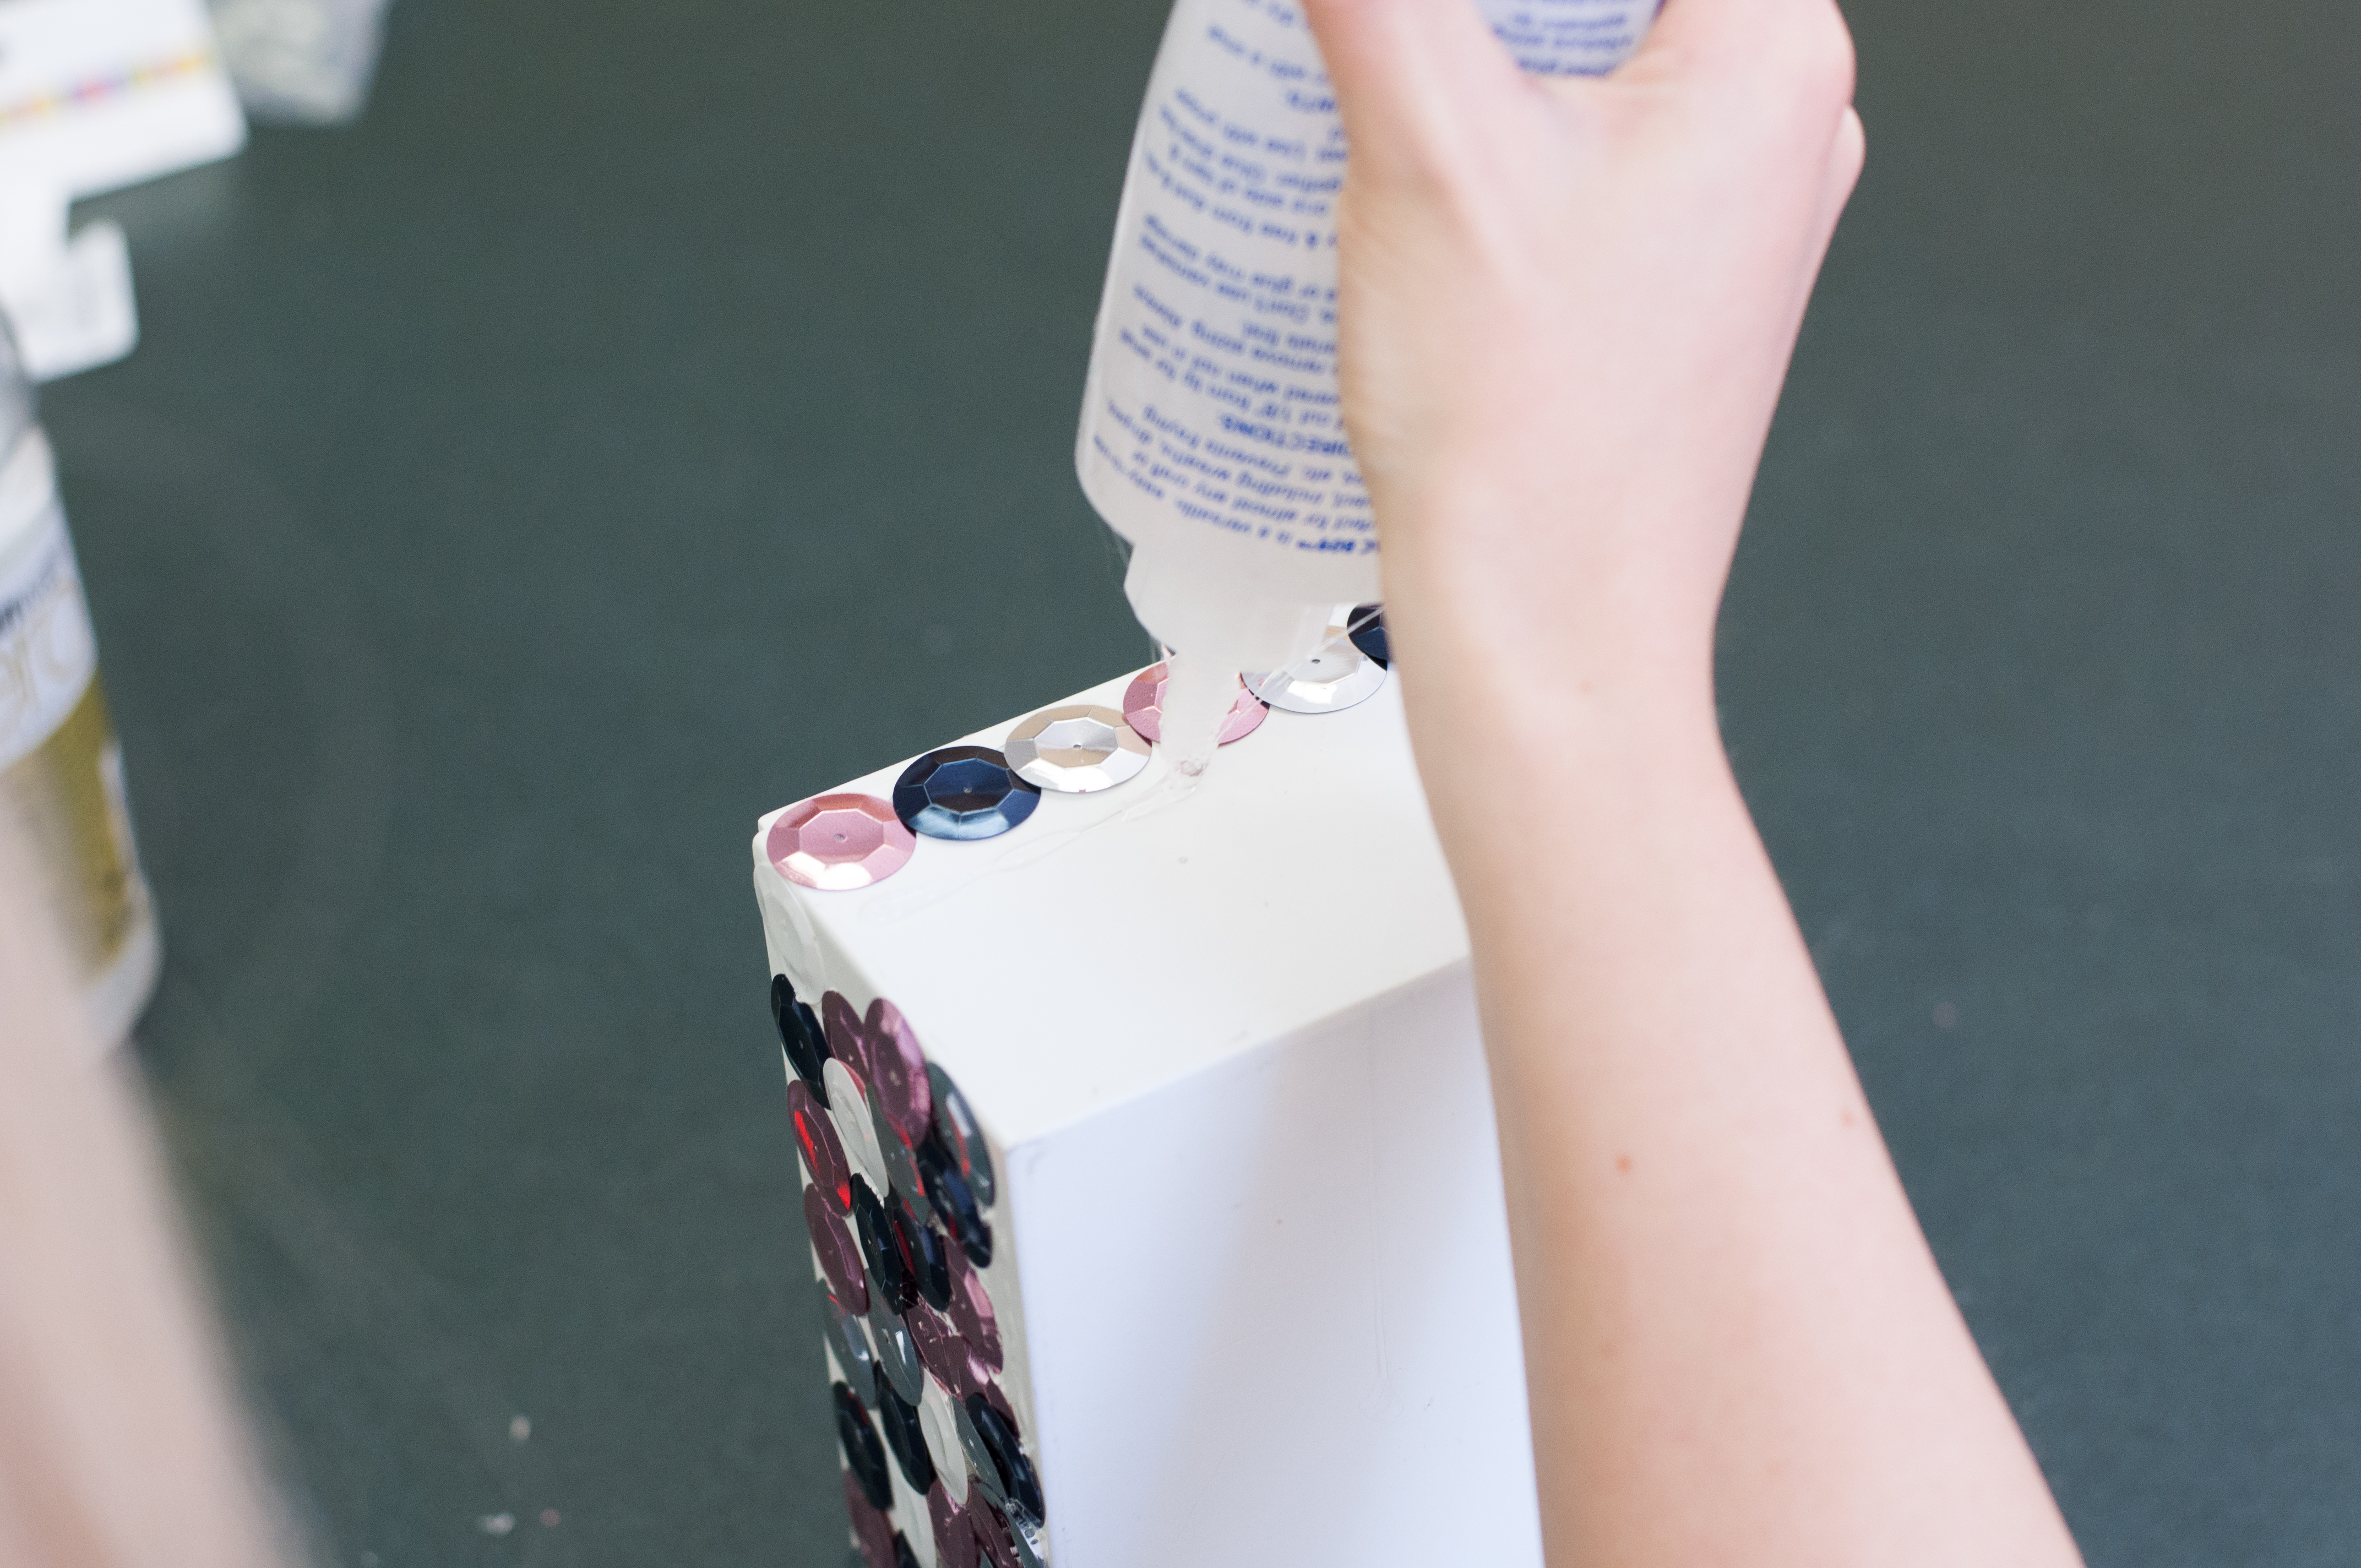
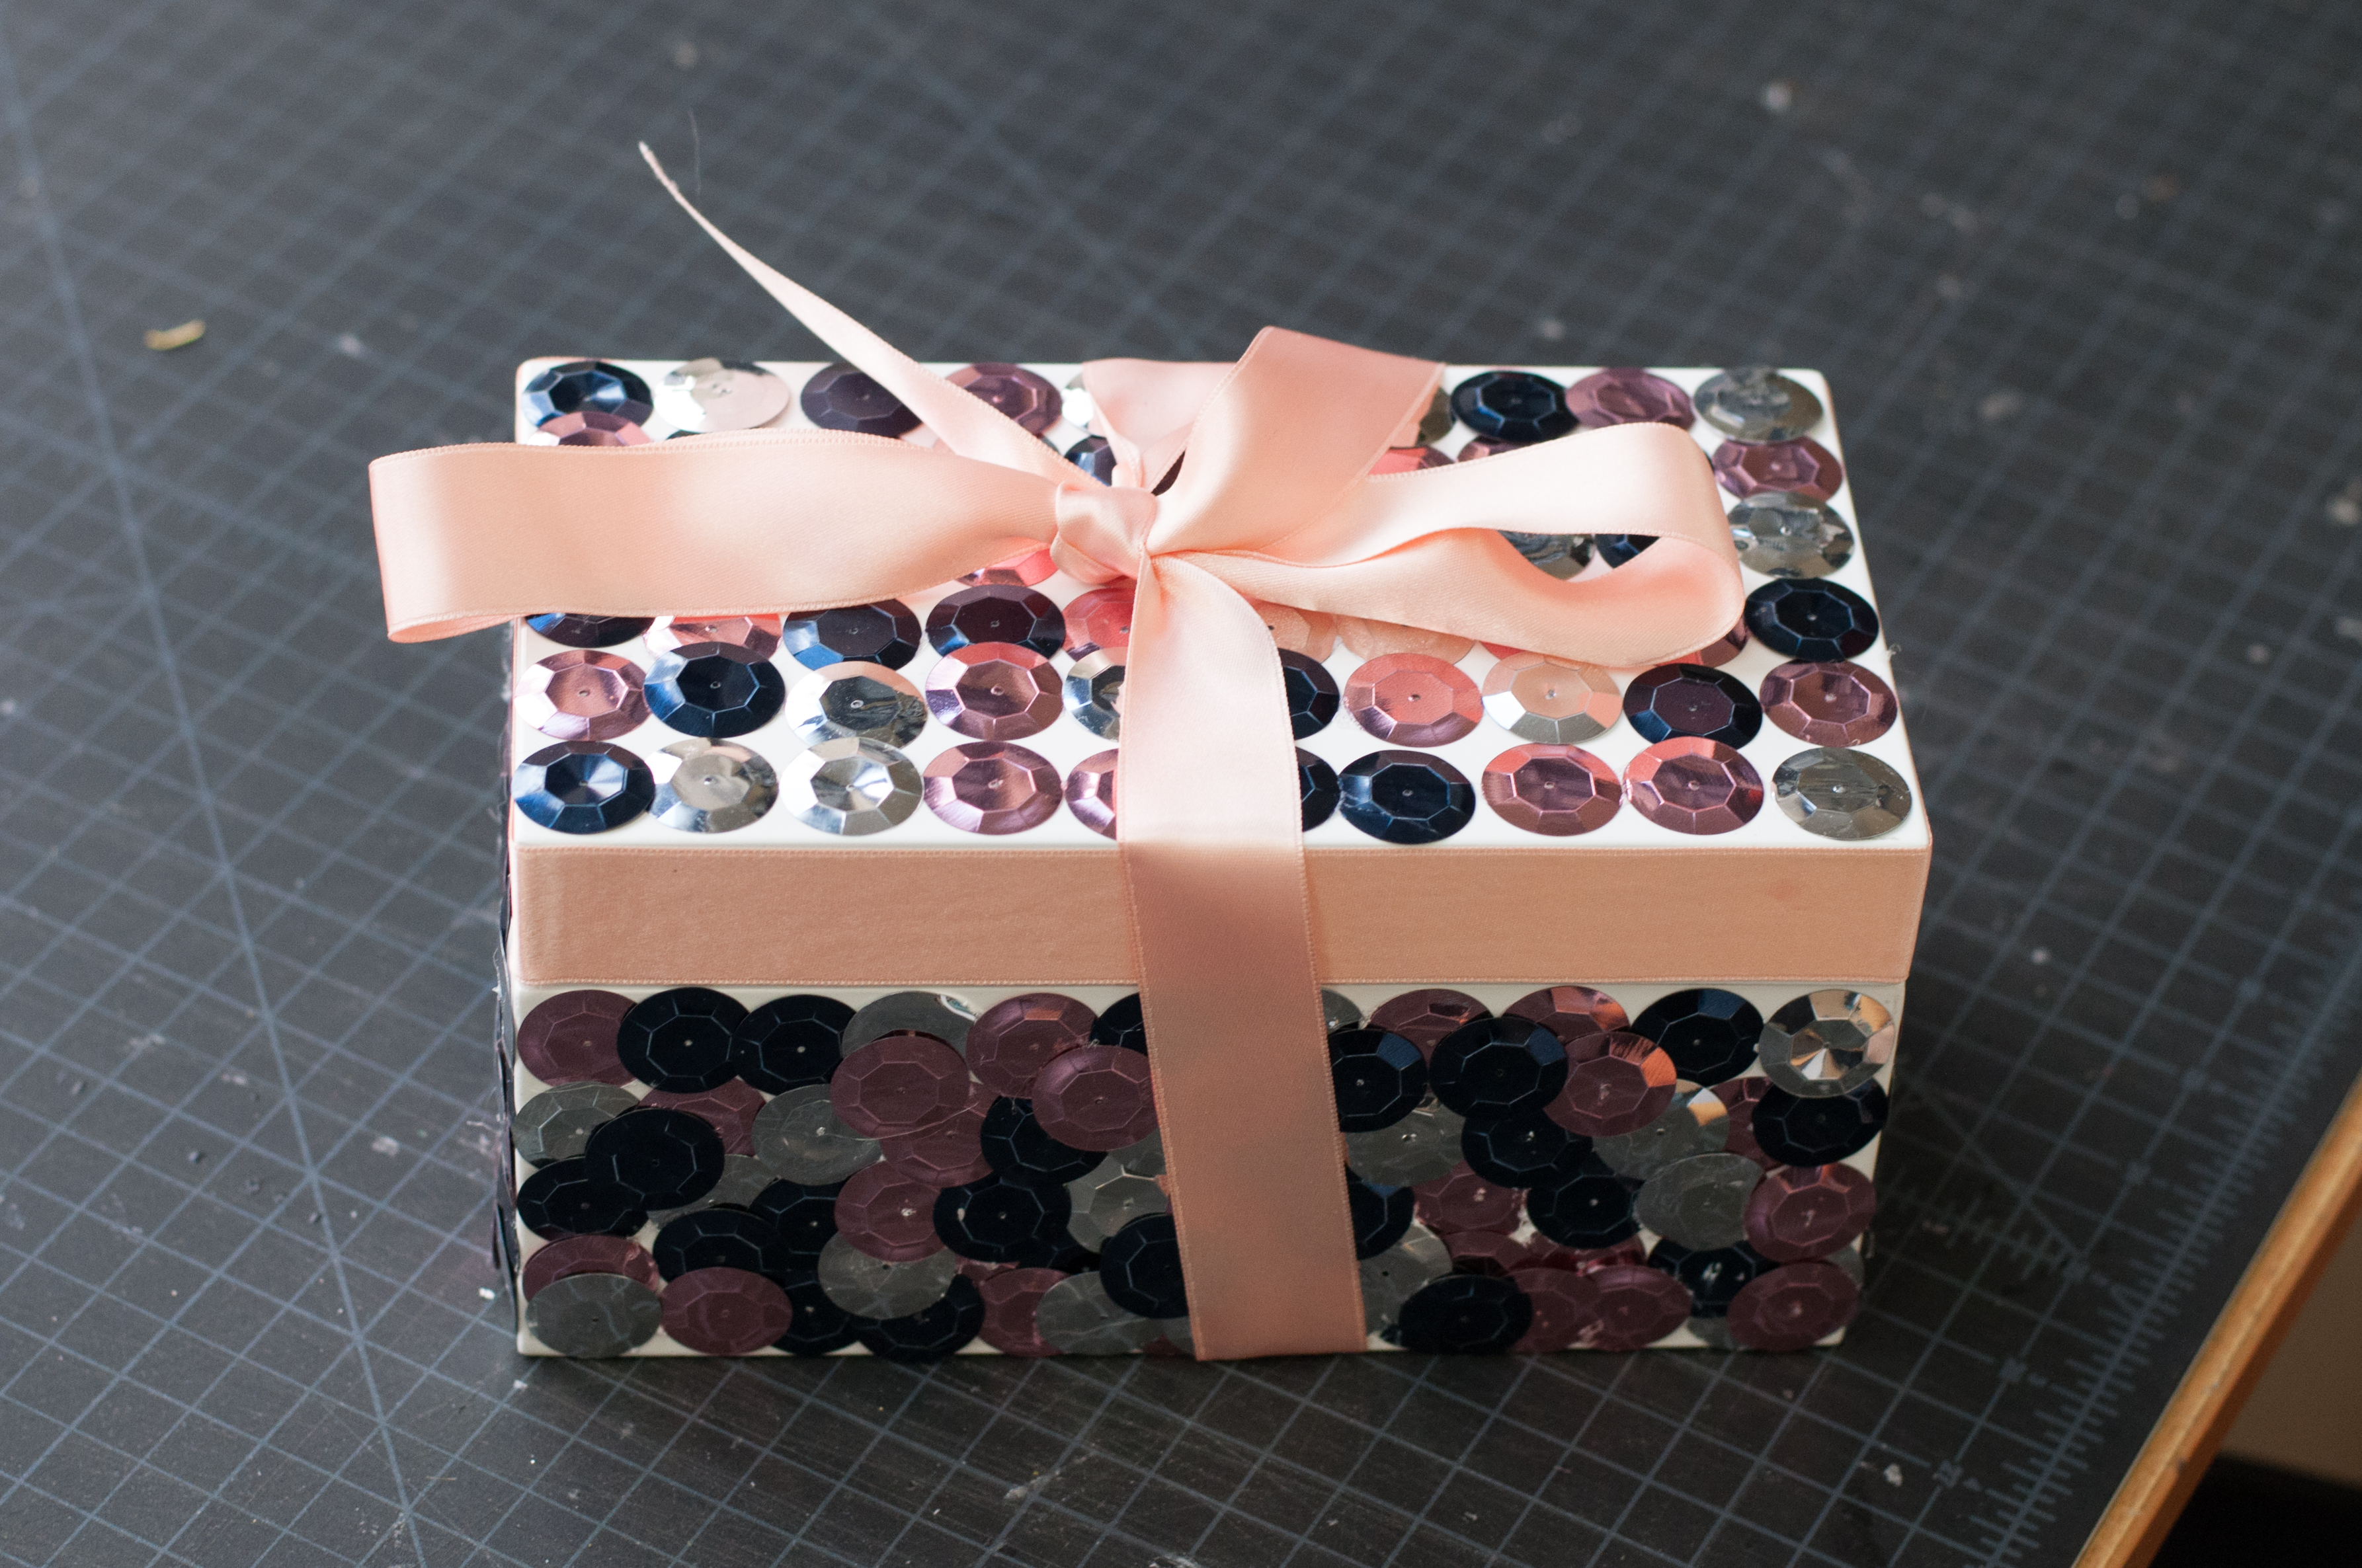
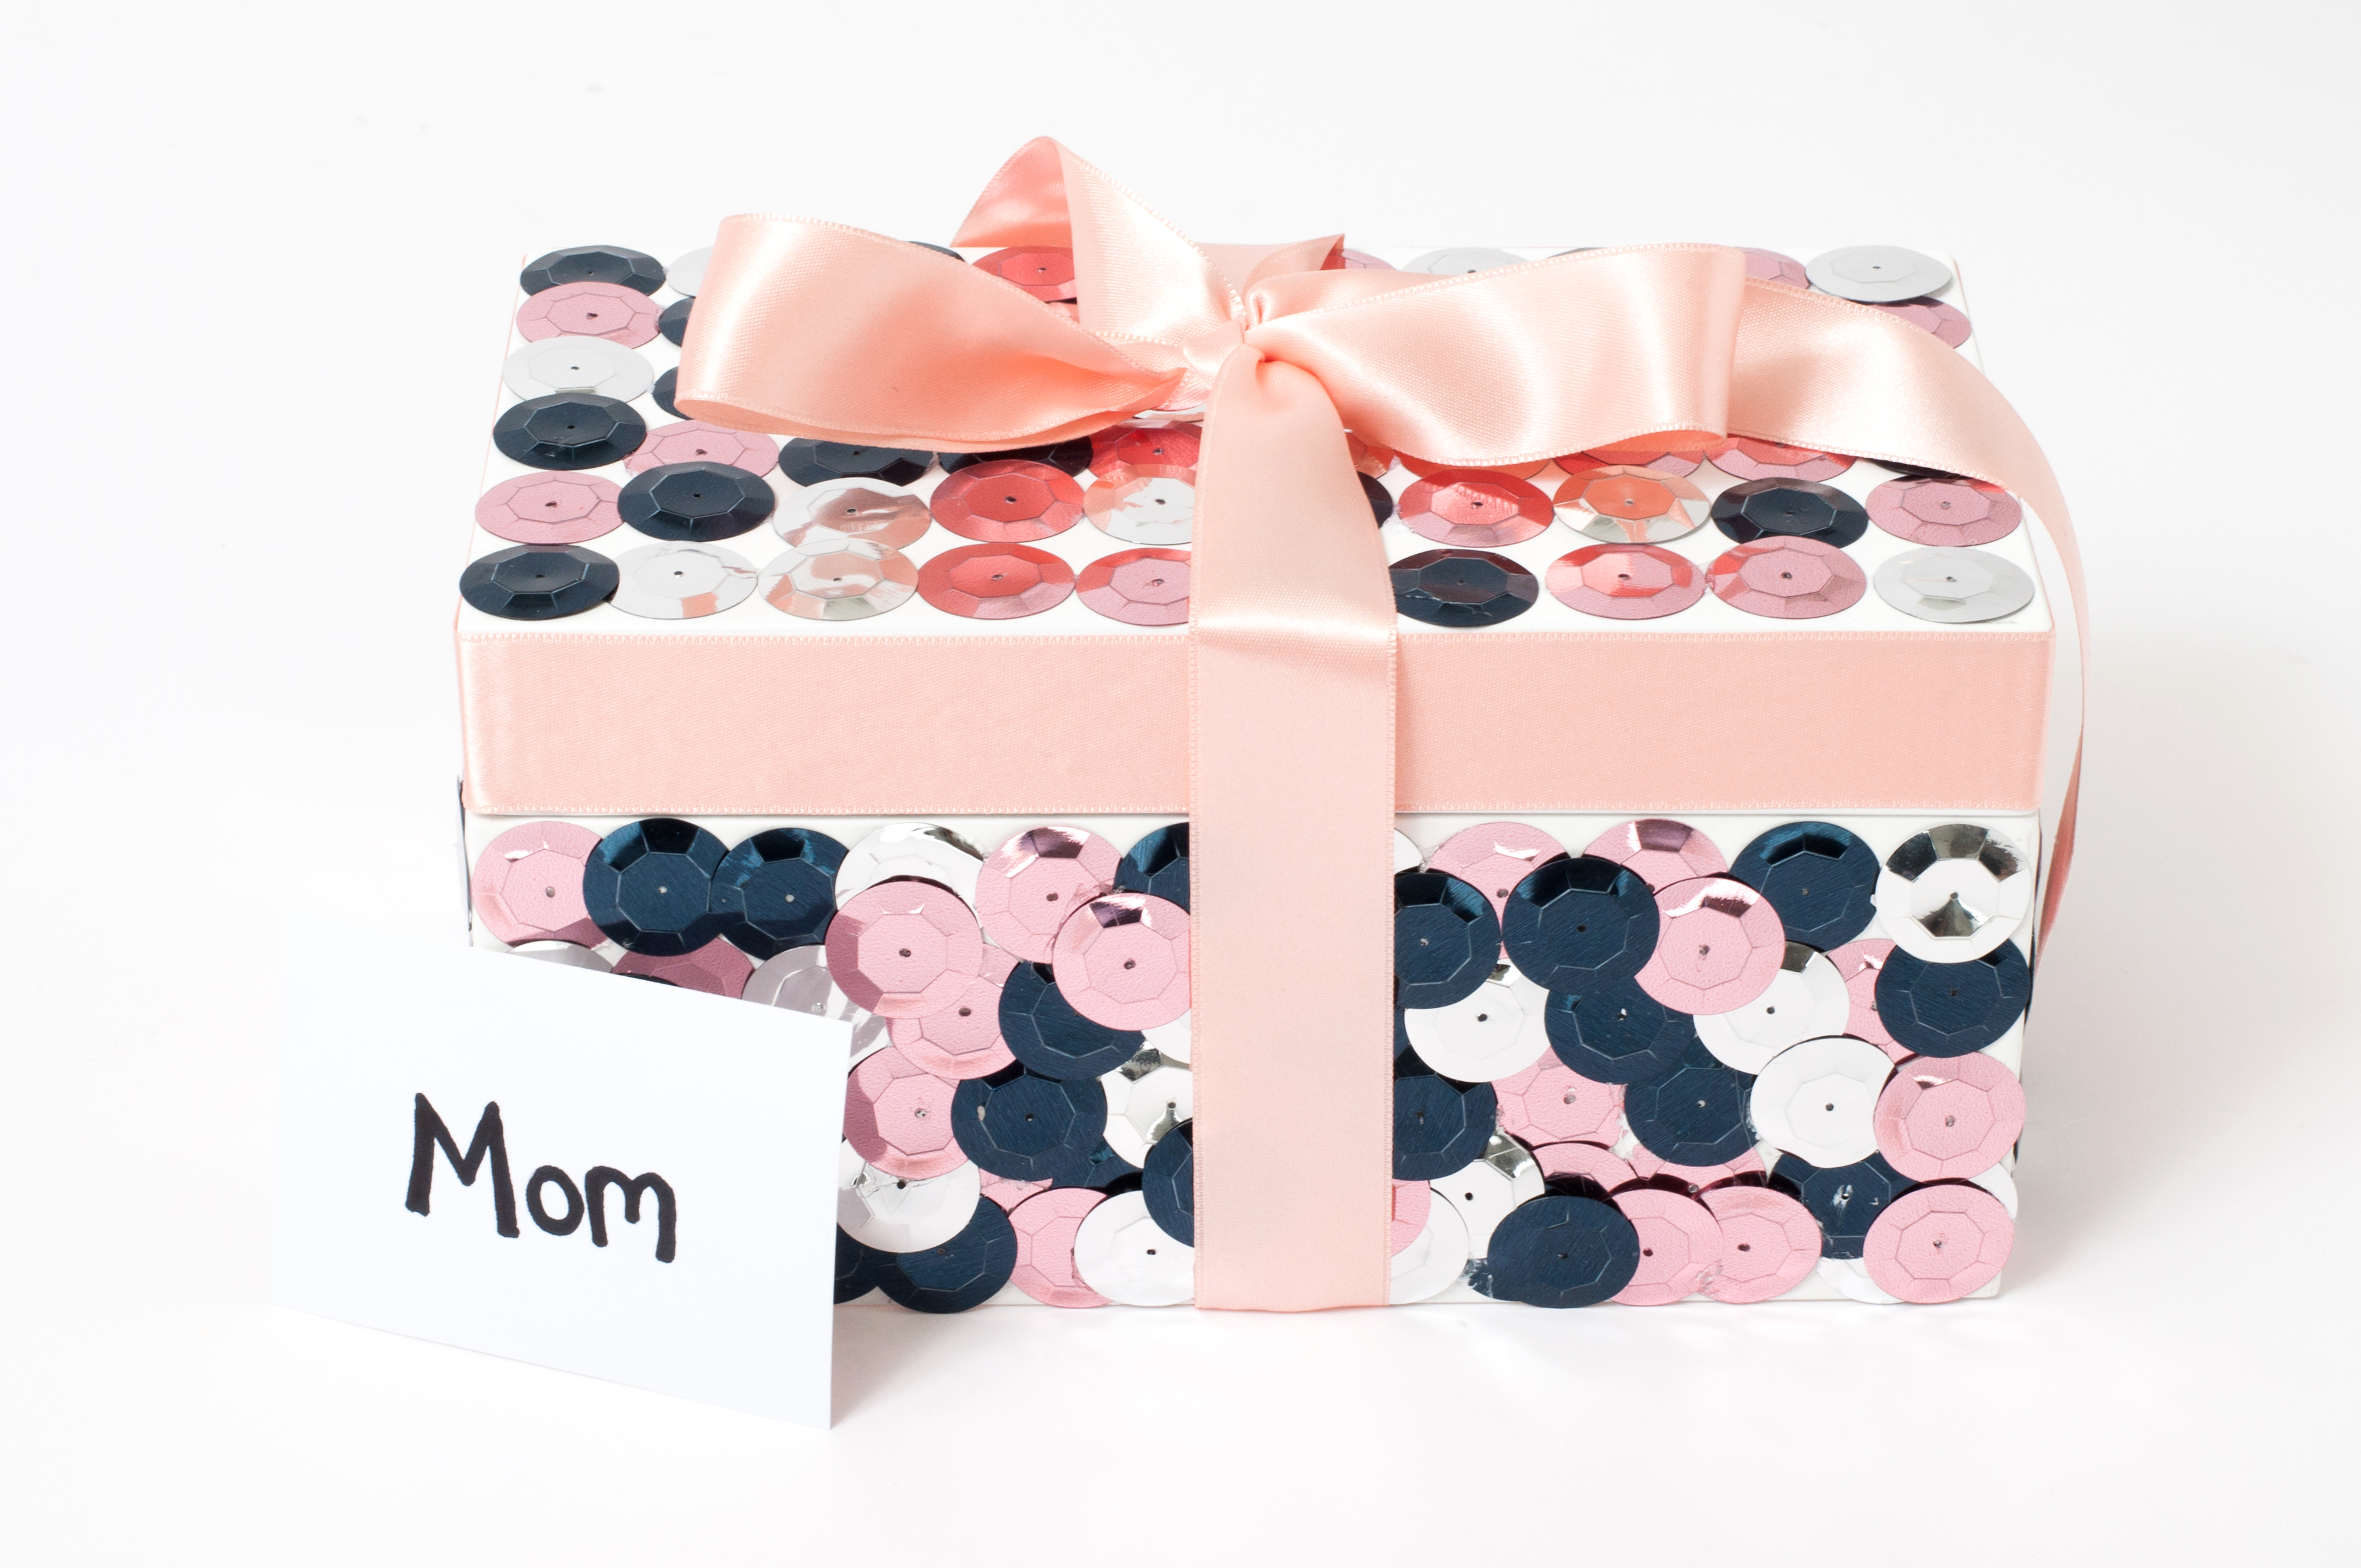
Upon opening each of the 20MM Loose Sequin packs, we mixed them together in the top of our jewelry box. We then laid our jewelry box on its side which created an easy work surface. We placed a small amount of Magna Tac glue down quickly placing a 20MM cup loose sequin on top.

DSC_0613-2

As we became more comfortable with the process, we progressed from gluing down one sequin at a time to gluing down many at once. We placed a strip of glue down and placed a row of sequins.

DSC_0620

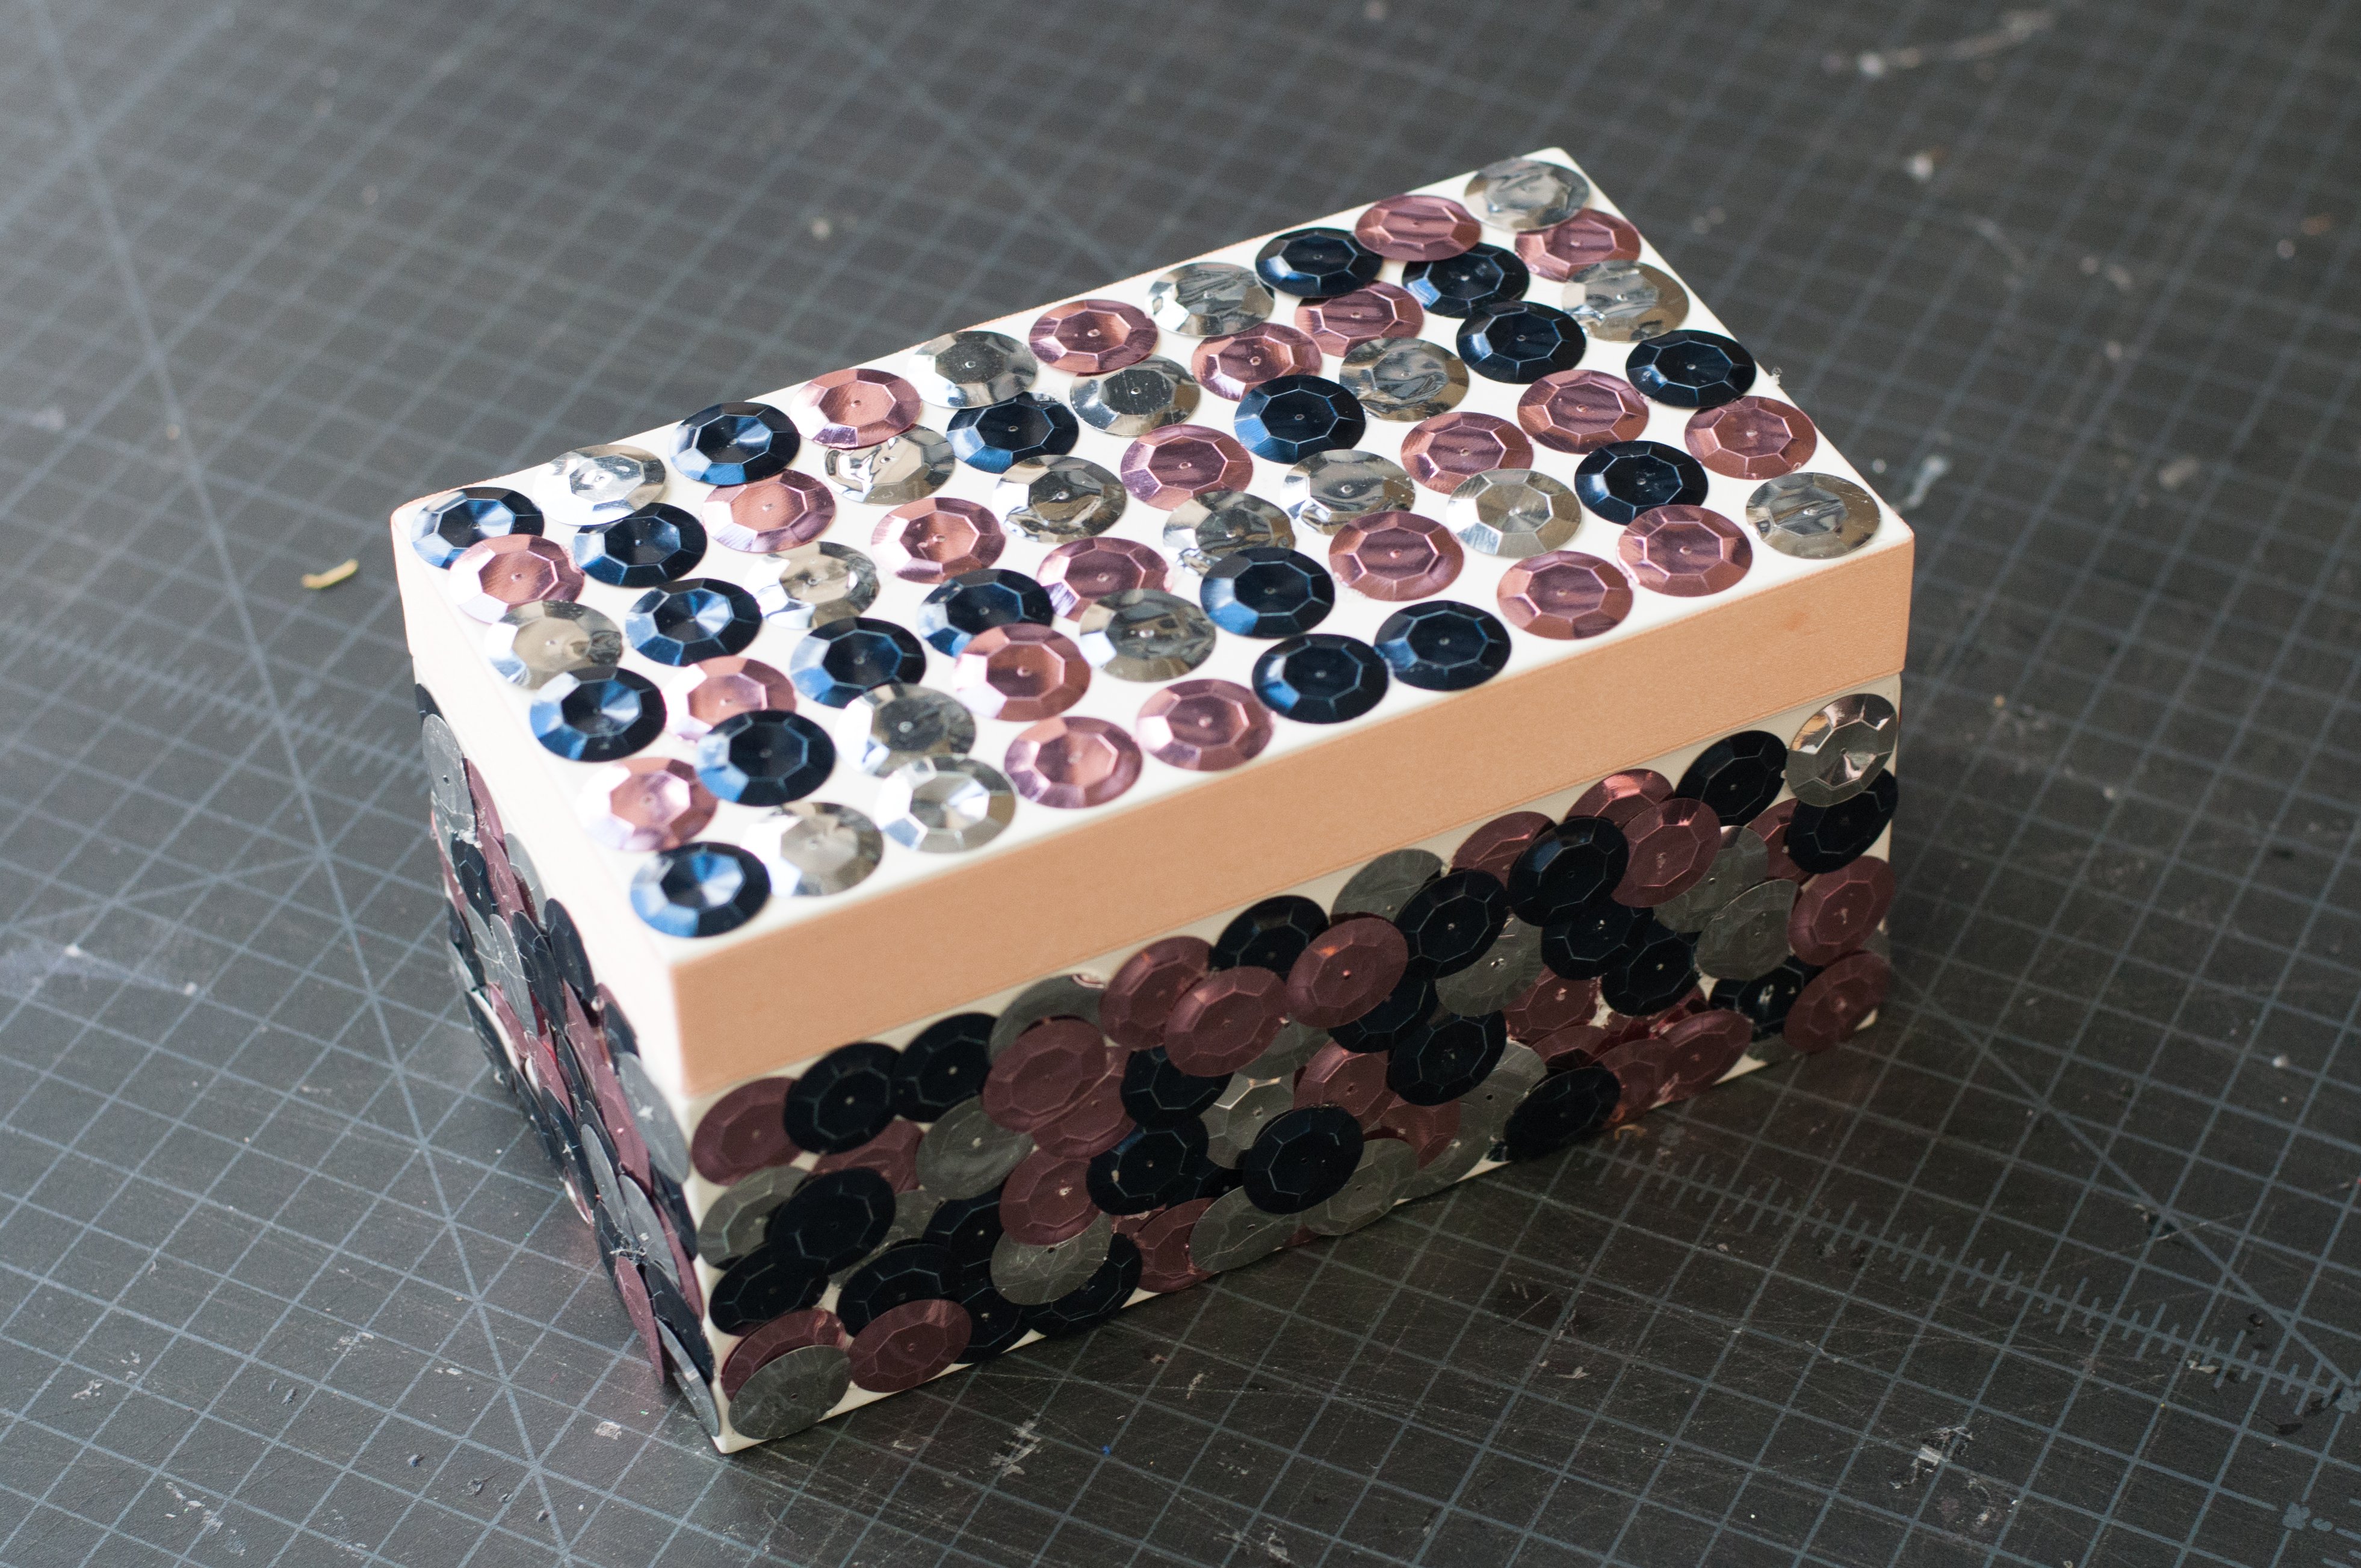
We repeated this process for each side of the jewelry box.

DSC_0625

DSC_0626

The greatest part about a DIY often comes in the middle of a project. During this time, you may question what can be tweeked or come up with something new. During this time, we noticed our jewelry box was missing something and picked up some of our Double Faced Silk Ribbon in Pink.

DSC_0821

We put a small amount of glue on our Double Faced Silk Ribbon and wrapped it around the side of our jewelry box top. This added a bit of elegance and charm any mother would certainly love.

DSC_0828

DSC_0831

We took the remainder of our Double Faced Silk Ribbon and finished off our jewelry box by creating a bow.

DSC_0832

DSC_0833

DSC_0834

We added a card and our gift is ready to go!
DSC_0839

Top 5 Mother’s Day DIYs

There are many types of moms out there. The fashionista mom, the stay-at-home mom, the office maven, the nature enthusiast and many more. Regardless of what type of mom you may be, or you may have there is something about a homemade gift that is truly special. Below are some of our favorite Mother’s Day DIY projects that are too precious for words. Any mom would truly adore these crafts.

Martha Stewart Iron On BagMartha Stewart Mother’s Day Crafts for Kids

Mothers Day CouponsThe Creative Place Mother’s Day Coupons

mothers-day-bouquet-diyPaper N’ Stitch Mother’s Day Bouquet

DIY-Fresh-Flower-BannerStudio DIY Mother’s Day DIY Banner

Country Living Ribbon StripesCountry Living Ribbon Striped Vase

DIY Knot Rope Necklace

By Blerona

This Year, This Season it’s all about the eccentricity of accessories, the weirder, the bigger, the funkier, The Better. What better gift to give on mother’s day than a gorgeous fashion forward knotted rope necklace. It’s simple and easy and looks anything but plain. Accessory designers like Lizzie Fortunato Jewels and also have there own forms of knotted rope necklaces. Check out this simple DIY.

Materials

Directions:

  • Step One: Important* Tape all the ends of the rayon cord, so they do not unravel.
  • Step Two: To make you starting point, take both rayon twist cords and loop them together. Then make a knot within the two cords.
  • Step two: From here on it’s really all about your imagination and the look you’re going for. You can leave the one knot the way it is or make knots on both sides of the middle knot, and loop different parts together, until you’re satisfied.
  • Step Three: Make one knot on each side about 1” away from the larger bigger knot.
  • Step Four: Now make one knot on one side about 2” or 3” inches away from the smaller knot. Then take your buttons and hot glue or sew each button on top of the knot.
  • Step Five: Now cut your chain in three even pieces and wrap two pieces on different ends of the necklace. (I sewed it into place, but you can also hot glue the chain)
  • Step Six: I made the necklace large enough to fit over my head, so I just hot glued both ends together and wrapped left over chain for finishing look. But you can add end caps to the end of the rayon rope and attach a lobster clasp.

*To see how to make a simple knot watch Bobbie Thomas on LXTV using M&J Trims. Click Here

DIY Bracelet for Mother’s Day/Prom/Evening out

By Dara

mom

Today’s project is a beaded trim bracelet.  You can make this bracelet as a gift for your mom, for yourself, for prom or a nice evening out.  It’s an easy way to accessorize in only a few minutes.  The steps are really easy and you can use the same instructions to make matching headbands or belt also.  Here’s the detail.

mom2

 Materials:

Instructions:

  1.  Measure the ribbon and along the center, add glue along the six inches in the center.
  2. Slowly add the beaded trim on top of the glue.
  3. Leave it to dry and you’re done.

If you want to make a headband, you can use a longer ribbon and it’s the same instruction.  The same instruction also applies to creating a belt.  When it dries, you can tie it up and you’re done.

DIY Mother's Day Leather Belt

By Dara

test70-0081

Where has the time gone?  It’s almost the end of April and Mother’s day is right around the corner.  With the way the economy is right now, everyone is cutting back.  That doesn’t mean you can’t give your mother a nice gift this year.  It just means you have to be wise about your spending.

 Last year, I post up a DIY mother’s day gift idea using fabric flowers and added it onto a necklace.  It came out great.  Well, this year we’re going to bring that idea back and step up a notch on the design.  This year, we’re going to make a leather belt with DIY fabric flower embellishments.  It’s really easy, especially if you already followed the steps from my post last year.  If not, it’s okay, we can start over. 

 test70-026

Materials:

 test70-032

Instructions:

  1. Lay the 50mm ribbon flat on the table, then fold it in half horizontally.
  2. Using straight pins, pin the ribbon in place.
  3. Using the matching thread begin hand-stitching the ribbon along the left side.  Be sure to stay close to the edge and start from the backside of the ribbon.
  4. Space each stitch at least ½” apart. 
  5. When you get to the end of the ribbon, remove the straight pins
  6. Then using your fingers, push the end of the ribbon back towards the beginning of the ribbon. 
  7. Stitch the end in place.
  8. Make sure the edges of both ends of the ribbon is facing you
  9. Stitch the edges together, allowing the trim to form a flower shape. 
  10. Tightly stitch the open center together.
  11. Then turn the ribbon around and add your button in the center.
  12. Stitch the button into the center.
  13. Repeat steps 1-12 for the 36mm and 24mm ribbons.
  14. Now for the belt, make sure you know your mom’s waist because the belt should fit perfectly.  Let’s say your mom’s waist is 28 inches, then that means you’ll need to cut 30 inches off the leather trim.
  15. After you cut the trim, add on the buckle by wrapping one inch in the loop and use the leather needle to stitch it in place.  Do this for both ends of the trim on each end of the buckles.
  16. Lastly, it’s time to add on the flowers.  If you unhook the buckles, the left sides you can use unique stitch glue to add the larger flower onto the buckle so that it covers it. 
  17. On the other side of half of the buckle, add the other two flowers along the side. 
  18. Leave it to dry and then after it’s dries, it’ll be ready for gift wrapping

Here’s a sample picture of how to put the flower together from last year’s post.

step_by_step

Lighting The Mood For Mom

By Eleah

Mothers day is just around the corner.  Almost any sensible woman above the age of 25 will tell you that lighting is key.  Bad lighting such as overhead fluorescents can drastically alter her appearance not to mention the all around mood of the room.  Help a lady out this Mother’s day with the gift of flattering light. 

This week I transformed a thrift store lamp into 2 different looks using spray paint, fabric and trimmings. I wanted to lean towards a monochromatic color scheme for the lamp itself, leaving a broader range of possibilities for the trimmings to match any room or style.

You will need:

  • A lamp + lampshade
  • Primer and Spray paint
  • Fabric (amount depends on the size of your lampshade)
  • Trimmings of your choice (You will have to measure out the appropriate amount depending on the size of your lampshade and how much coverage you want)
  • Tape measure
  • Scissors
  • Magna-tac 809 permanent adhesive
  • And of course a lightbulb with the appropriate wattage.

Making the Lamp:

  1. Lay your lampshade on its’ side and roll it across your fabric tracing it with a pencil as you go.  You will only need to roll it about ½ way around. 
  2. Create a second line about 1 inch outside of your original tracing and cut it out.
  3. Wrap the fabric around the lampshade folding the 1 inch seam allowance behind the top and bottom edges of the shade.  Secure with Magna-Tac as you go. (keep in mind that if your fabric is thin and covering a shade that is thin as well, your seam will show through once the lamp is turned on…so try to be as neat as possible.)
  4. Lay down 2 coats of primer to the lamp base and when it is dry spray paint a couple coats of top coat in the color of your choice.
  5. Secure the trimmings you have selected using Magna-Tac.  I used 3/8″ Pom Pom Fringe (31664)in mint and 5.25″ Pearl with flower fringe (14021) in black.
  6. Turn on your new creation to test out the final product and if you’re happy with it, wrap it up and give it to your favorite mom.

A Gift For Mom (DIY Fabric Flower)


 By Dara

Mother’s Day: May 11th, 2008


With the end of April and the beginning of May, flowers seem to be blossoming beautifully this year.  The beautiful flowers and the warm weather is definitely a reminder that Mother’s day is coming up soon.  It’s one of the greatest days for us to show our appreciation.  Did you know that Anna Jarvis created this special day in 1908?  She was a homesick gal who moved to Philadelphia in 1864 from West Virginia and after her Mother passed away she wanted to honor her by honoring all Mothers.  

If you have not yet decided on a gift, may I suggest the flower pin?  Almost all women enjoy the sight of beautiful flowers.  However, after a couple of days the flower seems to just die away.   For that reason I’ve made my own DIY flower pin.  This way, my Mother can keep it as a reminder that the love I have for her is as gentle and internal as the flower pin I’ve made her. 

Not only can she use the pin on her garments or handbag, but she can use it on accessories as well.  The one I’ve made here, I hooked the pin onto a chain and created this stylish necklace.  I’ve also made other styles of flower pins so she can switch the flowers to match her garment.   The pins are very easy to make.  Just choose a couple of trims you like.  Either grosgrain, silk, satin or any decorative styles of trim.  You can also mix and match like I did. 

 If you decided to make a flower pin, please do share.  We’d all love to see how it turned out or if you decided to make something else, I’m sure everyone would enjoy it as well.  The more ideas the merrier. 

Materials:

  •     ½ yard of any style or fabric trim you choose.  (Recommend size 1 ½” or larger in width)
  •     ½ yard of another style of fabric trim you choose.  (Smaller than the other trim you’ve chosen)
  •     Stitching needle
  •     Thread (Color should match with the fabric trim you’ve chosen)
  •     Any style shank-button you choose
  •     Pin-back
  •     Straight pin


Instructions:

  1. Lay the smaller trim on top of the larger trim.  Make sure the smaller trim is aligned with the left side of the larger trim.
  2. Using straight pins, pin the trims in place.
  3. Using the matching thread begin hand-stitching the trim along the left side.  Be sure to stay close to the edge and start from the backside of the larger trim.
  4. Space each stitch at least ½” apart. 
  5. When you get to the end of the trim, remove the straight pins
  6. Then using your fingers, push the end of the trim back towards the beginning of the trim. 
  7. Stitch the end in place.
  8. Turn the trim around so that the larger trim is facing you.
  9. Make sure the edges of both ends of the trim is facing you as well
  10. Stitch the edges together, allowing the trim to form a flower shape. 
  11. Turn the trim around and add your button in the center.
  12. Stitch the button into the center.
  13. On the backside of the flower, now stitch the pin-back onto the center.
  14. Now your flower pin is ready to be wrapped in a pretty box for your Mother.