Tag: Floral

DIY: Flower Studded Shoes

Ahh it’s that dreaded time of year when you start seeing all those back to school ads. Time to start thinking about finishing your assigned summer reading and mentally preparing for another school year. A cool new wardrobe is just the thing you need to help you look forward to the first day of school. Keep reading to see how you can make these adorable floral studded slip ons to strut into school with.

What you’ll need:

This daisy velvet trim

Small gold pronged studs

Scissors

Pliers

Shoes

1

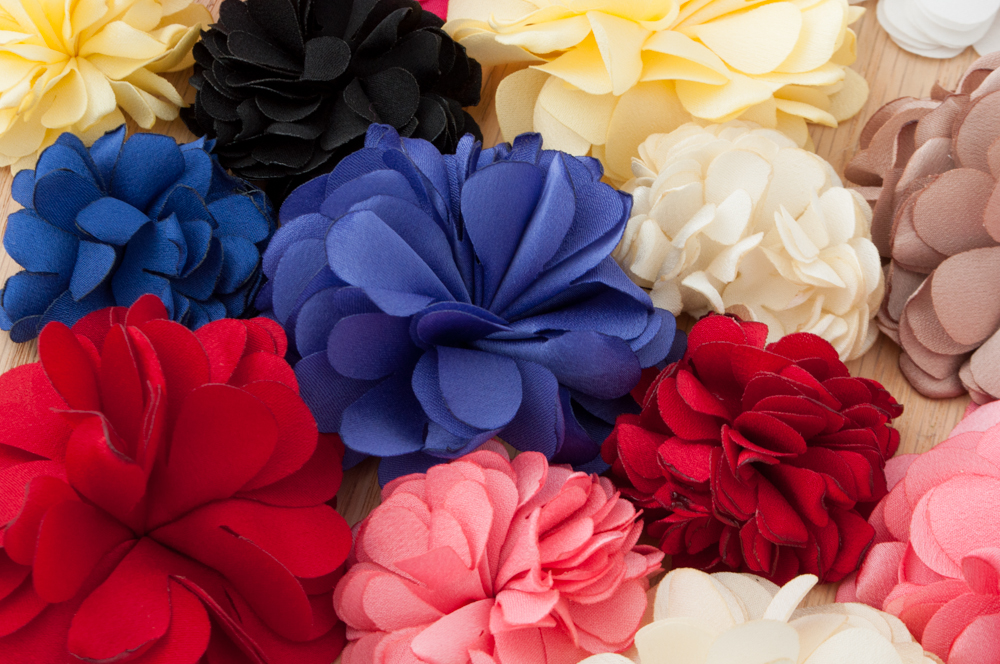
Start by cutting the trim into individual flowers. You can do this by cutting them where they join together.

2

Place the flowers on the shoes to see what placement looks good.

3

Using the stud, push it through the flower and through the shoe. On the back of the flap you can see the prongs protruding.
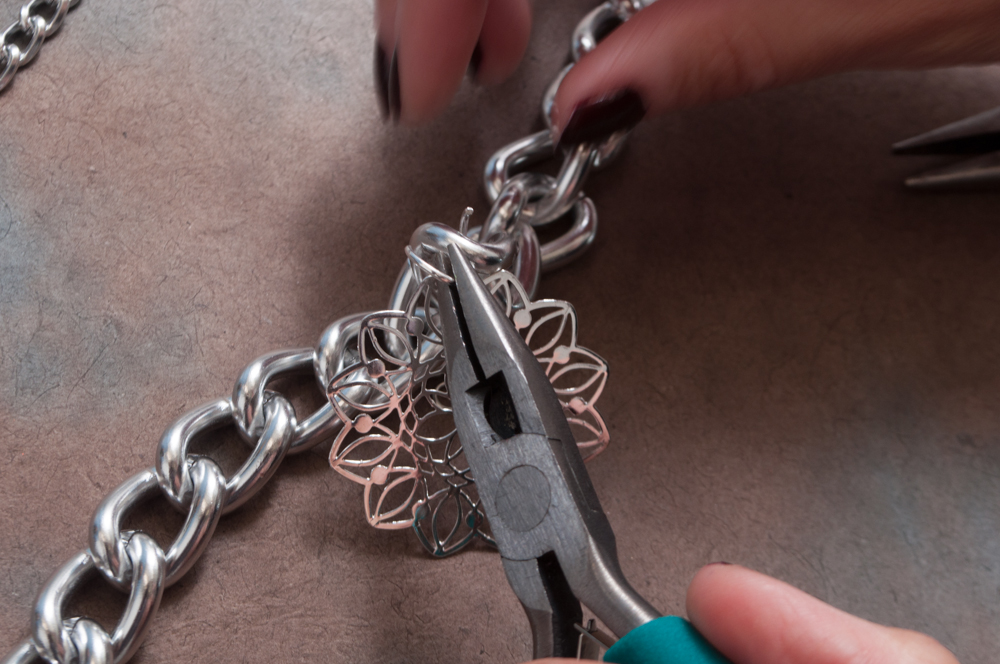
4

Using the pliers flatten each prong until it’s curling in. Repeat for all the flowers.

You can also try different placements as shown below:


That’s it! You’re done.


3 Ways to DIY Summer Shorts

It’s getting hot out there and it’s time to bust out your Daisy Dukes. With these three easy DIYs you can take your plain old shorts and turn them into pretty little things. Check out this video to learn how to make 3 awesome pairs of shorts for the summer:

For more details:

Floral Patched Shorts

Lace Trimmed Shorts

Rhinestone Bling Shorts 

DIY: Floral Patched Shorts

Summer = Flowers

Summer = Shorts

So Shorts = Flowers!

That’s the formula for this super simple floral patched shorts that will make your summer outfit stand out, whether you’re at the beach or on a night out. Check out the video below to see how to make them and scroll down for more information:

Here’s what you’ll need:

A pair of shorts

Iron On Floral Patches like these

Scissors

Iron

1

I wanted to cut the patches so I can place half inside the pocket and half along the pocket. This is totally optional. You can get creative with this step by mixing in other patches or putting it on the back pocket instead.

2

Place the patch where you want it and using a teflon sheet or a thin cotton cloth (to protect the patch) press and hold down the iron (heat on high, no steam) for 20 seconds. Repeat if necessary.

3

Guess what? That’s it. Simplest formula and simplest DIY ever!

DIY: Floral Patched Jeans

Seems like patches are everywhere since spring of last year. And they don’t look like they’re going anywhere. One of the more popular incarnations of this trend are the floral patched jeans. Watch this video to see how you make your own and scroll down for more detailed instructions.

What you’ll need:

A Pair of Jeans

Iron On Flower Patches – We used this, this* and this

Iron

You can also keep a cotton cloth handy for using over the patches while you iron.

Step 1: Place the patches where you want them. It might help to wear the jeans and mark the spot where you want the patches to finally be.

Step 2: Using an iron on its hottest setting, press down on each patch for 20 seconds at a time. Repeat if necessary. Using a cotton cloth over the patches while you iron will protect your jeans and your patches. Do not use steam for this step. Repeat on the other leg.

Tip: Let the glue cool before moving your jeans around or wearing them.

That’s it. You’re done!


*This item is currently unavailable. Check out our full selection of floral patches.

15 DIY Gifts For Mom

The best gifts Mom can receive for Mothers Day are those made from the heart. Mothers seem to love and appreciate just about anything you make them, and you don’t have to be a little kid to give Mom something handmade. These craft ideas are creative ways to show mom just how much you care (and secure your spot as favorite child). Visit M&J Trimming for the supplies you need then follow these step by step tutorials to give your Mom one of these special DIY Mothers Day gifts this year.

1. Ribbon Vase

Cluster pink peonies and tulips, red roses, and chartreuse verbena in an oversized square vase wrapped in striped and polka-dotted ribbons. Hot-glue the backs of the ribbons and adhere them to the vase (or substitute heavy-duty double-faced tape).

Your mom will love this simple yet fun DIY Ribbon Vase. Here’s how to make it.

2. Tassel Necklace

diy-tassel-necklace-18

For a simpler version use these tassels from M&J Trimming. Get the full tutorial here.

3. Mason Jar Picture Frame

How to make a mason jar vase and frame

This DIY is simple enough for kids to do mostly by themselves and it screams spring with the bright colors. Full Tutorial.

4. Blooming Monogram

Blooming Monogram DIY at LuLus.com!

Help Mom brighten up your home decor by adding M&J silk flowers to her monogram. Learn how here.

5. Button Rings

Get a load of this fresh notion for something you probably already have around the house! Emily Peters sells these baubles at our Country Living Fairs (emmalou vintage.etsy.com), but she's also generous enough to tell you how to craft your own. If you become so carried away that you need more buttons, Etsy.com has a killer selection of vintage ones. Step 1: Start with an adjustable brass "ring blank," the band that wraps around your finger ($6.50 for 10; findings.etsy.com). Step 2: If your button has a shank on the back, snip it off with wire-cutting pliers and sand down the back surface with a rotary tool (Dremel 4.8-volt, $24.97; homedepot.com). Step 3: Apply a thin layer of metal-bonding glue (Beacon's Glass, Metal & More glue, $6.99 for two ounces; createforless.com) to the back of your button, then adhere it to the top of the ring blank. If you'd like to add a second button, apply a thin layer of the glue to its back side, then adhere it atop the first button. Let dry for 24 hours.

Button jewelry is one of the latest trends, so help Mom look fabulous for Mothers Day with these rings. Instructions found here.

6. Scarf or Ribbon Watchband

It's easy to fall in love with vintage scarves at flea markets and thrift stores. The hard part? Finding a fresh way to wear the ladylike relics. Here's one: Just remove the straps from a watch, then weave a scarf through the watch's lugs (the bars that hold the straps in place). Wrap the scarf's ends around your wrist and secure with a knot to make a timely fashion statement.

For a different look, use ribbon instead of scarves for the band and then tie with a pretty bow.  Tutorial.

7. Lace Handbag

Make it any size! For the lining, cut two fabric circles, about 3/4 inch smaller than the two doilies. Right sides together, sew together the lining pieces, leaving an opening at the top; turn right side out. Sandwich lining between doilies and topstitch through all layers (lining included), leaving an opening at the top. From a runner, cut a wide handle, folding it lengthwise in thirds. Machine-stitch down its length. At the lining's opening, turn under the raw edges; stitch the ends of the handle inside.

M&J has a wide selection of lace that would work perfectly for this design. Instructions here.

8. Ribbon Shoes

Expert crafter Melissa Neufeld uses beautiful fabric ribbons to give everyday shoes a quick, colorful makeover. Using bright tafetta ribbon and a hot-glue gun, Melissa needed just 10 minutes to give a pair of suede slip-ons this stylish new look.

Spruce up a pair of shoes with Mom’s favorite color or pattern by adding ribbon, here are a couple different ways it can be done.

9. Lace Earrings

Three-DIY-Lace-Earrings

These delicate lace earrings will never go out of style and are super easy to make!

10. Rhinestone Jewelry Box

If your making any of the jewelry shown above, Mom might need a place to store it. Make her a rhinestone jewelry box to add a little sparkle to her room. M&J offers a wide variety of rhinestones so you can make this in Mom’s favorite color. This DIY is super easy, just get a wooden jewelry box from your local craft store and make it as simple or detailed as you want.

11. Box of Flowers

This is a beautiful gift for Mom to show her just how much you care. See how to make it here.

12. Fun Animal Cookie Throw Pillow

DIY Circus Animal Cookie Pillows | studiodiy.com

Add some fun to your home decor for Mothers Day with these cute frosted animal cracker pillows.  Find all your pompoms at M&J Trimming

13. Photo Pendent

Keep yourself close to mom’s heart with these photo pendents.

14. Pompom Branches

This craft is perfect for kids and it is super simple to do. These branches also goes great with our PomPom flowers we featured earlier on the blog.

15. Button Monogram

button canvas wall art

Buttons are being used in home decor all over the place. Help mom jump on this trend with her very own monogrammed initial. Get the full instruction here.

DIY: Pom Pom Flowers

You know those DIY tutorials that are so simple you catch yourself asking, “Wait, what’s the catch?”. Well there is no catch! It’s just that simple to make these adorable pom pom flowers that you can use to brighten up a space. The best part is you can keep them simple or get creative and make some elaborate flowers with different sizes of pom poms.

What you’ll need:

Big Pom Poms

Glue Gun

Sticks or Thin Branches

Scissors

Step 1: Trim the sticks to the length you want. I cut mine about ten inches.

Step 2: Cut the pom poms from the trim.

Step 3: Add a some glue to the end of one stick with your glue gun and stick a pom pom on. Apply glue and add a couple of more pom poms to create a flower. I varied the number to make different shapes.

Aaaand *drum roll* you’re done.


DIY: Floral Patched Bag

Fashion week told us one thing: florals aren’t going anywhere this season! We’ve got you covered! We’ve broke down this DIY floral patched, rhinestoned bag just for you! Check out our easy steps below to be ahead of the trend!

DSC_0165

What you’ll need:

Black Bag (Fabric works best)

Rose Patch

Floral Bunch Patch

1 yard floral jacquard trim

2 colors of rhinestones

Gem-Tac

Iron

Needle/ thread

Scissors

Tweezers

unspecified-1.jpg

unspecified-2.jpg

Step 1: Place patches as desired on bag. Carefully, press hot iron over patches and hold for 20 seconds. Repeat if necessary. Be careful of the metal zipper!

DSC_0169.gif

unspecified-3.jpgunspecified-4.jpg

Step 2: Remove strap from bag. Using scissors, cut strap and remove from the buckle. Cut floral trim to desired length.

unspecified-5.jpg

unspecified-6.jpg

Step 3:  Weave floral trim through metal buckle. Fold the end and sew it together.

unspecified-7.jpg unspecified-8.jpg

Step 4: Apply thin layer of gem-tac to floral patch. With tweezers, place rhinestones over desired area. Allow time to dry!

DSC_0208

And you’re done! Sport the latest trend this spring without breaking the bank.


DIY: Floral Medallion Chain Belt

Do you enjoy jewelry making? If so, you’ll sure love this DIY project we “chained” up for all you to try out. This week’s DIY project is a gorgeous Floral Medallion Chain Belt. We took three of our favorite chains (do not hesitate to add more) and made this awesome chain belt that can be paired up with just about anything. Sometimes our outfits are missing a little pop, so a chain belt will definitely give you that pop it’s missing. Pair this belt with a shirt dress, a casual button down shirt, or a casual plain dress for best results!M&J Trimming - DSC_0018

40MM Flower Medallion

3MM Brass Figaro Filed Chain

4MM Steel Cable Chain

5MM Brass 8 Figure Chain

15MM Metal Chain

15x20MM Clasp Jump Ring

Beadalon 10MM Jump Ring

5MM Jump Ring

Chain Nose with Cutter Pliers

Side Cutter Pliers

M&J Trimming - DSC_0021

  1. Measure your waist with the larger chain and remove any excess chain links.

M&J Trimming - DSC_0023

M&J Trimming - DSC_0024

2. Attach both jump rings to each end of chain, then attach clasp to one end.

M&J Trimming - DSC_0026

3. Attach larger jump ring to the medallion.

M&J Trimming - DSC_0027

4. Attach larger jump ring with medallion to the middle link of the larger chain.

M&J Trimming - DSC_0029

M&J Trimming - DSC_0030

5. Take a different style chain and cut a small portion of it evenly in half.

M&J Trimming - DSC_0034

M&J Trimming - DSC_0036

6. Attach jump ring onto one end of chain to attach to the medallion

M&J Trimming - DSC_0037

7. Take a larger jump ring to attach to one end of chain

M&J Trimming - DSC_0038

8. Attach to the larger chain a few links away from medallion.

M&J Trimming - DSC_0031

9. Repeat steps 5-8 with a second different style chain in a longer portion. Repeat steps 5-9 on opposite side.

M&J Trimming - DSC_0057

10. Take a third style chain and attach jump rings to both ends.

M&J Trimming - DSC_0056

11. Attach to farther ends of larger chain. A few links away from the second chain.

M&J Trimming - DSC_0059

12. Take a larger jump ring to attach the middle link of third chain onto the bottom middle of medallion.

M&J Trimming - DSC_0060

M&J Trimming - DSC_0061

M&J Trimming - DSC_0063

13. Take a larger jump ring to hook all three chains onto the larger chain link.

M&J Trimming - DSC_0067

What’s New in October

At M&J we don’t only sell buttons and ribbons. We have a wide variety of rhinestones, buckles, pins and appliques that will fit almost any DIY project. This month we introduced some flirty and feminine appliques that you’ll be excited to add to your crafting supplies!
DSC_0209Bloom throughout autumn with our beautiful 2″ Chiffon Flowers!*

DSC_0213These beautiful velvet bows** are perfect for holiday presents and outfits! You can also add a comb to the back to create a festive hair bow.

DSC_0215If you like your appliques with a little more texture, check out the 3 1/2″ Satin Organza Double Bow* and the 3” Tulle Flowers with Beads* which combine two different types of fabric.

*This item is currently unavailable. Check out our full selection of flower pins.

**This item is currently unavailable. Check out our full selection of velvet ribbons.