Tag: Inspiration

Best Pieces from Fall 2018 Haute Couture

The Best Looks from Fall 2018 Couture Week

From July 1 to July 5, top designers released their couture collections on the runway; below are my favorite picks from the week!
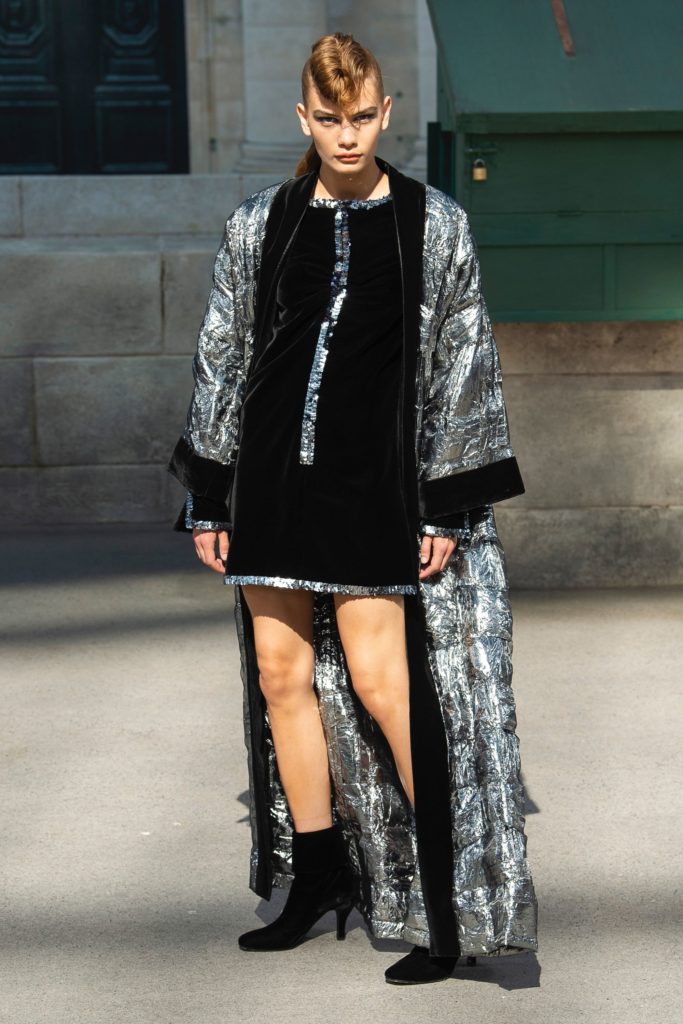
Maison Margiela

(Source)

Galliano exemplifies detail with his colorful couture collection, using innovative fabrics and elaborate stitching, which was a focus in every piece. The outerwear pieces are unforgettable with the patterns and textures, showing how the designer is exploring new trends and is ready to make a statement this autumn season. Tip: Margiela includes textures such as feathers and belts, which you can purchase at M&J for your own collection!

Chanel

(Source)

Chanel’s couture always is mind-blowing, right down to every bead sewn on to their signature tweed blazers. Lagerfeld used the signature Chanel tweed to create other silhouettes that are embellished to express even more of a luxury look. The buttons on the long coats also add the perfect amount of detail to the signature pieces, making the garments unique without overdoing it. Use beaded appliqués on your designs to recreate this unforgettable look just like Karl Lagerfeld!

Givenchy

(Source)

Waight Keller, creative director of Givenchy, constructed a collection to honor Givenchy’s passing focusing on spin off’s of his original “Breakfast at Tiffany’s” inspired designs. The collection consists of black and white base pieces with pops of color from different textures. Givenchy modernized their designs, but stuck with the seasons popular use of beading and feathers, as well as fabrics such as velvet and satin.

Elie Saab

(Source)

I have never been so invested in an Elie Saab collection before this one. Just like any woman, I am dumbfounded by long, gorgeous evening gowns, which is the epitome of this show. The embellishments over the sheer fabrics made the dresses pop, as well as the large appliqués that accented the designs. The crystals that were sewn on individually were definitely easy on the eyes as well. I recommend adding crystals to anything you want to spice up, using the garments from this show as inspiration!

Christian Dior

(Source)

While I am a fan of over the top haute couture, I think Dior’s subdued approach looked beautiful. The color palette was quite soft, and the tone of the collection was more serious than playful, which is perfect to contrast the other collections and make it stand out in a different way. The elaborate designs make up for the lack of embellishment, as seen above in the sleeves of the green coat. The plunging neckline in my favorite navy piece gives the dress enough shape that fancy fabric would potentially have made the garment too flashy. The basic fabrics and colors may not seem like traditional couture, Dior definitely hit hard with this collection.

Valentino

(Source)

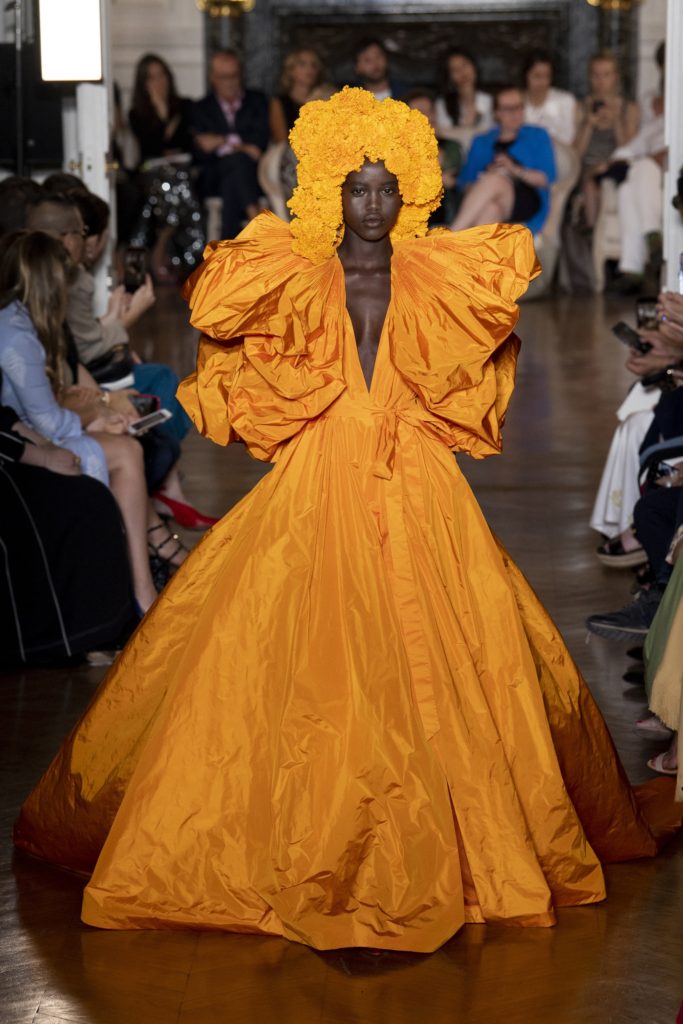
The Valentino show was the last of the Haute Couture week this year and I understand why: the best was saved for last. Valentino hasn’t always been my favorite designer, but this collection immediately peaked my interest and rethink my opinion because it is the definition of couture. Pierpaolo Piccioli chose colorful fabrics, elaborate designs, AND lavish trims to create the perfect runway collection. My favorite piece was the last because of the bright mustard color paired with the larger-than-life dress design. If you’re new to haute couture, check out the Valentino show to get the all around effect.

DIY: Beaded and Sequined Mother’s Day Gifts

Mother’s Day is almost upon us! Struggling to find the perfect gift for mom, something that’s handmade yet worthy of her? We’ve got you. These super simple, super stylish DIYs will have mom smiling and you looking like the best daughter/son.

Flowered Sun Hat

This easy DIY will take you all of 10 minutes. Add a little glitz and glam to a sun hat by adding some beaded flower appliques.

What you’ll need:

A Hat

These Floral Beaded Appliques

E6000 Glue

Some Tape

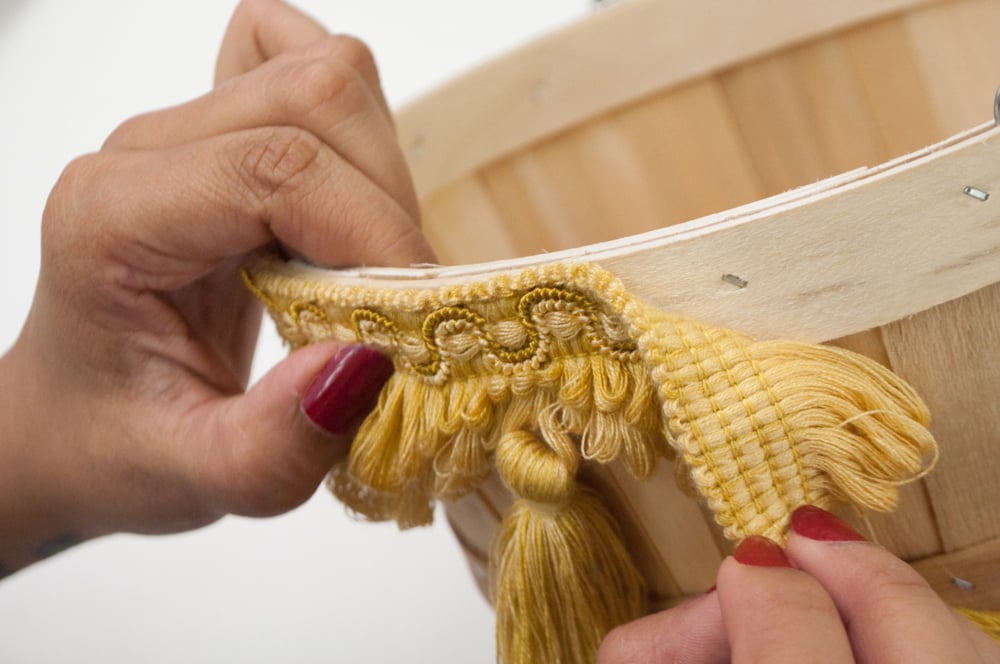
1: Add some glue to the back of the applique, making sure you get all the edges.

2: Place the patch where you’d like it and press it down.

3: Put some tape over it to keep it in place while it dries.

4: Let dry for a few hours, wrap it up and give it to mom!


Embellished Loafers

Give mom a pair of comfy loafers to slip into, that she can wear out to dinner too.

What you’ll need:

A Pair of Loafers

An Iron

A Cotton Cloth or Teflon Sheet

2 x This Beaded Flower Applique

1: Place the patch where you want it.

2: Cover the patch with a thin cotton cloth or Teflon sheet and iron on high heat. Hold the iron down for 20 second intervals, repeating as necessary. Don’t use steam.

3: Repeat on the other shoe.

4: Gift them to mom and put a spring in her step 😉


Sequin/Beaded Flower Bag

All moms have that one bag that they throw everything in. They always manage to have snacks and bandaids and just about anything you might need in a sticky situation. Like wet wipes. Treat her with a clutch that she can take out when she’s off duty.

What you’ll need:

A Plain Clutch or Crossbody Bag

E6000 Glue

This Flower Beaded Patch

1: Apply glue to the back of the patch, making sure you get all the edges.

2: Place the patch on the bag and press down.

3: For added measure, place a heavy object over it and let it dry for a few hours.

Now you just have to gift it to mom and see her try to fit all the “essentials” into it.


DIY: Gucci Inspired Embroidered Fall Coat

Gucci has been bringing its A-game these last few seasons with downright decadent designs. They’ve used an amalgam of textures, fabrics and embroidery to create eclectic but wearable collections. I personally love the slew of tigers in various forms on everything from dresses to coats. The only thing that isn’t easy on the eyes or the wallet is their price tag. I like the idea of owing beautiful things without having to empty my bank account, so I made this Gucci Inspired Coat that’s way more affordable and super easy to create.

Gucci’s Embroidered Coats


Our Version

Price does not include cost of the coat.


What you’ll need: 

All these beautiful patches:

A coat

An iron

A thin cotton cloth to cover the patches while you iron


1

Place patches how you want them and take a picture so you know where everything goes. I stuck to the body of the coat but you can get creative with the back and the sleeves. If you want to keep it simple, you can just add flowers to the lapel.


2

Set the iron to high with no steam. Place a thin cotton cloth or teflon sheet over the patch and hold the iron down for 20 seconds. Repeat if necessary. Do this with all the patches.


And guess what? That’s it. You’re done. Yup, it’s that simple.

*This item is currently unavailable. Check out our full selection of floral patches.

Halloween Décor Inspiration

There is no American holiday that is as creative and original as Halloween. Between scary and sophisticated Halloween masks, Halloween costumes that range from political to pop culture to classic, and spooky and chic indoor and outdoor décor, this yearly celebration is a godsend for creative DIY-ers like us. Here are some of our favorite Halloween decorations that are stunning and bold and can be crafted at home.

Embellished Pumpkins

(Source)

This DIY sequin polka dot pumpkin is an elegant addition to any doorstep or foyer. All you need are gold sequins, craft glue and a pumpkin or two and you are all set.

(Source)

Spooky Wreaths

This dazzling pumpkin is a shiny and stylish take on the classic jack o’ lantern carved pumpkin. Think less spooky and chilling and more stately and refined, perhaps a statement piece for your dining room. Paint your pumpkin, add any number, size and color nailheads and you’re done!

(Source)

This batty wreath can be easily crafted with bat patches. The 3-D effect will make your front door pop and is sure to scare all the kiddies in the neighborhood.


(Source)

Eerie Lighting

Halloween would be incomplete without a spooky wreath for your door. This Day of the Dead themed wreath features large, blooming flowers and creepy, soul-piercing skulls.

(Source)

Dress up a mason jar with candles and lace to set the mood and add a warm glow to your Halloween decked home. Use this décor all year round to add ambiance to any room.

Whether this is your first time DIYing your décor or your tenth season transforming the mundane into the masterful, don’t get spooked! These easy DIY décor inspirations are sure to steer you in the right direction. Happy Halloween and Best Witches!

Halloween Masquerade Inspiration

Getting ready to attend a masquerade ball this Halloween? Well, you’re in good company. These parties have been around since the 15th century and are still going strong today. Originally happening during the festive time before Lent and celebrating marriages and life events, today the masked ball is about socializing and having fun, meeting new people, and even concealing your identity to be able to free your inhibitions and party more freely.

Originating in Italy, masquerade balls have spread rapidly to most of the world. Each country and culture that has adopted this celebration has added their own spin and fashion to these festivals, culminating in beautiful masks ranging from modern to traditional and showcasing the country’s heritage and roots. This Halloween, you’ll see masks ranging from traditional Venetian, to lace, feathers and jewels, super hero and tv characters, animals both real and mystical, Day of the Dead, classic Halloween icons and even painted on masks made entirely of jewels and make up. Whatever look you’re going for, we’ll help you get inspired with some of our favorite masks of 2017. Masquerade balls are one age-old tradition that we can’t wait to partake in each year!

First up, we have Venetian masks from the Carnival of Venice, a traditional celebration held each year and filled with some of the world’s most elaborate masks. These masks are characteristically full faced and monochromatic, with matching feathers, jewels and trim.

(Source)

Next up is a mask of one of the year’s most amazing super heroes. Who can forget Gal Gadot’s performance in Wonder Woman? If you’re looking to dress up as your favorite sci-fi role model, look no further than this stunning mask filled with eye popping gold and sleek, full bodied, dark feathers.

(Source)

As far as mystical creatures are concerned, unicorns rank as the very best. It would be utterly cool if these legendary beasts came to life. In the meantime, show your love with this easy to make unicorn mask complete with horn and hair in soft pastel colors.

(Source)

The beauty of the traditional lace mask is that it will go with any outfit and is as elegant a mask as it gets. It is chic and dressy and won’t take the focus away from your killer dress. Add rhinestones and assorted jewels to the mask for a hint of sparkle and sophistication.

This offbeat Minnie Mouse lace mask appeared in a 2005 Vogue but it’s still so stylish and relevant.

(Source) (Source) (Source)

When considering a Halloween mask, be sure to also consider Halloween make up and nontraditional masks that utilize jewels and sequins to paint the face in an unrecognizable, dazzling work of art. Here are some favorites. Maison Margiela is known for the full face rhinestone masks.

 (Source) (Source) (Source)

Halloween tends to bring out a bit of our darker sides. It’s just starting to get cold and you can feel the first chill of winter everywhere around you. It’s pitch black outside and you’re pressed against a throng of people at a parade or a party. This is the best atmosphere for a dark, alluring, raven mask. You’ll blend in to your surroundings elegantly and seamlessly.

(Source) (Source)

Day of the Dead, or Dia de los Muertos, is a celebration honoring the dead. What better look for your spooky masquerade ball then an otherworldly dalliance with the dead and perhaps, the undead? This look is heavily centered around a red and black floral and lace headband and ornate, hand drawn designs and drawings on the mask itself.

(Source)

 (Source)

Classic masks should not be overlooked when choosing your masquerade look. These masks can easily be DIYed with feathers, rhinestones and perhaps beads or flowers. This is the best look if you want to customize your mask and make sure that it will be truly one of a kind. The possibilities are endless but here are a couple of ideas to get you started.

(Source)

(Source)

This Halloween season, it is our responsibility to continue the 600 year old tradition of attending masquerade balls like our predecessors have done for generations. This is the one night a year that you can revel in a new identity and embrace the mystery around you without any reservations. Wherever this night takes you, put on a mask and party in style.


DIY: Jungalow Dorm Room

If you love plants and the word “Jungalow” is unfamiliar to you, you should get acquainted, quickly. The true queen of Jungalow is Justina Blakeney, with her ‘jungaliciousness’ (her word) decor and homes. It combines bright colors and organic textures with nature. It’s not a hard look to achieve and if you can’t keep plants alive just find some real looking fake ones. Besides, if you’re in college, looking after yourself is hard enough. I have two easy DIY’s to add some color to your Jungalow.

Beaded Jungle Lamp

I found this fabric in our fabric drawer and I couldn’t believe how perfect it was for this DIY. I decided to sew a lampshade for it that fit one of the frames I had. You could just modify an existing lampshade or buy one for cheap at a thrift store. And you can substitute the printed fabric for solid colors if that’s more your style.

Here’s what you’ll need:

A lampshade

Beaded Fringe

Sequin Patches – We used this, this and this

Sewing Machine or Strong Fabric Glue

Iron

1

First, start by placing your patches on your lampshade. Since I made mine I could lay it flat, but if you have a pre-made one you can pin your patches to it for placement. Once you have them where you want them, cover them with a thin cotton cloth. Using an iron on it’s hottest setting, press and hold down for 20 seconds at a time. Repeat if necessary. Be careful, the metal of the lamp will get hot too. For all those of you who own a hair iron, you can use that too.

*DO NOT do this while the lamp is still plugged in.

2

Once all the patches are ironed on, start pinning the beaded fringe to the fabric. If you’re going to be gluing it to the lampshade you can skip this step. Pin the fringe and the fabric with their ‘right’ sides facing each other.

3

If you’re using glue (I suggest Sobo Craft Glue or E6000), start gluing the fringe in sections to the inside of the lampshade for a neater finish. You can use binder clips to keep it in place while it dries. I would sew a few stitches by hand just to secure it.

If you’re sewing it to a lampshade, sew along the pinned fabric, removing the pins as you go along.

Now plug that lamp in and watch the beads catch the light.

Jacquard Bed Scarf

You must be wondering what a bed scarf is. Trust me, the term is new to me too. I just called it that decorative quilt-like thing at the foot of the bed. So that’s what a bed scarf is. I decided to use all the beautiful jacquards that we have and it totally goes with the Jungalow theme.

You’ll need:

Jacquard trim – We used the following:

1 ½” Ivory and Gold Jacquard

30MM Metallic Jacquard

2″ (50mm) Sun Moon Jacquard

Embroidered Metallic Jacquard

50MM Imported Wine Metallic Jacquard

53MM Fine Imported Jacquard

1 ¼” Metallic Jacquard Red/Gold

40MM Metallic Jacquard Red/Green


Tassel trim

Scrap fabric – You can choose a print you like that complements the jacquard

Scissors

A sewing machine – If you don’t have a sewing machine you can glue the trims together but I strongly recommend sewing

1

Plan the arrangement of your trims. Take a picture when you’re done so you know the order you want them in.


2

Take the first two trims and lay one over the other, overlapping very slightly. Now sew along the edge making sure you’re sewing both together. Repeat this process with the all the trims.


3

When you’re done with all the jacquard, place the tassel trim with the tassels at one end of the scarf, facing away from the edge; right side facing down. Next,  take the scarp fabric and lay it over the the tassel trim, sandwiching it in between.


4

Sew along about 1/2″ from the edge. You can leave the fabric in the back unfinished and cut it to about 2 inches or you can do a double fold and sew it. Repeat this for the other side of the scarf. I added a top stitch just to make it more sturdy.


And Voila. Jungalow done.


DIY: Bohemian Chic Dorm Room

Yes, yes, I know, you don’t want to think about school. You just want to keep enjoying your summer and pretend that it’s never going to end. But sadly, it must. Maybe a cool new dorm room is just what you need to make the start of school less daunting. Over the next couple of weeks we’re going to give you awesome budget-friendly ideas for decorating your dorm room. You can choose the one that suits your style the most and then put your own unique spin on it. The first one in the dorm decor series is a chic bohemian dorm room that can express your wandering spirit and bohemian aesthetic. We have three easy tutorials to bring bohemia straight to your dorm room.

Fringe Wall Hanging:

Woven wall hangings have been making the rounds all year and some of them can be time consuming and hard to make. We came up with an easier way to achieve the cool textured effect that you can customize and complete in less than 30 minutes.

Here’s what you’ll need

Various Colors of Bullion Fringe – Based on the width of your final hanging, buy double or triple that amount so that you can color block

We used these:

6″ Pink Bullion Fringe

6″ Loden Bullion Fringe

3″ Dark Beige Bullion Fringe

3″ Spruce Bullion Fringe


Scissors

Board – A piece of wood or sturdy cardboard would work. We made ours 11″ x 17″

A Glue Gun

1

Cut all the fringes to the width of the board you have + 2 inches.


2

Once you’ve planned how you’re going to lay out your colors, starting at the bottom, glue your first line of fringe. To finish the ends, glue the excess fringe around the fringe to the back.

3

Keep repeating this process until you get to the top and finish off the top edge by gluing the last fringe slightly higher, so it’s peaking out over the edge and covers the board behind. The aim is to not have the board show through at all.

4

Now just find a spot and hang up this beauty.

Tassel Trimmed Basket

This DIY is so easy I don’t think you need step by step instructions. But I’ll give them to you anyway.

Here’s what you’ll need:

A Basket

Tassel Trim

A Glue Gun

Scissors

1

Start by applying glue on the top edge of the basket.

2

Place the tassel trim over the glue and press to secure. Make sure you align it to the edge. When you’re done, cut the excess and add a little glue to the cut end to prevent fraying.

3

Repeat this process, working on small sections at a time so the glue doesn’t dry out.

That’s it. Now go put some plants in it and show off your awesome project on a window sill or a side table.

Pom Pom Pillowcase

This DIY is a little more advanced (you need to know how to sew on a sewing machine). If you don’t have access to a sewing machine you can glue the trim on. This tutorial can also be applied to curtains, cushion covers and duvet covers. You can use bigger pom poms for a duvet cover.

What you’ll need:

Pillowcase

Pom Pom Trim

Scissors

Sewing Machine (or fabric glue)

Pins

1

Measure how much you need for the pillow case. You can either sew it in sections or per side. Cut according to what you decide. We decided to sew it as one continuous piece for 3 sides and do it separately for the open side.

2

Pin the trim to the pillow case edge. Make sure you’re not pinning it to the part the pillow has to fit through. Stick to the very edge, along the seam.

3

Using a sewing machine sew the trim along the edge of the pillowcase.

*An even more advanced option would be making the pillow case from scratch and sandwiching the pom pom trim between the fabric for a more finished look.


DIY: Velcro Patches

Never had a tattoo because you can’t commit to a design? Feel the same way about trends? Me too. I love looking at all the beautiful things designers grace the runway with every season but I can never manage to semi-permanently adopt a hot new trend. Patches have been a staple since the spring of 2016 and they don’t seem to be going anywhere, anytime soon. So I thought to myself, what can I do if I want to cover my things with unicorns and emojis without really committing to the trend? The answer is *drumroll* VELCRO!

Fun Fact: The word Velcro is a linguistic blend of the French words velours (“velvety fabric”) and crochet (“hook”). It’s one of those companies (yep, it’s the company name) that’s become synonymous with the product.

You can watch the video below to see how you can use Velcro to attach patches and scroll down for more details.


Here’s What You’ll need

Velcro

Patches

Scissors

The thing you want to put patches on

1

Cut the Velcro to the size that you need. You can cut both sides of the Velcro so that you have a matching set.

2

Peel off the backing for the adhesive and stick one piece of Velcro on the accessory or clothing and the other on the patch.

3

Now you just have to attach the two pieces like you would do with Velcro normally. Switch ’em out for different patches.

*Note that the adhesive might not stick to some materials.

Kind of a no-brainer huh? I love simple life hacks.

You can also do it with shoes:


Spring Summer 17 Trend Alert: Straw and Wicker

This summer’s latest trend is straw and wicker hats, bags and furniture. With Scandinavian influences, the trend embraces natural fibers and un-dyed, light colors. The pale shades of lemon yellow and creamy beige are light and sunny and will instantly turn any outfit into a summer look and any room into an airy oasis.

The original straw and wicker trendsetter is Jane Birkin, circa 1974 with her iconic basket bag but the upcoming trendsetter is you, circa now. So gather your looms and weaving materials, and come on a straw studded journey through this summer’s latest craze.

FRANCE – FEBRUARY 08: Jane Birkin Posing With Her Little 10 Month Old Daughter On The Boardwalk In Nice On September 9, 1972. The 28 Year Old Actress Was Then On The Set Of The Film Trop Jolies Pour Etre Honnetes, Directed By Roger Balducci. (Photo by Keystone-France/Gamma-Keystone via Getty Images)

First up, straw hats and bags with inspired verbiage like “do not disturb”, “beach please”, “out of office” and more. The large, script, playful letters in contrasting blues and reds make this style really pop and come to life. It’s great when your accessory can speak for you with a little message and it’s a whimsical look perfect for the beach or pool. 

Eugenia Kim’s Hats are so adorable (and so DIY-able) (Source)

In the home décor world, we have outdoor woven furniture. Rattan and wicker has returned and natural furniture pieces are making a comeback. Whether the piece is retro or modern, designers are foregoing all things heavy and dark for a refined “back to nature” look.

(Source)

This summer, drop your leather bags and hardwood and opt to accessorize with your new favorite materials.  The look may have started with the Scandinavians but it ends here with you.

DIY: 3 Ways to Use Frames In Your Dorm Room

One of the most versatile things you can find is a frame. You probably already have plenty lying around or you can get them for a couple of bucks at ikea or if you’re adventurous you can find them at yard sales or thrift stores. I put together 3 ways you can use a frame in your dorm decor but this is just a starting point for you guys to come up with your own unique ideas.

LACE DRY ERASE BOARD

This one is super simple and quite useful. You can hang it on your wall and write yourself a note or on the outside of your dorm door for people to leave you messages when you’re out.

Here’s what you need:

A frame with glass

Cardstock (thick paper) in a light color

Wide lace like this one

Scissors

1

Take the backing out of the frame and lay it on the cardstock. I used a corner so I would only have to cut two sides.

2

Using a pencil trace around the board and cut out the resulting rectangle.

3

I used this Chantilly lace which was wide enough for a 11 x 14 frame with some extra. With the glass in the frame (facing down), place the lace and then the cardstock on top. Then carefully insert the backing to hold everything in place.

And that’s it. Now get your self some dry erase markers and make a to do list.

TRIMMED POLAROID HANGER

With Instax and other companies making affordable polaroid cameras, polaroids are a nice way to collect memories and document your travels. What you need is a cute frame where you can hang up your awesome polaroids.

Here’s what you need:

A frame

Braided trims in 2 colors (more or less, depending on the size of your frame.

This Rococo trim

Scissors

A Glue Gun

Clips to hang your polaroids

1

Measure the trim to fit from side to side of the frame and cut all of them equally.

2

Apply a small amount of glue to the right side of the trim and attach to one side. Let it dry for a minute. Then, pulling it tight, add glue the other end to the other side. Be careful with the hot glue though!

3

Repeat with the other two trims and you’re done.

Hang up your polaroids and show them off!

Velvet Ribbon Art

Want a sophisticated and tactile piece of art for your dorm room that’s not going to break the bank? I have just the idea for you. All you need to do is figure out your color scheme and then just play with the different velvet trims in different widths till you like the layout. You can see the one I made for some inspiration:

What you’ll need:

A frame

Velvet ribbon in various colors

This adorable velvet daisy trim

Tape

1

I used half a yard for each of the strips for a 14″ tall frame. Measure the inside area of the frame and add 4 inches to that measurement to know how much you’ll need for each strip.

2

Starting with one side start taping the ribbon taut onto the backing of the frame. I did it directly on the backing because it’s sturdy and won’t bend when I pull it tight.

3

Keep going, experimenting with different widths that you can change by overlaying the ribbon differently.Add the daisy trim in between for some dimension. The back is going to look messy with all the tape so if you want a cleaner more permanent solution use a glue gun and glue all the ribbon evenly.

And that’s it. Pop the backing back into the frame and hang your art up.