Category: Slider

Back To School 2018: DIY Preppy Backpack

It’s that time of year again, the one that students dread and parents love: Back to School Season. The fall semester starts in about a month so it’s about time to start creating some great new school supplies, for a great price! I am going to start this series with an essential: the backpack. Today, we are creating the perfect, basic, preppy-style backpack which is perfect for every student who wants to update their backpack for the new school year!

Today’s Look: The Preppy Student

What You’ll Need:

Instructions:

Step 1: Cut zipper tassels already on bag off with scissors. Then, loop leather cord through zipper and cut to desired length, making a loop.
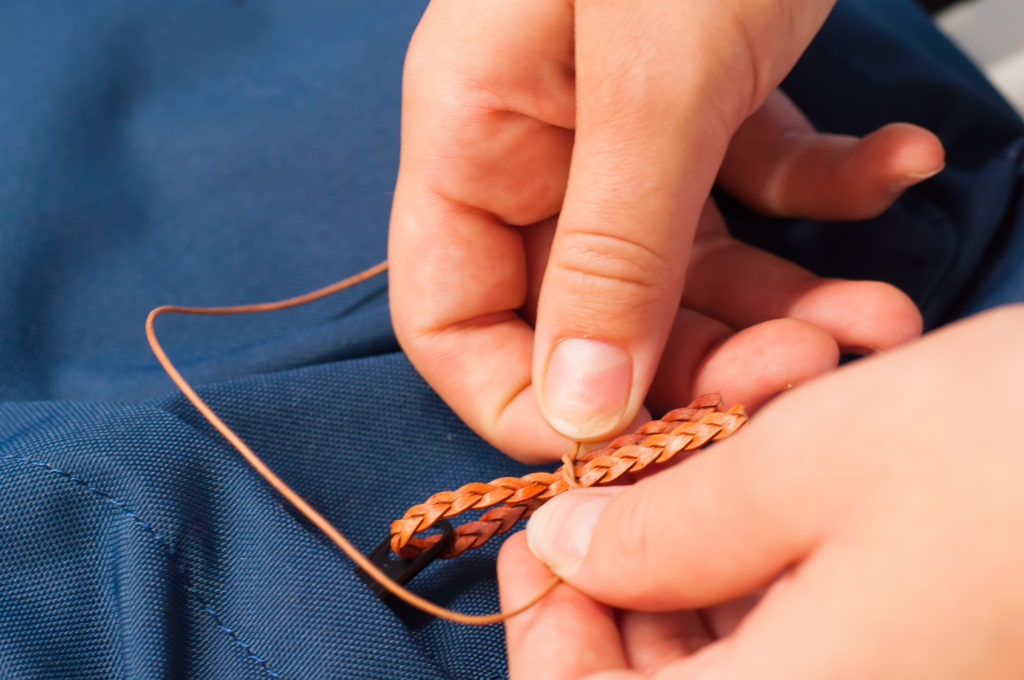
 

Take thinner cord and tie in a knot around the loop to hold it together. Wrap thin cord around and then tie in a knot twice to secure. Cut off excess of both cords. Repeat for all other zippers on bag.

Step 2: Take white grosgrain ribbon and striped grosgrain ribbon and layer them on top of each other, then glue with E6000 glue. Wait for it to dry a bit, then you can begin to line your backpack with it.

Glue ribbon to the inside part of the zipper flap and then fold to begin lining the backpack along the zipper.

Continuously glue as you go until the ribbon is all the way across the top of the backpack. To finish, fold over flap and glue, the same as when you started the ribbon.

Step 3: Using the same ribbon layered and glued on top of each other, glue to the side pockets of the backpack (if there are any) using E6000 glue. Tip: Use binder clips to secure ribbon while drying to make sure it stays in place!

Step 4: Now we are going to apply the letters! Lay out your monogram in the desired order and lay a thin piece of fabric on top in order to protect the letters from the iron.

Then, use your iron to press down onto the patches for about 20 seconds, or until they are attached to the bag.

Remove fabric for the finished look!


DIY: Beaded and Sequined Mother’s Day Gifts

Mother’s Day is almost upon us! Struggling to find the perfect gift for mom, something that’s handmade yet worthy of her? We’ve got you. These super simple, super stylish DIYs will have mom smiling and you looking like the best daughter/son.

Flowered Sun Hat

This easy DIY will take you all of 10 minutes. Add a little glitz and glam to a sun hat by adding some beaded flower appliques.

What you’ll need:

A Hat

These Floral Beaded Appliques

E6000 Glue

Some Tape

1: Add some glue to the back of the applique, making sure you get all the edges.

2: Place the patch where you’d like it and press it down.

3: Put some tape over it to keep it in place while it dries.

4: Let dry for a few hours, wrap it up and give it to mom!


Embellished Loafers

Give mom a pair of comfy loafers to slip into, that she can wear out to dinner too.

What you’ll need:

A Pair of Loafers

An Iron

A Cotton Cloth or Teflon Sheet

2 x This Beaded Flower Applique

1: Place the patch where you want it.

2: Cover the patch with a thin cotton cloth or Teflon sheet and iron on high heat. Hold the iron down for 20 second intervals, repeating as necessary. Don’t use steam.

3: Repeat on the other shoe.

4: Gift them to mom and put a spring in her step 😉


Sequin/Beaded Flower Bag

All moms have that one bag that they throw everything in. They always manage to have snacks and bandaids and just about anything you might need in a sticky situation. Like wet wipes. Treat her with a clutch that she can take out when she’s off duty.

What you’ll need:

A Plain Clutch or Crossbody Bag

E6000 Glue

This Flower Beaded Patch

1: Apply glue to the back of the patch, making sure you get all the edges.

2: Place the patch on the bag and press down.

3: For added measure, place a heavy object over it and let it dry for a few hours.

Now you just have to gift it to mom and see her try to fit all the “essentials” into it.


Spring/Summer 2018: Get The Look

I’m secretly hoping that by dressing for Spring, I’m willing it to come quicker. It’s April and I want to cast off the blues, grays and blacks and bust out the yellows, pinks and reds. There are so many fun trends to try out this season and I’ve rounded up 5 of my favorite ones. You can easily incorporate these trends into your wardrobe with some mini DIYs. I hope you find some inspiration in here to brighten up your Spring/Summer wardrobe.

Pink + Red

Although this combination is timeless, it packs a punch every time it comes around. The contrast is just beautiful and can easily be achieved with either accessories, separates or jewelry. Designers like Dolce and Gabbana, Ferragamo and Stella McCartney are embracing this yummy palette. Does it remind anyone of candy?

(Source)

Here’s a few ideas on how you can try this trend out for yourself:
  • Some pink buttons on a red shirt or vice versa.
  • Red and pink sew-on jewels on a blouse would look stunning.
  • A red fur pom pom on a pink handbag or vice versa

Birds of a Feather

Feathers are a whimsical touch to any garment or accessory. They add a bit of dramatic flair or in the case of Alberta Ferreti and Proenza a Schouler, a LOT of dramatic flair.

(Source)

Here’s a few ideas on how you can try this trend out for yourself:
  • Add some feathers around an ankle strap on your strappy sandals.
  • A wispy feather trim around the neckline or sleeves is just the thing.
  • Long feather earrings to add to a simple outfit.

Sequin-Land

Sparkle is abundant on the runways this season. Sequins made an appearance time and time again, upping the glam quotient. It’s clear that sequins are no longer restricted to the holidays!

(Source)

Here’s a few ideas on how you can try this trend out for yourself:
  • Glue on sequins to a pair of heels for some instant glam.
  • Sew on large paillettes to a tank top to create a going out outfit.
  • Embellish a clutch for a night out by gluing some sequins on it.

Bling-Bling

Sequins aren’t the only ones having a moment right now. I don’t think we’ll ever tire of bedazzling things. Rhinestones and crystals have made their way into several collections on the runway this season. Everyone from Saint Laurent to Gabbana is adding some sparkle to their lines.

(Source)

Here’s a few ideas on how you can try this trend out for yourself:
  • Take a page out of Dolce and Gabbana’s book and add some crystals to your sunglasses.
  • Add rhinestones to a pair of thigh-highs like Saint Laurent.
  • Add some sew-on jewels to your light spring overcoat to make it a style statement.

Fringe Benefits

I personally love the flappers from the twenties with their beaded shift dresses and drawn-on panty hose. Fringe was an essential back then and apparently in S/S 18 too. Whether it’s Chanel’s subtle fringe on their classic tweed suits or Stella McCartney’s macrame fringe bag, we can’t get enough of this trend.

(Source)

Here’s a few ideas on how you can try this trend out for yourself:
  • Make a pair of statement earrings with a 6″ fringe to add some oomph to any outfit.
  • Glue some fringe onto the front of a small bag for a statement piece.

    Let us know in the comments if you tried any of these trends out! Happy Spring!

DIY: Lace Wedding Centerpieces

Looking for the perfect table toppers? Enhance your reception table bouquets with some inexpensive, rustic flair. We love the homey, backyard-wedding feel of these lace covers for Mason jar vases. Mix and match using our great selection of lace to give your DIY wedding a quick and easy, vintage look.

What you’ll need:

Cluny Lace

Cotton Eyelet Lace 

Leaf Lace Fringe

Scissors

Glue Gun

1 spool of invisible thread

30 Mason Jars (minus the lids)

Note: We used 3 different sizes of mason jars but you can choose to use 3 of the same.

1

Measure the lace around each jar allowing for a 1/2″ seam (doing the measuring and trimming all at once saves precious time!)


2

Cut lace accordingly

3

Wrap the piece of lace around the jar and eyeball a section 1/2” from the edge

4

This is where you can choose to delicately glue the piece together overlapping at the ½” mark, or sew the edges together. We prefer gluing to save on time. If you’re sewing, make sure that you’re using invisible thread. It’ll disappear into the trim!


Voila! Beautiful vase coverings that give your tables a country feel!

Want to put together your own assortment of lace? Choose from M&J Trimming’s incredible selection of guipure, knitted and more to find the perfect lace for your special day. These DIY lace coverings for mason jars are also the perfect giveaway for guests that want to bring a little bit of your wedding day home with them! 

DIY: Dorm Room Décor Round Up

Dorm Room Décor Round Up

After a long day of classes followed by a long night of studying in the library, what you need is to come home to some peace and quiet to recharge before tomorrow’s craziness. There are a few different style directions that you can take to make your dorm as comfy and inviting as ever while still maintaining all of your spunky personality.

Come home to a bright, colorful jungle and escape your surroundings with this DIY: Jungalow Dorm Room  This décor option is for those adventurous spirits that like to travel and explore the unknown. Think tropical birds, bright blues, deep greens and fun, eclectic prints. 

Rest and rejuvenate with DIY: Modern Dorm Room which will take you 10 years into the future when you’ve landed that sweet job and are living in your contemporary dream home. This style is for those with the latest fashion and decor tips at their fingertips who have an eye for modern design and know how to spice up any room with their trendy finds.

If you identify with the artists and bohemians all around you and love to wander, DIY Bohemian Chic Dorm Room will further express your free spirit. This room is all about earthy colors, rich textures and a fringe wall hanging that will bring your inner maverick to light.

The room where you’ll spend over 1/3 of your day should express your inner self and be home to your creative genius. Whichever option you choose, you can be confident that your dorm room will tower above all others in its unique, chic beauty.

DIY: Beaded Summer Sandals

It’s time to free those toes! Put away the stuffy boots and slide into some flirty sandals, because spring is here! We just got these great new beaded iron-on trims and had to put them on something quick. 

What you’ll need:

A Pair of Sandals

Beaded Rhinestone Trim (This one is Iron-On but we didn’t want to iron it onto vinyl)

Pom Pom Trim

E6000

Scissors

Step 1: Cut the trim to size by measuring it on the sandals. To play it safe, cut a little extra on either side. You can always trim that later.

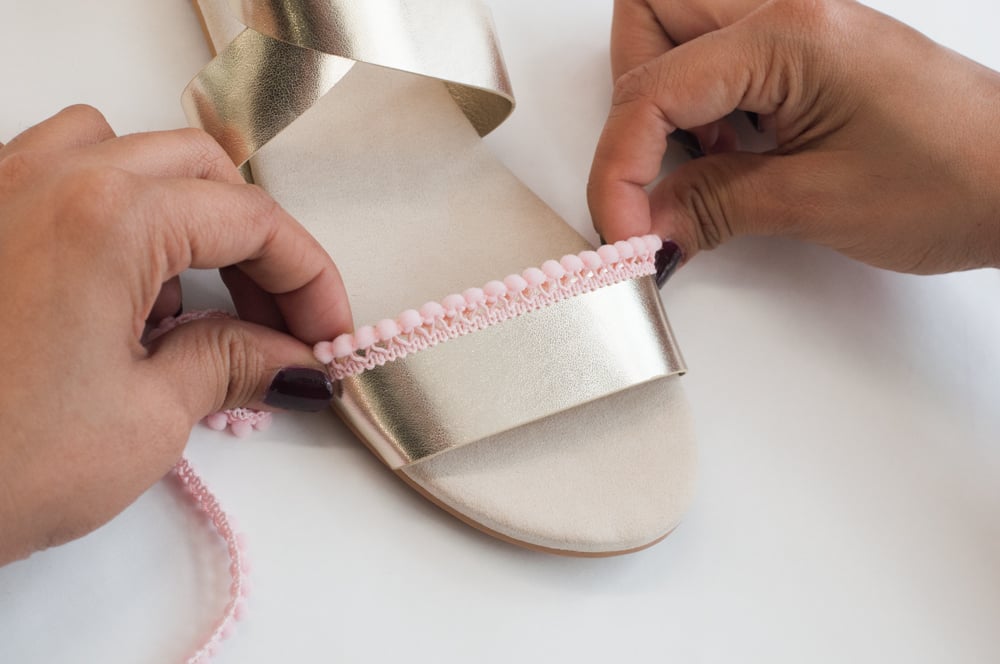
Step 2: Apply a thin line of E6000 on the the strap. Stick the pom pom trim to it with the pom poms facing outward.

(E6000 is a great glue but make sure you’re working in a well ventilated area since it’s a powerful formula. It also takes longer to dry than other glues. You can use a glue gun for quicker results)

Step 3: Apply glue between the two pom pom trims and glue on the rhinestone trim. Since this is an iron on trim you have the option of ironing it on if your base fabric will allow it.

Step 4: Trim the excess on either side and let dry.

And you’re done!

DIY: Gucci Inspired Studded Acid Wash Denim Jacket

Who would have thought these trends make a comeback! Studs on Acid Washed Denim! Gucci this Spring took these popular 80s trends, put them in a blender and out came this:

We thought we’d take this hot trend and turn it into a fun, easy DIY. We love recreating runway looks for those of who you love fashion but don’t want to break the bank. The first thing we did was hunt for the perfect denim jacket – something slightly oversized to match the current trending silhouette. We bought a classic blue Talbots denim jacket and headed back to HQ to get started on the project.

What You’ll Need:

Step 1: Remove all the buttons from the jacket. We wanted to replace the plastic buttons on the jacket with cool metal ones. This step is optional. If you like the current buttons on your jacket, skip this step.

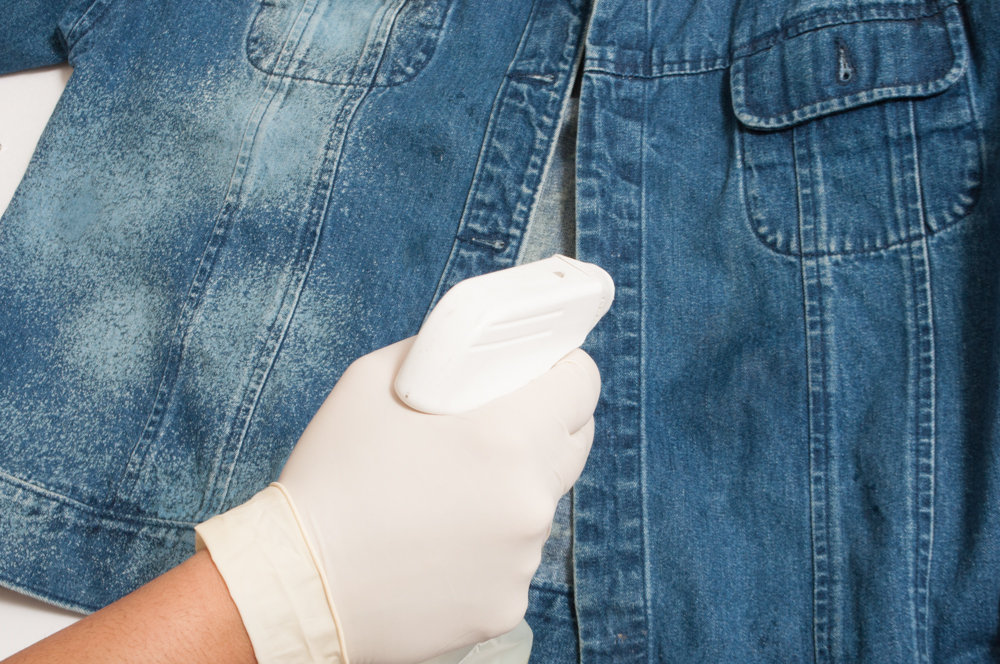
Step 2: Fill a spray bottle with bleach. Make sure you wear rubber gloves to protect your skin. We advise that you work in a well-ventilated area when working with bleach. Keeping the bottle about 6 inches from the jacket, start spraying in random sections. Don’t spray too much! You’ll notice the color stripping away. Let it dry and then wash it.

Disclaimer: Bleach strips dye from fabric and sometimes reflects the undertones present in the dye. For example, you might see yellowish or pinkish tinges based on your denim’s original wash/dye.


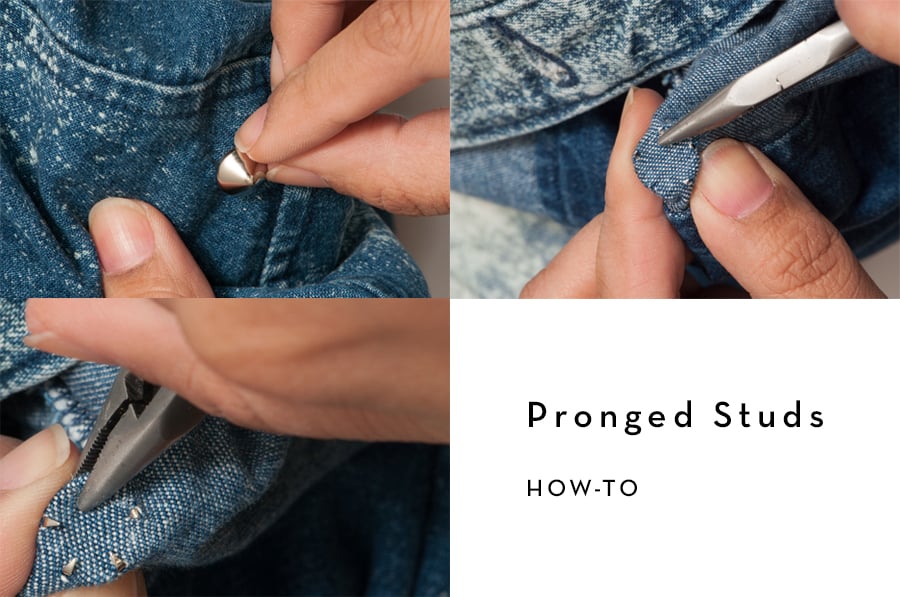
Step 3: Start attaching the studs. For the studs with prongs, poke it through the fabric and use pliers to bend the prongs inward into the hollow of the stud. For the studs with screws, use a sharp tool (scissors/awl/X-Acto knife) to make a small hole and push the screw in. Then screw the stud onto the screw.

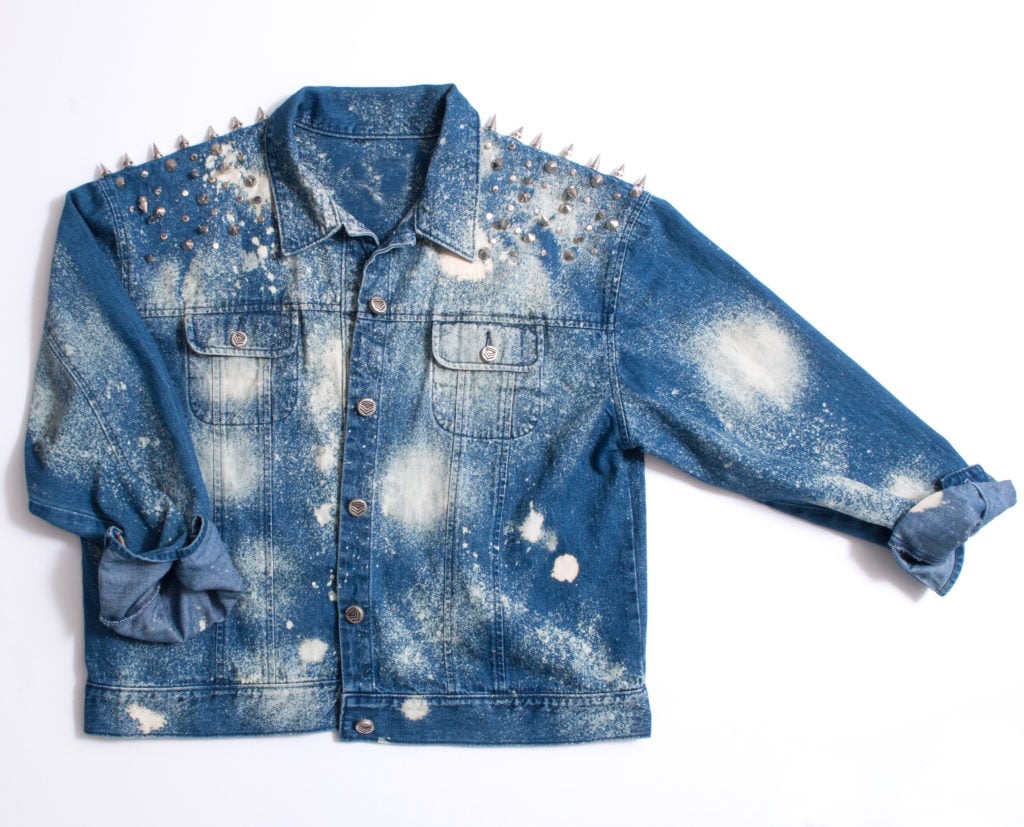
Starting at the shoulder, attach as many studs as you like.

Step 4: Sew on the new metal buttons. Again, this step is optional.

And you’re done! If you wanna buy this jacket go here. Hurry! There’s only one.


Studs used in our project:

Small Metal Spikes with Screw
Large Cone Spike with Screw
Medium Spike with Screw
Small Flat Nailheads
Cone Nailheads