Category: Fashion

DIY: Embroidered Off-The-Shoulder Top

There’s no way you haven’t seen these off-the-shoulder tops in every store and every fashion pin in 2017. They’re so cute and summery and actually really easy to make. You don’t even need a sewing machine. Wait, what?!

 Totally crushing on this top from the Alexis 2017 Resort Collection

All you need is:

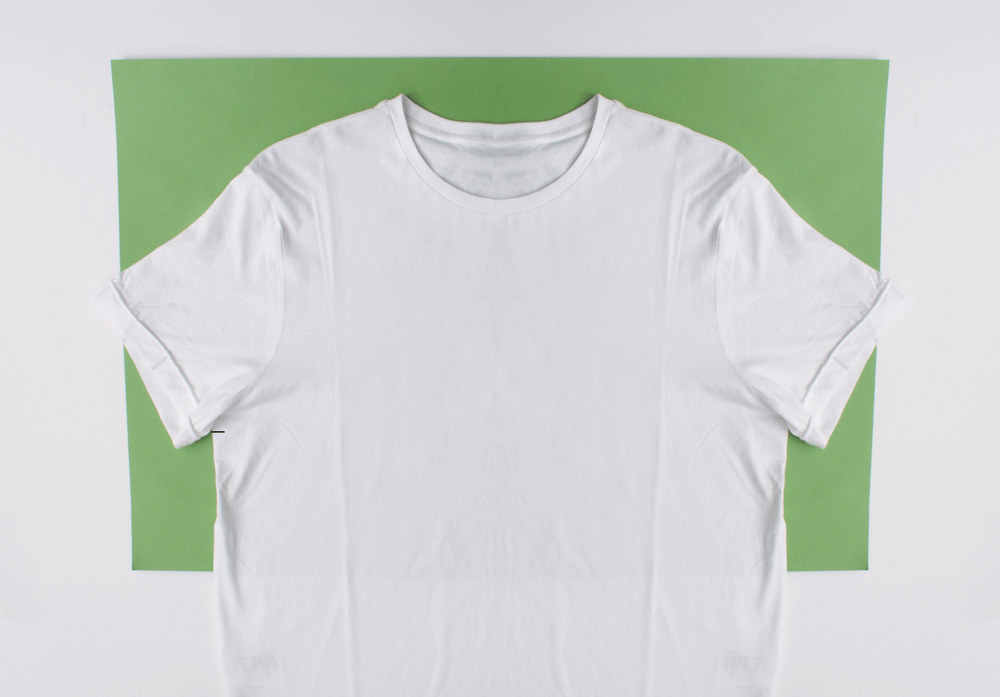
An oversized T-Shirt

Scissors

Embroidered Floral Patches

Elastic

Iron

Needle and Thread

Safety Pin

Also, keep a measuring tape handy.

1

Cut the T-shirt right under where the sleeves begin, in a straight line. You’ll be using the bottom half. Then, cut the sleeve in a straight line an inch or so from the armhole. Using the cut piece as a reference, use it to cut the second sleeve.

2

Now, place the embroidered patches where you want them on the piece you cut and iron it on. I did one big piece near the hem and cut the second patch into smaller flowers for the sleeves. Use a thin cotton cloth to cover the patches while you iron and hold down the iron for 20 seconds at a time. Repeat as necessary. Do not use steam.

3

Using a measuring tape, measure across around the upper chest. Then, measure your bicep. That’s the fullest part of your arm. Cut 1 piece of elastic a couple of inches smaller than your upper chest measurement and 2 pieces an inch smaller than your bicep measurement. For example, I had  30″ as my upper chest measurement and 10″ as the bicep measurement. I cut my elastic to 1 x 28″ piece and 2 x 9″ pieces respectively.
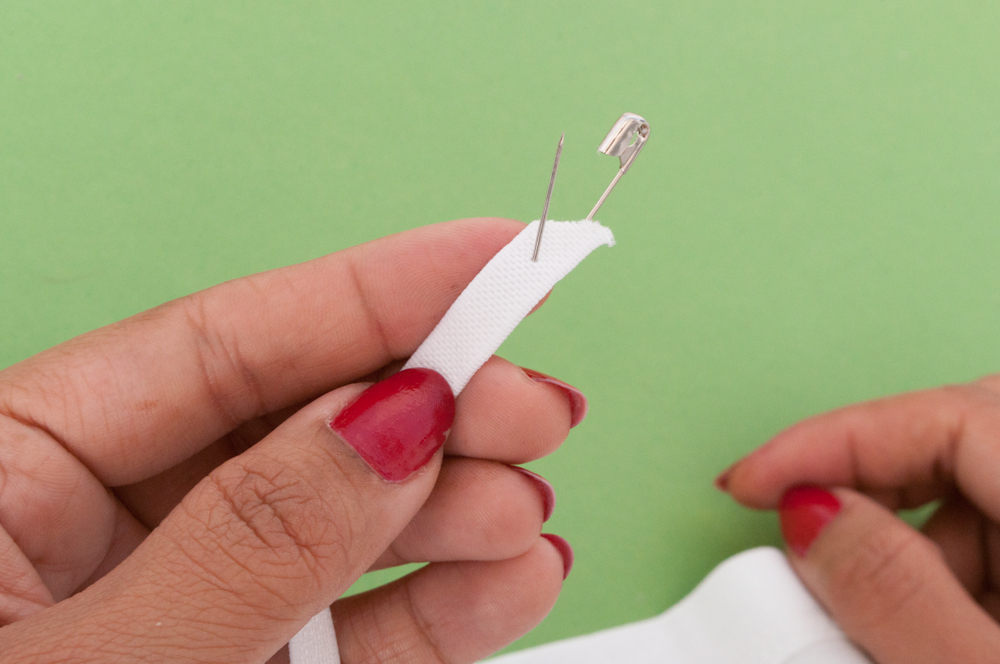
 

4

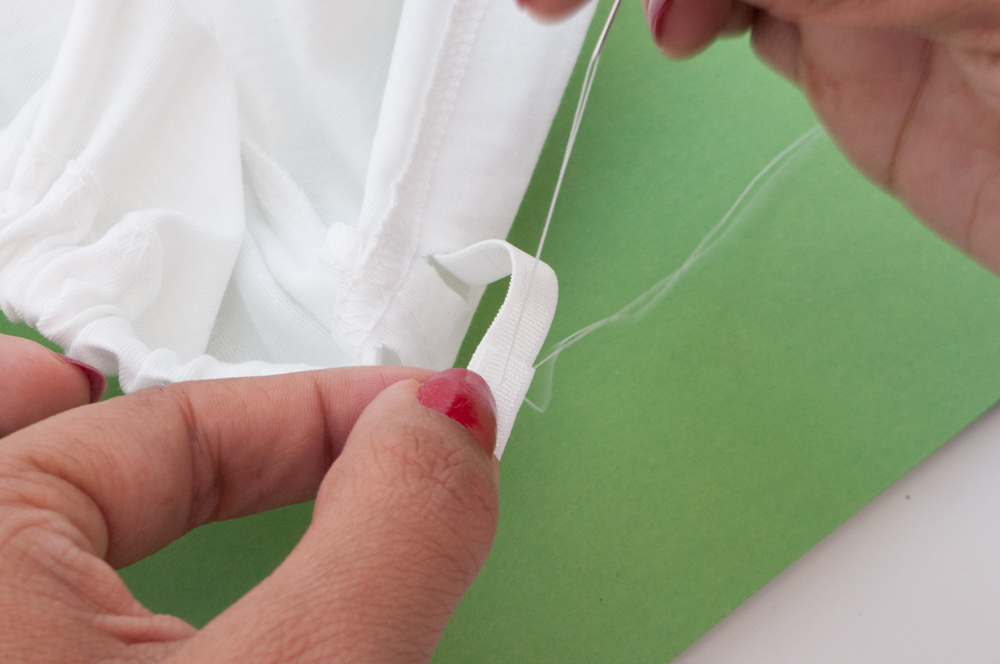
Taking a pair of scissors, snip two small holes (big enough for the elastic to go through) near the seam of the hem. That’s the pre-stitched part of the piece you cut. Then, attach the safety pin to one end of the longer elastic and use it to pull it through the hem. Make sure you secure the loose end so it doesn’t get pulled in. Scrunch as you go along as there will be more fabric than elastic. Repeat this step with both sleeves. Once you’ve threaded the elastic and come out through the second hole, secure it by stitching it to the fabric.

5

The final step is attaching the sleeves to the body. Match the seams of the sleeve and the body and sew on either side at about 1/2″.

Pair it with some denim cut-offs and show off your new embroidered off-the-shoulder top!

DIY: Velcro Patches

Never had a tattoo because you can’t commit to a design? Feel the same way about trends? Me too. I love looking at all the beautiful things designers grace the runway with every season but I can never manage to semi-permanently adopt a hot new trend. Patches have been a staple since the spring of 2016 and they don’t seem to be going anywhere, anytime soon. So I thought to myself, what can I do if I want to cover my things with unicorns and emojis without really committing to the trend? The answer is *drumroll* VELCRO!

Fun Fact: The word Velcro is a linguistic blend of the French words velours (“velvety fabric”) and crochet (“hook”). It’s one of those companies (yep, it’s the company name) that’s become synonymous with the product.

You can watch the video below to see how you can use Velcro to attach patches and scroll down for more details.


Here’s What You’ll need

Velcro

Patches

Scissors

The thing you want to put patches on

1

Cut the Velcro to the size that you need. You can cut both sides of the Velcro so that you have a matching set.

2

Peel off the backing for the adhesive and stick one piece of Velcro on the accessory or clothing and the other on the patch.

3

Now you just have to attach the two pieces like you would do with Velcro normally. Switch ’em out for different patches.

*Note that the adhesive might not stick to some materials.

Kind of a no-brainer huh? I love simple life hacks.

You can also do it with shoes:


DIY: Flower Studded Shoes

Ahh it’s that dreaded time of year when you start seeing all those back to school ads. Time to start thinking about finishing your assigned summer reading and mentally preparing for another school year. A cool new wardrobe is just the thing you need to help you look forward to the first day of school. Keep reading to see how you can make these adorable floral studded slip ons to strut into school with.

What you’ll need:

This daisy velvet trim

Small gold pronged studs

Scissors

Pliers

Shoes

1

Start by cutting the trim into individual flowers. You can do this by cutting them where they join together.

2

Place the flowers on the shoes to see what placement looks good.

3

Using the stud, push it through the flower and through the shoe. On the back of the flap you can see the prongs protruding.

4

Using the pliers flatten each prong until it’s curling in. Repeat for all the flowers.

You can also try different placements as shown below:


That’s it! You’re done.


DIY: Rhinestone Bling Shorts

Can you take a pair of casual shorts and turn them into a hot little number for a night out? You absolutely can, and should. These cute little rhinestone buttons add the perfect amount of bling to a plain pair of shorts. Check out the video below to see how to make them and scroll down for more details:

What you’ll need:

A pair of shorts

Rhinestone buttons like these (make sure you select 14mm Crystal/Silver)

Needle and Thread

Tailor’s chalk

1

Using tailor’s chalk, mark where you want the buttons. I spaced them out about 3 inches or so in an alternating pattern.

2

With a needle and thread sew the buttons on using the shank in the bank.

3

Repeat step 2 wherever you’ve marked a spot with the chalk.

That’s it!


DIY: Floral Patched Shorts

Summer = Flowers

Summer = Shorts

So Shorts = Flowers!

That’s the formula for this super simple floral patched shorts that will make your summer outfit stand out, whether you’re at the beach or on a night out. Check out the video below to see how to make them and scroll down for more information:

Here’s what you’ll need:

A pair of shorts

Iron On Floral Patches like these

Scissors

Iron

1

I wanted to cut the patches so I can place half inside the pocket and half along the pocket. This is totally optional. You can get creative with this step by mixing in other patches or putting it on the back pocket instead.

2

Place the patch where you want it and using a teflon sheet or a thin cotton cloth (to protect the patch) press and hold down the iron (heat on high, no steam) for 20 seconds. Repeat if necessary.

3

Guess what? That’s it. Simplest formula and simplest DIY ever!

DIY: Lace Denim Shorts

Lace and denim just seem to go hand in hand don’t they? I personally think it’s girly in the nicest way. Check out how you can make these adorable shorts to complete your summer attire. Check out the video below to see how to make them and scroll down for more information:

Here’s what you’ll need:

A pair of denim shorts

Lace like these

Thread and Needles

1

Before I started, I cut two inches off the bottom of the shorts. I did this to accommodate the extra length the lace was going to add. This is optional but odd lengths on shorts can be extremely unflattering so I would suggest doing it.

2

I then started sewing the lacy about three inches in. I made small stitched every half inch or so along the top of the lace. I started and ended at the inner seam for a clean finish.

3

You need to around the whole leg and then repeat it with the other side.

That’s it!


Spring Summer 17 Trend Alert: Straw and Wicker

This summer’s latest trend is straw and wicker hats, bags and furniture. With Scandinavian influences, the trend embraces natural fibers and un-dyed, light colors. The pale shades of lemon yellow and creamy beige are light and sunny and will instantly turn any outfit into a summer look and any room into an airy oasis.

The original straw and wicker trendsetter is Jane Birkin, circa 1974 with her iconic basket bag but the upcoming trendsetter is you, circa now. So gather your looms and weaving materials, and come on a straw studded journey through this summer’s latest craze.

FRANCE – FEBRUARY 08: Jane Birkin Posing With Her Little 10 Month Old Daughter On The Boardwalk In Nice On September 9, 1972. The 28 Year Old Actress Was Then On The Set Of The Film Trop Jolies Pour Etre Honnetes, Directed By Roger Balducci. (Photo by Keystone-France/Gamma-Keystone via Getty Images)

First up, straw hats and bags with inspired verbiage like “do not disturb”, “beach please”, “out of office” and more. The large, script, playful letters in contrasting blues and reds make this style really pop and come to life. It’s great when your accessory can speak for you with a little message and it’s a whimsical look perfect for the beach or pool. 

Eugenia Kim’s Hats are so adorable (and so DIY-able) (Source)

In the home décor world, we have outdoor woven furniture. Rattan and wicker has returned and natural furniture pieces are making a comeback. Whether the piece is retro or modern, designers are foregoing all things heavy and dark for a refined “back to nature” look.

(Source)

This summer, drop your leather bags and hardwood and opt to accessorize with your new favorite materials.  The look may have started with the Scandinavians but it ends here with you.

DIY: Multicolor Lettered Clutch

I’m sure you’ve seen the graphic clutches on the runway the last couple of seasons, with everything from patches to embroidered letters. Now you can make your own.

Watch the video to see how to make it and scroll down for more detailed instructions.


What you’ll need:

A Clutch/ Flat bag

Markers

Iron On Letters like these

Iron

Tip: Use a teflon sheet or cotton cloth to cover the letters when you iron them.

Step 1: Color in the letters. This step is optional. I just wanted something more personalized. You can even dye them for a more uniform color.

Step 2: Place the letters how you want them.

Step 3: Covering the letters with a cotton cloth or teflon sheet, iron in sections, holding the iron down for 20 seconds at a time. Repeat if necessary.

Go on now, flaunt your new clutch.

DIY: Lettered Sweatshirt

Want an easy way to embroider words onto your sweatshirt or t shirt? Just use iron on chenille letters like we did. It’s an easy and fun way to make matching sweatshirts for an event or bachelorette. Watch this video to see how you make your own and scroll down for more detailed instructions.

Here’s what you’ll need: 

Sweatshirt (or whatever you’re ironing on – cotton works best)

Iron-On Chenille Letters – We used These

Iron-On Chenille Symbols – Like These

An Iron

Tip: We recommend also using a teflon sheet or a thin cotton fabric to cover the letters while ironing.

Step 1: Place the letters how you want them on the sweatshirt.


Step 2: Cover the letters with the teflon sheet or fabric and Iron over it, pressing down on each section for about 20 seconds. Repeat if necessary.

Step 3: Reverse the sweatshirt and iron on the back of where the letters are.

That’s it, you’re done!

DIY: Faux Leather Keychain for Dad

Shopping for dad can be quite the task but we have a DIY that’ll make your life easier. It’s the perfect father’s day gift – stylish yet functional. This minimal keychain will be your dad’s new favorite accessory.

Here’s what you’ll need:

Vinyl Trim like this one

Screw on Studs like these

A keyring

Scissors

Step 1: Cut the vinyl trim to the length you want your keychain to be x 2. For example if I want the keychain to be 4 inches long I’m going to cut 8 inches.

Step 2: I wanted to add a point at the end of the key chain so I cut off 0.75 inch at a 45 degree angle.

y

Step 3: I then placed the key ring inside the folded trim and made a hole at the center of the ring.

Step 4: Push the screen into the hole and screw the stud on from the other side.

Step 5: Pull the ring back down and make a hole on the other side of it. Repeat the stud inserting process.

You can experiment with different styles with the same tools.

Now steal your dad’s keys and surprise him with his brand new key chain.