Category: DIY

DIY: Rope Basket

I know this DIY’s been making the rounds for a while now and I wanted to jump in and try one myself. I did want to put a spin on it by using different types of ropes so I get different textures instead of sticking to cotton rope. Check out these easy steps to make your own rope basket.

What you’ll need:
  • Rope (I used this one and used about 15 yards)
  • Glue Gun (and at least 10 glue sticks)
  • Spray Paint (optional)
  • A shape to mold your basket around. Something uniform in shape or tapering to the bottom works best. I use this lampshade I had lying around
  • Tape

1

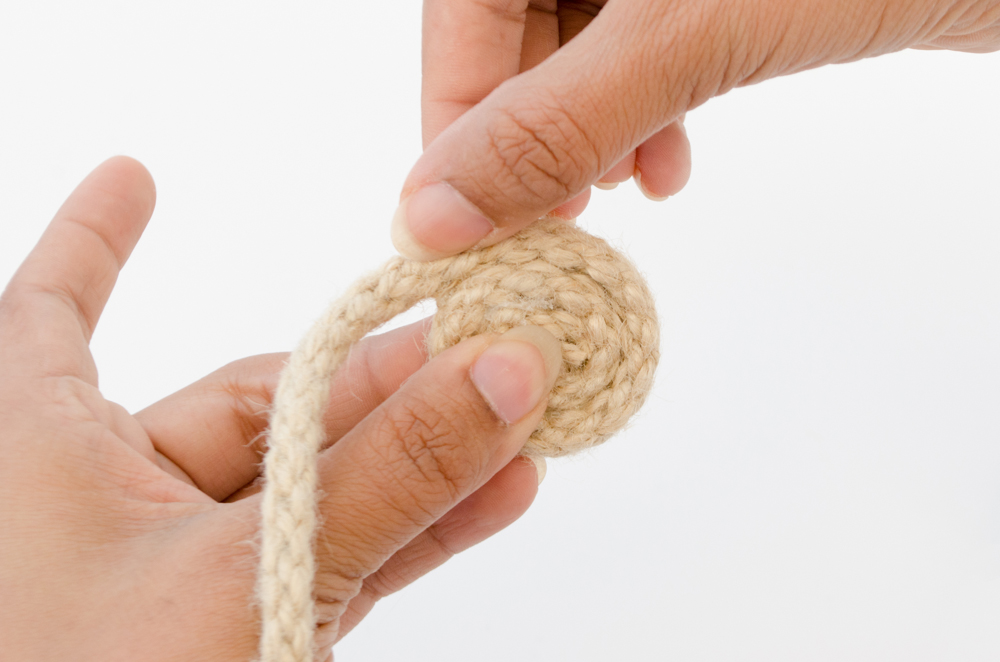
It’s important to know what shape you’re going to end up with. In my case, my lamp shade which I’m using as a base, is round. So I glue the rope on itself with the smallest turn.

If I was making a rectangular basket my first turn would be long.

2

You then have to keep adding a thing line of glue and wrapping the rope around the first turn. Keep doing this till you finish the bottom of your basket.

3

Once you reach the size you want, place the lamp shade or whatever base you’re using over it and make sure the bottom is one turn bigger than the bottom of the lamp. You then start applying glue on top the rope instead of the side and start wrapping it around the lamp.

Keep in mind you’re not gluing the rope TO the lamp shade. You’re just using it as a shape to mold your basket around.

4

Let it cool for a couple of minutes and take the basket out.
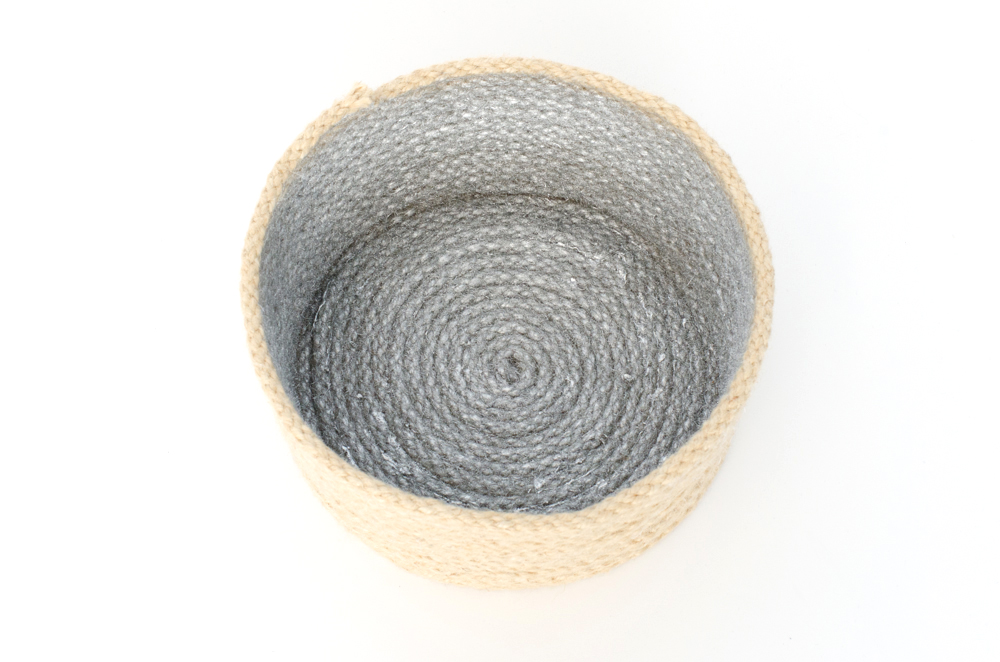
5

This step is optional.

I taped the top edge of the basket and added two coats of silver metallic spray paint. Make sure you do this in a well ventilated area and wear a mask to protect yourself.

DIY: Rhinestone Bling Shorts

Can you take a pair of casual shorts and turn them into a hot little number for a night out? You absolutely can, and should. These cute little rhinestone buttons add the perfect amount of bling to a plain pair of shorts. Check out the video below to see how to make them and scroll down for more details:

What you’ll need:

A pair of shorts

Rhinestone buttons like these (make sure you select 14mm Crystal/Silver)

Needle and Thread

Tailor’s chalk

1

Using tailor’s chalk, mark where you want the buttons. I spaced them out about 3 inches or so in an alternating pattern.

2

With a needle and thread sew the buttons on using the shank in the bank.

3

Repeat step 2 wherever you’ve marked a spot with the chalk.

That’s it!


DIY: Floral Patched Shorts

Summer = Flowers

Summer = Shorts

So Shorts = Flowers!

That’s the formula for this super simple floral patched shorts that will make your summer outfit stand out, whether you’re at the beach or on a night out. Check out the video below to see how to make them and scroll down for more information:

Here’s what you’ll need:

A pair of shorts

Iron On Floral Patches like these

Scissors

Iron

1

I wanted to cut the patches so I can place half inside the pocket and half along the pocket. This is totally optional. You can get creative with this step by mixing in other patches or putting it on the back pocket instead.

2

Place the patch where you want it and using a teflon sheet or a thin cotton cloth (to protect the patch) press and hold down the iron (heat on high, no steam) for 20 seconds. Repeat if necessary.

3

Guess what? That’s it. Simplest formula and simplest DIY ever!

DIY: Lace Denim Shorts

Lace and denim just seem to go hand in hand don’t they? I personally think it’s girly in the nicest way. Check out how you can make these adorable shorts to complete your summer attire. Check out the video below to see how to make them and scroll down for more information:

Here’s what you’ll need:

A pair of denim shorts

Lace like these

Thread and Needles

1

Before I started, I cut two inches off the bottom of the shorts. I did this to accommodate the extra length the lace was going to add. This is optional but odd lengths on shorts can be extremely unflattering so I would suggest doing it.

2

I then started sewing the lacy about three inches in. I made small stitched every half inch or so along the top of the lace. I started and ended at the inner seam for a clean finish.

3

You need to around the whole leg and then repeat it with the other side.

That’s it!


DIY: 3 Ways to Use Frames In Your Dorm Room

One of the most versatile things you can find is a frame. You probably already have plenty lying around or you can get them for a couple of bucks at ikea or if you’re adventurous you can find them at yard sales or thrift stores. I put together 3 ways you can use a frame in your dorm decor but this is just a starting point for you guys to come up with your own unique ideas.

LACE DRY ERASE BOARD

This one is super simple and quite useful. You can hang it on your wall and write yourself a note or on the outside of your dorm door for people to leave you messages when you’re out.

Here’s what you need:

A frame with glass

Cardstock (thick paper) in a light color

Wide lace like this one

Scissors

1

Take the backing out of the frame and lay it on the cardstock. I used a corner so I would only have to cut two sides.

2

Using a pencil trace around the board and cut out the resulting rectangle.

3

I used this Chantilly lace which was wide enough for a 11 x 14 frame with some extra. With the glass in the frame (facing down), place the lace and then the cardstock on top. Then carefully insert the backing to hold everything in place.

And that’s it. Now get your self some dry erase markers and make a to do list.

TRIMMED POLAROID HANGER

With Instax and other companies making affordable polaroid cameras, polaroids are a nice way to collect memories and document your travels. What you need is a cute frame where you can hang up your awesome polaroids.

Here’s what you need:

A frame

Braided trims in 2 colors (more or less, depending on the size of your frame.

This Rococo trim

Scissors

A Glue Gun

Clips to hang your polaroids

1

Measure the trim to fit from side to side of the frame and cut all of them equally.

2

Apply a small amount of glue to the right side of the trim and attach to one side. Let it dry for a minute. Then, pulling it tight, add glue the other end to the other side. Be careful with the hot glue though!

3

Repeat with the other two trims and you’re done.

Hang up your polaroids and show them off!

Velvet Ribbon Art

Want a sophisticated and tactile piece of art for your dorm room that’s not going to break the bank? I have just the idea for you. All you need to do is figure out your color scheme and then just play with the different velvet trims in different widths till you like the layout. You can see the one I made for some inspiration:

What you’ll need:

A frame

Velvet ribbon in various colors

This adorable velvet daisy trim

Tape

1

I used half a yard for each of the strips for a 14″ tall frame. Measure the inside area of the frame and add 4 inches to that measurement to know how much you’ll need for each strip.

2

Starting with one side start taping the ribbon taut onto the backing of the frame. I did it directly on the backing because it’s sturdy and won’t bend when I pull it tight.

3

Keep going, experimenting with different widths that you can change by overlaying the ribbon differently.Add the daisy trim in between for some dimension. The back is going to look messy with all the tape so if you want a cleaner more permanent solution use a glue gun and glue all the ribbon evenly.

And that’s it. Pop the backing back into the frame and hang your art up. 

DIY: Multicolor Lettered Clutch

I’m sure you’ve seen the graphic clutches on the runway the last couple of seasons, with everything from patches to embroidered letters. Now you can make your own.

Watch the video to see how to make it and scroll down for more detailed instructions.


What you’ll need:

A Clutch/ Flat bag

Markers

Iron On Letters like these

Iron

Tip: Use a teflon sheet or cotton cloth to cover the letters when you iron them.

Step 1: Color in the letters. This step is optional. I just wanted something more personalized. You can even dye them for a more uniform color.

Step 2: Place the letters how you want them.

Step 3: Covering the letters with a cotton cloth or teflon sheet, iron in sections, holding the iron down for 20 seconds at a time. Repeat if necessary.

Go on now, flaunt your new clutch.

DIY: Lettered Sweatshirt

Want an easy way to embroider words onto your sweatshirt or t shirt? Just use iron on chenille letters like we did. It’s an easy and fun way to make matching sweatshirts for an event or bachelorette. Watch this video to see how you make your own and scroll down for more detailed instructions.

Here’s what you’ll need: 

Sweatshirt (or whatever you’re ironing on – cotton works best)

Iron-On Chenille Letters – We used These

Iron-On Chenille Symbols – Like These

An Iron

Tip: We recommend also using a teflon sheet or a thin cotton fabric to cover the letters while ironing.

Step 1: Place the letters how you want them on the sweatshirt.


Step 2: Cover the letters with the teflon sheet or fabric and Iron over it, pressing down on each section for about 20 seconds. Repeat if necessary.

Step 3: Reverse the sweatshirt and iron on the back of where the letters are.

That’s it, you’re done!

DIY: Monogrammed Pet Bed/Pillow

Here’s a DIY for the great loves of our lives, the little puppers and kitties. We think they deserve a nice monogrammed bed or pillow. Watch the video to see how to make it and scroll down for more detailed instructions.

What you’ll need:

Dog bed/pillow

Iron On Letters like these

Iron

Tip: Use a teflon sheet or cotton cloth to cover the letters when you iron them.

Step 1: Place the letters where you want them.

Step 2: Covering the letters with a cotton cloth or teflon sheet, iron in sections, holding the iron down for 20 seconds at a time. Repeat if necessary.

That’s it, you’re done! Your little fur ball is going to feel like royalty on this new pillow.

Make sure the fabric your ironing on can take the prolonged heat. Check care instructions.

DIY: Faux Leather Keychain for Dad

Shopping for dad can be quite the task but we have a DIY that’ll make your life easier. It’s the perfect father’s day gift – stylish yet functional. This minimal keychain will be your dad’s new favorite accessory.

Here’s what you’ll need:

Vinyl Trim like this one

Screw on Studs like these

A keyring

Scissors

Step 1: Cut the vinyl trim to the length you want your keychain to be x 2. For example if I want the keychain to be 4 inches long I’m going to cut 8 inches.

Step 2: I wanted to add a point at the end of the key chain so I cut off 0.75 inch at a 45 degree angle.

y

Step 3: I then placed the key ring inside the folded trim and made a hole at the center of the ring.

Step 4: Push the screen into the hole and screw the stud on from the other side.

Step 5: Pull the ring back down and make a hole on the other side of it. Repeat the stud inserting process.

You can experiment with different styles with the same tools.

Now steal your dad’s keys and surprise him with his brand new key chain.

DIY: Floral Patched Jeans

Seems like patches are everywhere since spring of last year. And they don’t look like they’re going anywhere. One of the more popular incarnations of this trend are the floral patched jeans. Watch this video to see how you make your own and scroll down for more detailed instructions.

What you’ll need:

A Pair of Jeans

Iron On Flower Patches – We used this, this* and this

Iron

You can also keep a cotton cloth handy for using over the patches while you iron.

Step 1: Place the patches where you want them. It might help to wear the jeans and mark the spot where you want the patches to finally be.

Step 2: Using an iron on its hottest setting, press down on each patch for 20 seconds at a time. Repeat if necessary. Using a cotton cloth over the patches while you iron will protect your jeans and your patches. Do not use steam for this step. Repeat on the other leg.

Tip: Let the glue cool before moving your jeans around or wearing them.

That’s it. You’re done!


*This item is currently unavailable. Check out our full selection of floral patches.