Category: Bridal

The Perfect Wedding Cake

Besides deciding on the flavor of your cake, most brides and grooms are also concern about the appearance of the cake itself.  After all, it’s one of the most important part of your wedding day and your first anniversary.  Leave the flavor of the cake to your taste bud because I’m pretty sure you’ll know what you like.  As for the adornment of the cake, that’s the important part.  Of course you want something memorable and matches the theme of your wedding.  This can easily be done by using satin ribbons and Swarovski rhinestones.Just use colors that best matches your theme.    For instance, the cake above used 5/8″ and 7/8″ satin ribbon in baby blue and black.  The flowers on the cake were also embellished with Swarovski flatbacks.  Who would have thought that ribbons and crystals can make a big difference on a cake that leave memories of a lifetime. 

You can also use crystal sprays on top of the cake.   If you’re really like to customize your cake, you can add a personalized printed ribbon.  It can have your names and the wedding date on it.  Then embellish it with some rhinestones. 

DIY Bridesmaid's Dress

By Kristin

kristin_blog1

As many of my loyal blog readers can tell, I’m a pretty crafty person. Some of you may not know I’m an avid seamstress too. For this week’s blog I decided to make a Bridesmaid’s dress and embellish it with items from M&J. Granted, my best friend isn’t using purple in her wedding.   My Sister-in-law probably won’t either, but at least I made a pretty little dress I can wear again. You don’t even need to make the dress, you can buy something simple off the rack and go from there.  It’s a more cost effective (and more custom) alternative to Box Store Bridesmaids’ dresses.
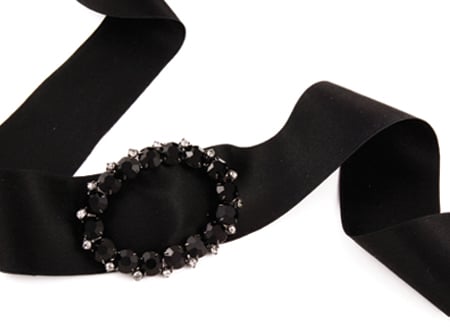
I used McCalls #4460, view C. For the dress I used a Purple/White cross woven Silk Dupioni. Not shown is the black tulle along the bottom.  You could even use a jazzy black lace along the hem instead! I used a 24mm Silk Satin Ribbon in Black for the belt, and Rhinestone Buckle #32367 in Jet/Black Diamond/Gunmetal.  The top of the dress is edged in the 15mm Black Organdy Ribbon with a 9mm Black Silk Satin placed in the middle. I simply used Unique Stitch glue on the ribbons and it holds really well.

kristin_blog2
If you want to take a store bought dress and embellish it, pick a simple dress with very little details already on it. You can add a ribbon belt as I have, use a beaded trim around the top or on the waist, add Sew on Rhinestones or use a silk flower.

Bridal Headband

By Kristin

bride_headband_1

bride_headband_2

Winter is here in NYC and the air is cold.  I can start to see the sign of snow and I was inspired by this.  I noticed while looking at bridal head wear that headbands made of luxurious ribbons are very much ‘In’.  Taking a cue from Milton’s headband blog, I went a little more bridal with mine.  For the winter bride I used a white Silk Satin Ribbon and a Snow Flake beaded and rhinestone appliqué.

 First, I tied a bow about 1/3 of the way into the ribbon.  Then I applied the appliqué over the middle of the bow using Unique Stitch glue.  You can use any style and omit the bow if you wish.  You can even take 3 sections and braid them together to create a unique look.  To finish the headband, simply follow Milton’s instructions.

Bridal Wedding Veil

By Kristin

veil_full

The tradition of the veil on a bride has many back-stories.  Some say it started in ancient Rome to confuse the evil spirits who may try to steal her away from the groom.  Some say it was to disguise the bride before the wedding of an arranged marriage, this way if he saw something he didn’t like he wouldn’t run away.  It is also said that the lifting of the blusher veil is so the groom knows he is marrying the right woman.  There are so many variations on the story, but today the veil is more an accessory to the gown.

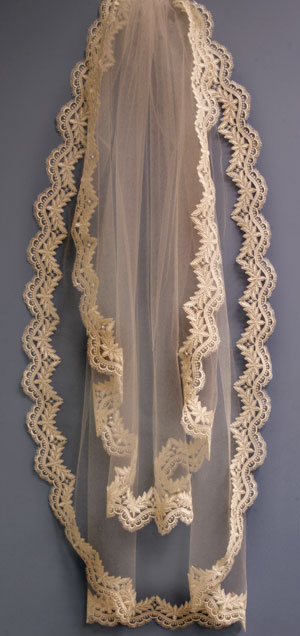
 My best friend recently got engaged and has put me in charge of making her wedding gown and veil.  As her Maid-of-Honor it is my duty to see what would look best on her and work with her taste.  I know she likes lace, being a pretty traditional girl, so that’s what I went with.  Looking in various bridal stores I noticed how expensive beautiful lace edged veils can be!  They can be anywhere as much as $300 on up!  So I’m going to describe how I made a beautiful antique looking lace veil that my friend could use on her big day without the big price tag.

 veil_detail

Materials Used:

Note: I chose a length a little longer than the fingertip.  It is double layered with the top layer being about 8″ shorter than the under-layer.  Choose a length that works for you, I’m going to give directions for fingertip length though. 


Directions:

  1. Measure the length from where you want the veil to start, to your knee.
  2. Fold the tulle in half and use the folded edge as the top of the veil (where the comb will be sewn).  Fold this piece in half length wise.  From the top of the folded edge (comb edge) measure the length you used for the head to knee.
  3. Mark with pins a quarter oval.  Make it a little wider at the top than the bottom to give it a more full look.  When you are happy with the shape, cut it out.
  4. Unfold the piece (leave the top and bottom layers folded together) so you now have a half oval shape.  Take the top layer and mark with pins about 8″-10″ up from the edge.  Cut it shorter but still keep the shape of the bottom layer.
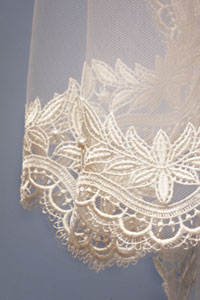
  5. Now the fun begins, you get to glue on the lace!  This will take patience and time, it cannot be rushed!  You can also opt to sew the lace on with a machine.  Line the edge of the scallop up with the edge of the tulle and pin in place if sewing, pin it as you glue otherwise.
  6. Once you have the lace attached (and it has dried overnight) you can set the pearls or rhinestones (or both if you so choose).
  7. If you used a scalloped edge lace as I have, be sure to cut the excess tulle from the scallops for a cleaner look.

 The nice thing about the veil is that you can choose to use lace as I did here, leave the tulle plain (like I did for my own wedding), use rattail cord (1mm or 2mm), beaded trims, or a thin ribbon edge.  You can personalize your veil to match your dress and it won’t cost a fortune.

Unity Candles

By Kristin

 candle

My husband and I were originally not going to use unity candles, but I thought it would be a nice thing to incorporate into our short ceremony.  Unity candles are used to represent the love of the two families for the Bride and Groom coming together as one happy family.  Usually there are two taper candles and one pillar.  The parents of the bride and groom light the tapers and in turn the bride and groom light the pillar candle with the tapers making the union complete. 

I used a pretty taffeta ribbon that has a great sheen to it and accented with a coordinating rhinestone button.  You can pick any ribbon/button combo you like, I just happen to love purple colors, so that’s what I used here.

Note:  Before you look into having a unity candle, be sure to ask your venue if you can have live flames from candles.  Some places will not allow them.


Materials Used:

 Tools:

 Direction

Wrap the ribbon around the pillar candle and tie into a bow.  Sew the rhinestone button to the middle of the knot.  The same technique can be used for the taper candles as well, the rhinestone button can be left off the tapers and just a simple small bow tied towards the bottom.

Flower Girl Dress & Basket

By Kristin

Using silk ribbons, it’s so easy to match the flower girl’s dress to the flower basket.  Rhinestone buttons can be added to give it that extra elegant finish.  This is a great idea for brides who are looking for something easy yet still beautiful for her flower girl.  You can choose silk ribbon colors that match with your wedding theme.  All you have to do is tie the bow onto the dress and stitch the ribbon onto the wedding basket.  Then finish it off with a glistening Swarovski rhinestone button and you’re all finish.

Updated Bridal Center


M&J Trimming had recently updated our new Bridal Center.  It took a while, but it’s finally finished and ready for all brides-to-be and wedding planners.  On the right side, you’ll noticed that there are a few clickable links to some of the most popular merchandise for weddings.  They are often used for decorations, bridal gowns, invitations and more.  In the center, the images change and if you click on them, they’ll take you to the most current inspriation for themed weddings.  You can also access the blog from this center.  The left side are merchandise that completes every perfect wedding.  We have swarovski crystals that are often used on bridal gowns and accessories.  Our laces are the most popurlar for veils.  Of course last by not lease, our personalized custom ribbons help accessorize all favors and decor.  If there’s something you don’t see and have questions about, you can also call our bridal expert at 1.800.965.8746 ext. 377. 


Cake Jewelry

By Kristin


Cake jewelry is a popular item that Brides call me for daily.  Although M&J Trimming don’t sell premade cake jewelry, you can easily use M&J products to create your own custom look.  When I was browsing through M&J for ideas for the blog, I noticed these gorgeous crystal spray and pearl sprays.  I was inspired immediately! 

Take the sprays and arrange them so the stems are all lined up and the sprays create nice large flower look.  Tape the top, middle, and bottom to secure for wiring.  Take a piece of beading wire and wrap it (starting at the top) around the stems until you reach the bottom, clip the excess wire.  You can then simply place the new large stem directly into the cake.

Another way to do it is to take one stem, surround it with 4 stems positioned slightly lower (by 1″), position the remaining 7 stems around those 4 another inch lower.  Tape and wrap the same way as before.  This will create a tiered firework effect with the sprays.

If you want a fuller look, try 2 or even 3 packs of sprays.  You can also mix the rhinestone sprays with the pearl sprays for a multi-textured look.  Rhinestone buttons can be added to the tiers with ribbon to carry the cake topper look to the rest of the cake.

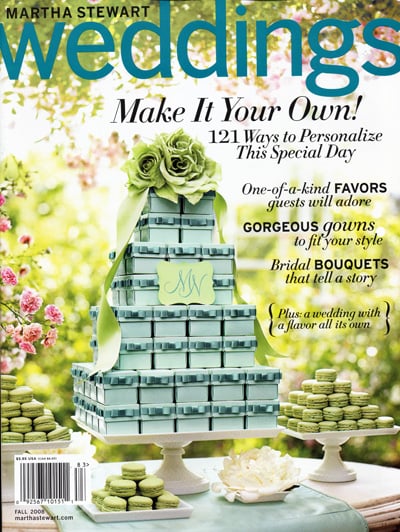
M&J Trimming Featured In Martha Stewart Wedding Fall 2008


Silk flower and midori ribbon featured in Martha Stewart Wedding Fall 2008

Silk Rose (Left):  Sea Foam #31907

Silk Rose (Right):  Sage Green #31905

Midori Double Fact Satin Ribbon:  Sea Foam #37307


23MM MESH TUBE RIBBON #36878.  Call 1.800.9.MJTRIM to order or for more information on availabe colors.

White Pearls #11825


16MM Imported Double Face Satin Box Pleated # 33564