
![]()
Cathy Attix is the creator of Trinkets in Bloom, a fashion DIY blog with an eye for design and creative expression. Her DIY’s are inspired by runway fashion, street style and vintage finds. She brings more than fifteen years of fashion industry experience to her creations and a lifetime of creativity and experience to her tutorials.
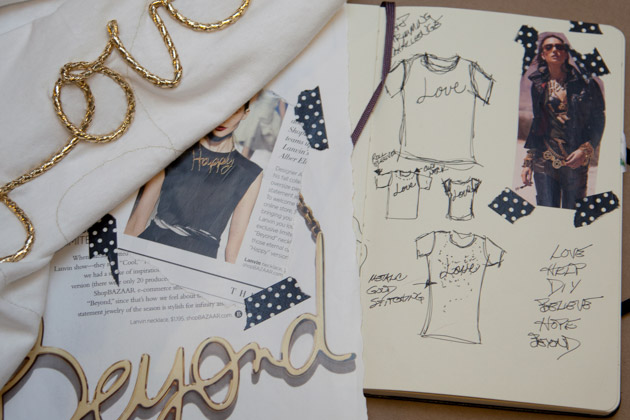
DIY T-SHIRT WITH LOVE IN GOLD CORD
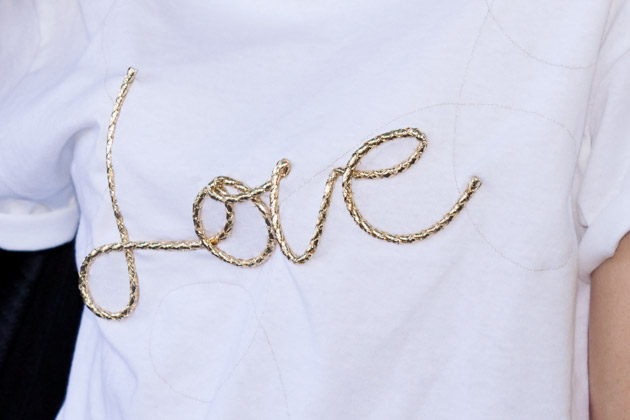
Inspired by the Lanvin word necklaces for fall, this DIY T-Shirt with Love in Gold Cord is sure to be a great addition to your wardrobe. The delicate gold stitching in the background adds subtle detail and extra sparkle.

My inspiration and sketches to make this DIY T-shirt.
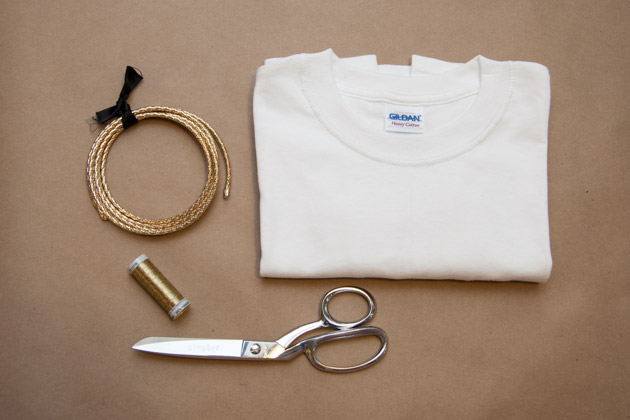
TOOLS & MATERIALS:
- Gold cord
- T-Shirt
- Gold metallic thread
- Sewing needle
- Sewing machine
- Scissors
- Flexible curve
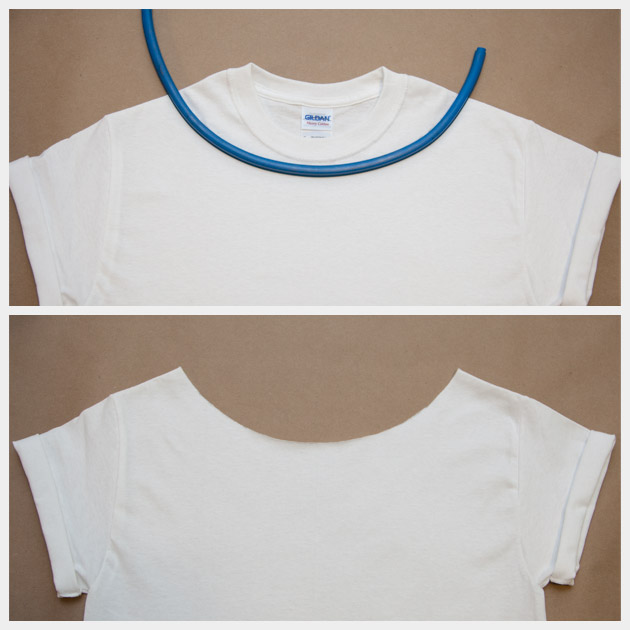
step 1Layout your t-shirt on a flat surface and decide how you will cut your neck.
I used a flexible curve to help me get the right curve to cut my neckline.
Trace your curve with a pencil. When you are sure you have it the way you want it use your scissors to cut your neckline.
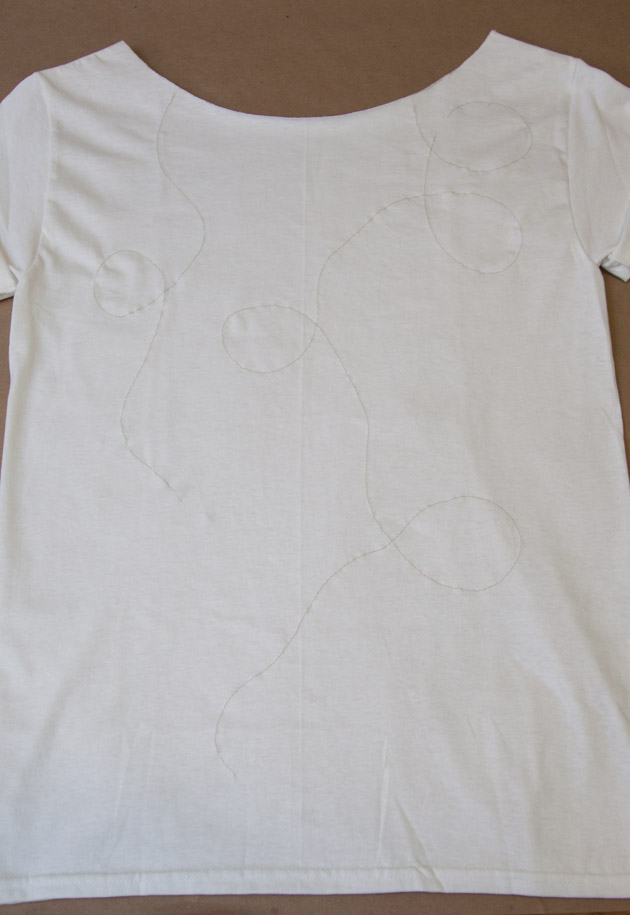
step 2Thread your gold metallic thread through your sewing machine.
Using your sewing machine, sew some swirls and curves onto your t-shirt.
You can do this freehand or lightly draw the shapes you want onto your t-shirt and follow those lines when sewing.
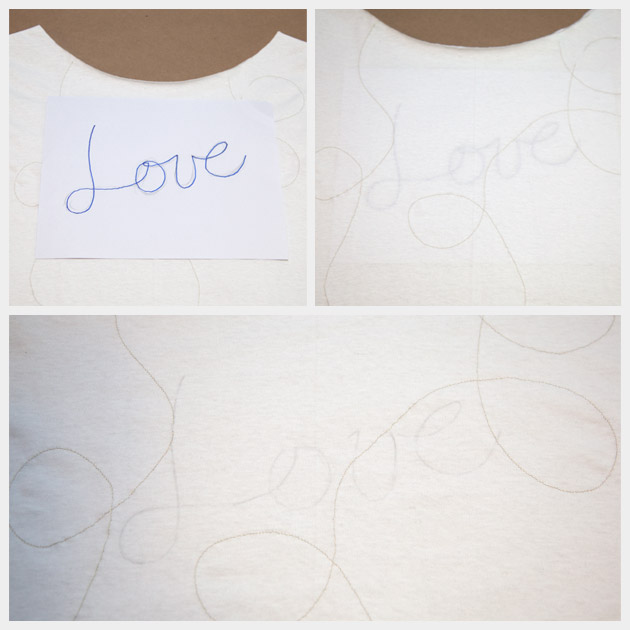
step 3I chose to write the word love on my t-shirt.
I drew it out on a piece of paper and then placed the piece of paper inside the t-shirt and traced it onto the shirt.
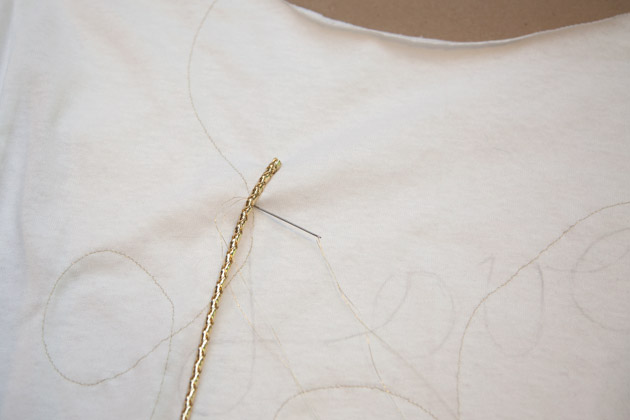
step 4Use your sewing needle and your gold metallic thread to carefully and securely sew your gold cord onto your t-shirt, following your design.
The cord is a little stiff, so it is important to make sure you sew it on securely and firmly.
Continue sewing your gold cord onto your t-shirt until you have completed your word.

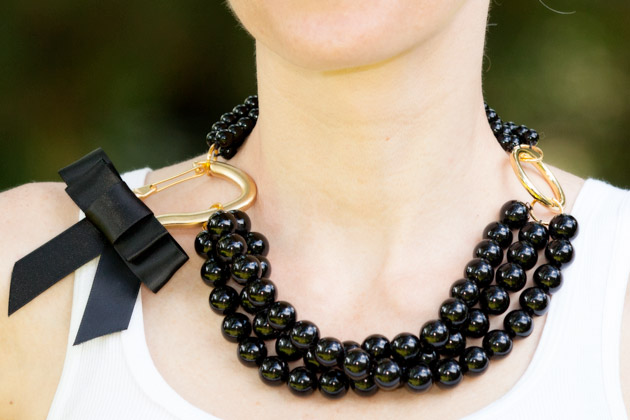
DIY BEADED NECKLACE WITH LARGE GOLD CLASP
Using a large gold clasp as a closure for this chunky beaded necklace creates a stunning statement necklace in this DIY Beaded Necklace with Large Gold Clasp.

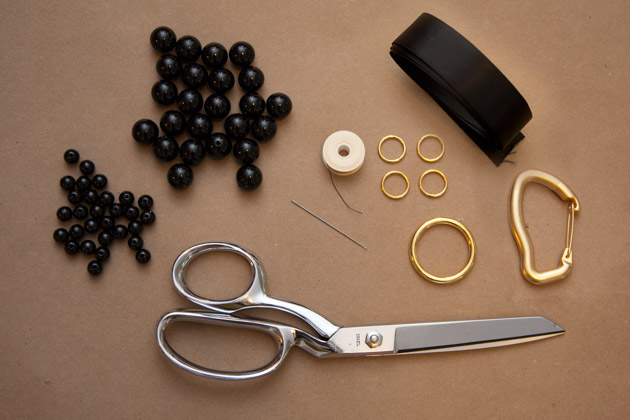
TOOLS & MATERIALS:
- Large Gold Clasp
- Large gold ring
- Large black beads
- Small black beads
- Needle and thread
- Black satin ribbon 1 inch wide
- Fabric glue
- 4 Large gold jump rings
- Pliers
step 1Using your pliers open two of your large jump rings and add them to your gold ring.
step 2Using your needle and thread, attach the end of your thread to one of the jump rings. Use a small drop of fabric glue to secure your thread.
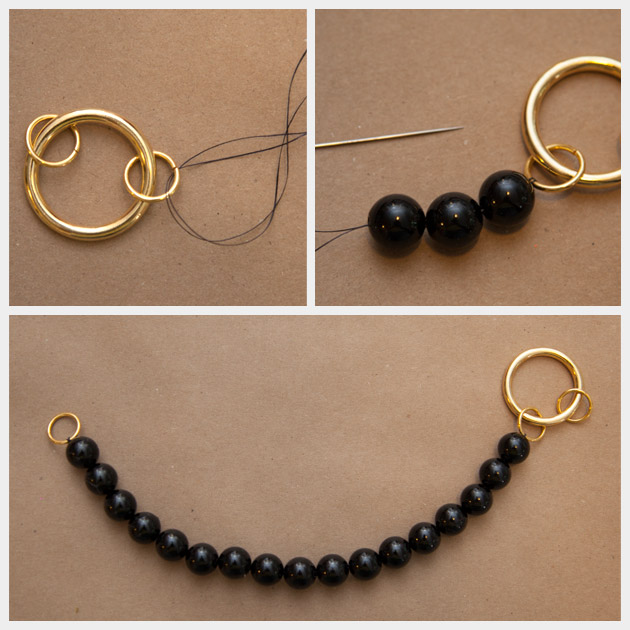
step 3Start threading your beads onto your thread.
I put 17 large beads onto my thread.
When you have all your beads onto your thread tie off your thread around another jump ring.
Make sure to tie it really well and add a small drop of fabric glue to hold it.
For my strands of large beads I made two strands with 17 beads and then the center strand has 18 beads. This just helps it to lay nicer.
step 4Thread your smaller beads the same way you did with the larger beads.
For my strands of smaller beads I used 23 beads for each strand.

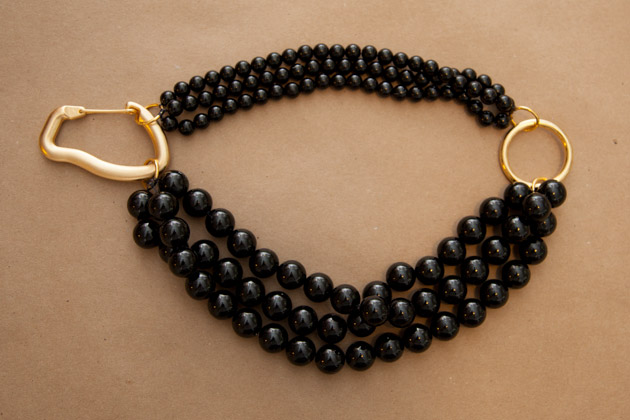
step 5Attach your two large jump rings to your large gold clasp by threading them through the opening.
step 6Making your bow.
Fold your ribbon until you have made two loops about 3 inches wide.
Using your needle and thread sew your ribbons together.
Fold your ribbon again just like you did for the first part of your bow but a little smaller, this one will sit on top of your first one.
Sew this ribbon onto the first part you made.
Take a piece of ribbon and fold it around the looped ribbon and tack it in place. Do not sew all the way through, only sew on the back side.
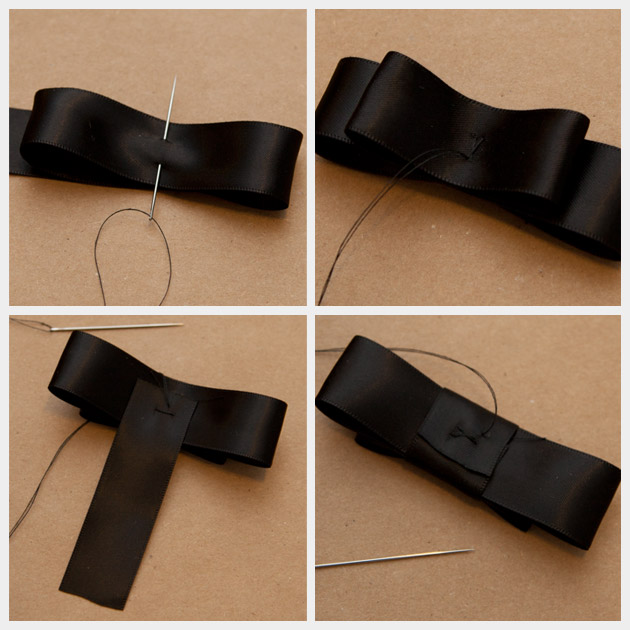
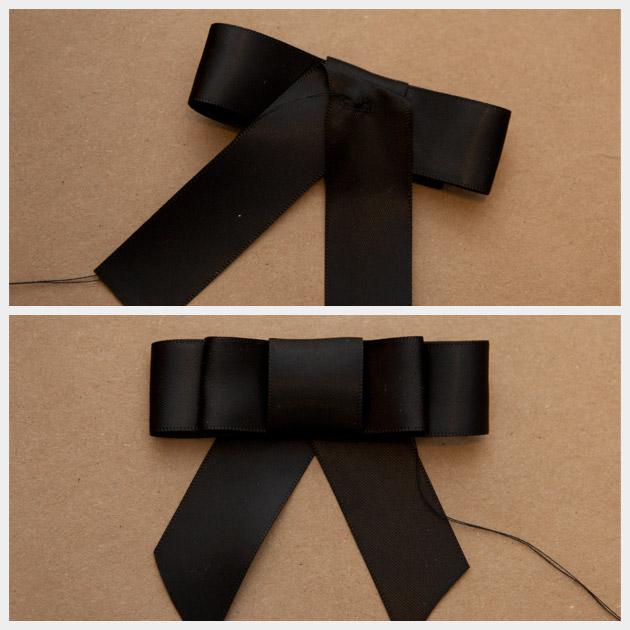
Take another piece of ribbon and fold it at an angle and tack it to the back side of your bow.
Trim the ends at an angle.
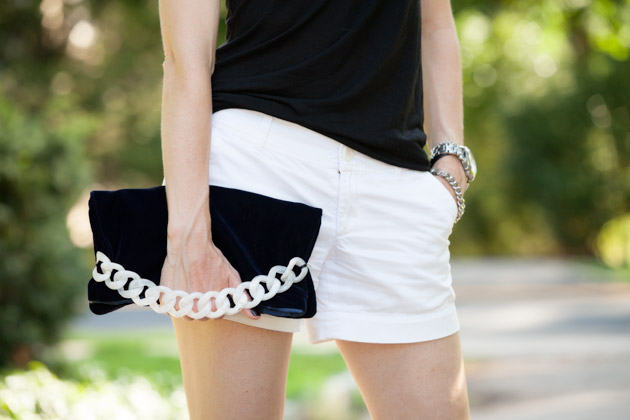
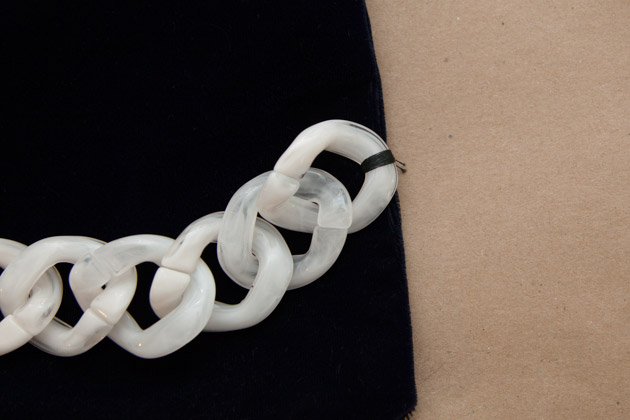
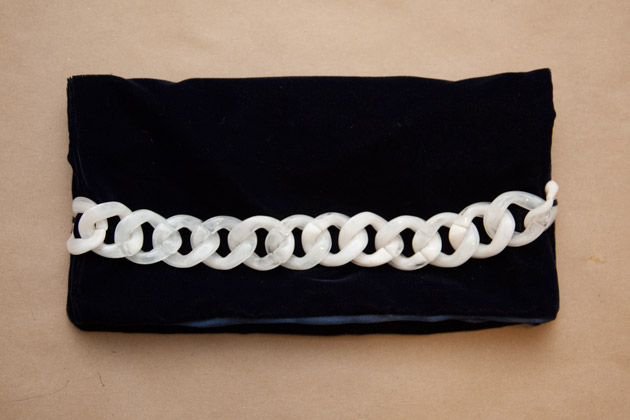
DIY CLUTCH WITH PLASTIC CHAIN HANDLE
The combination of plastic chain with soft velvet make this DIY Clutch with Plastic Chain Handle a unique and on trend, elegant clutch.
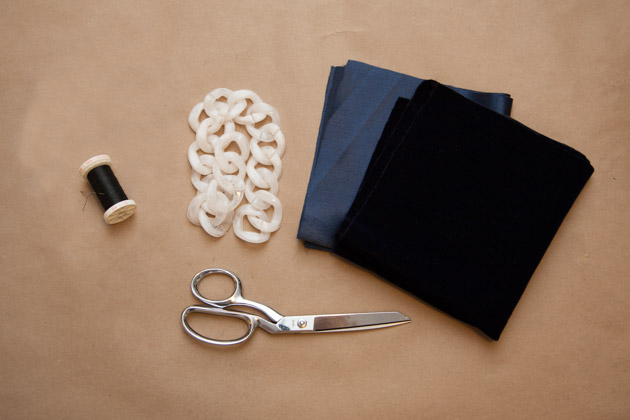
TOOLS & MATERIALS:
- Large Plastic Chain
- Velvet fabric
- Satin fabric
- Needle & thread
- Sewing machine
- Pins
- Scissors
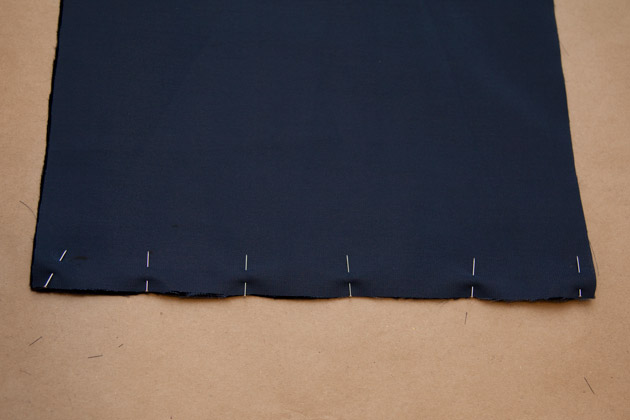
step 1I recommend making a pattern with paper to cut your fabric. (I used newspaper)
I made my fabric 13 inches by 14 inches.
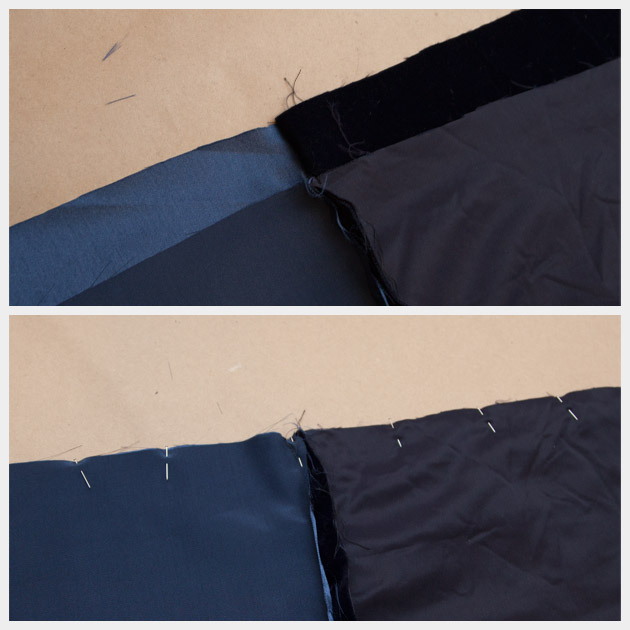
Cut out 2 pieces of velvet and 2 pieces of satin the same size.
step 2Pin 1 piece of velvet to 1 piece of satin (with right sides together) and pin together across the top one of the shorter sides.
Using your sewing machine sew across the top of your fabrics. When you are sewing be sure to leave about a half inch unsewn on either side.
Do this for both pieces of velvet and satin.
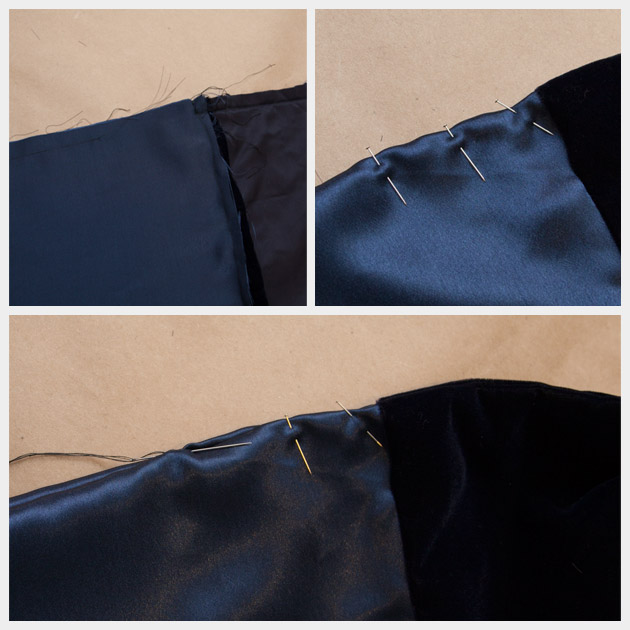
step 3Flatten your fabrics out and place the velvets on top of the velvet and the satin on top of the satin (with right sides together).
Pin them together all the way around, leaving about a 3 to 4 inch opening to turn it right side out.
step 4Using your sewing machine sew all the way around leaving a 3 to 4 inch opening.
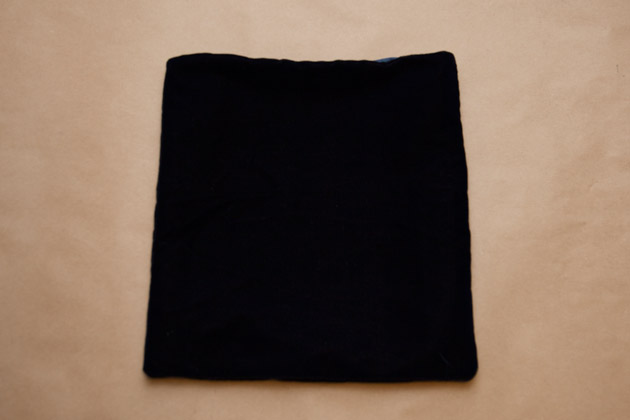
step 5Turn your fabrics right side out.
Pin the opening closed and using your needle and thread, sew the opening closed.
Fold the satin sides into the velvet.
step 6Lay your plastic chain across the width of your clutch.
Measure where you want it to be.
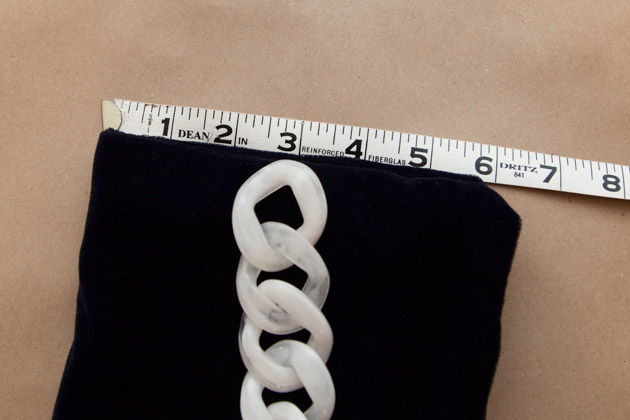
If necessary remove a link or two of your plastic chain to make it fit across your clutch.
Using your needle and thread sew your plastic chain on either end of your clutch, sew your chain close to the bottom of your clutch.
When your chain is sewn on you will fold the top part of your clutch over and through your chain.
Make sure you sew it enough times to make it secure. Do this for both sides.

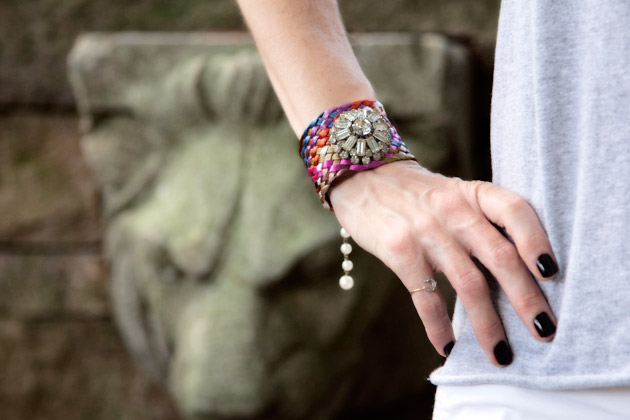
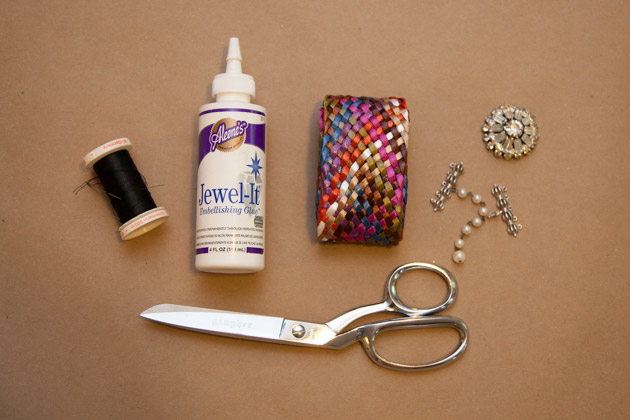
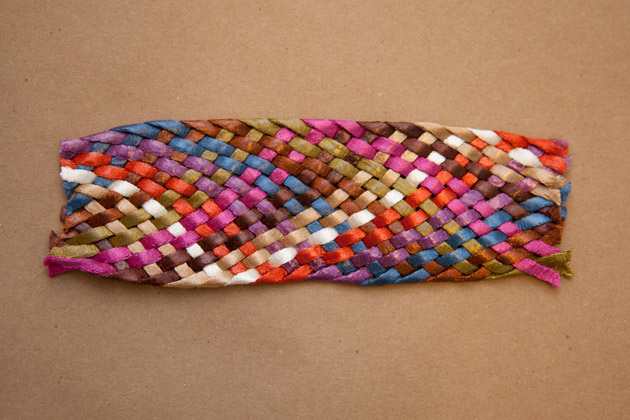
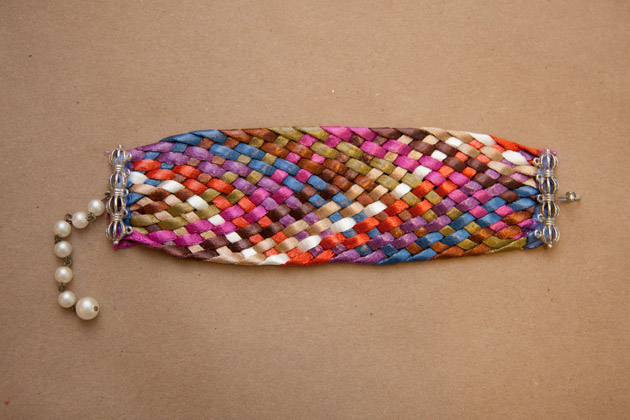
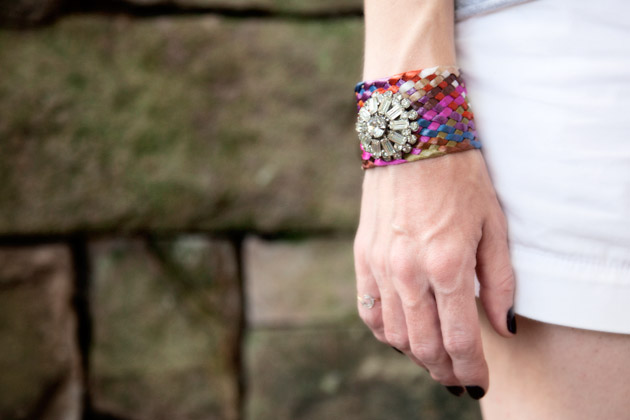
DIY CUFF BRACELET WITH BROOCH
A few unexpected details and a bright and colorful woven band create this fun DIY Cuff Bracelet with Brooch. The combination of a soft woven band with a vintage brooch makes this a real statement bracelet.
TOOLS & MATERIALS:
- Multi color woven band
- Vintage necklace closure
- Brooch
- Glue
- Needle & thread
step 1Cut your multi color woven band to be a little shorter than needed to wrap around your wrist. Keep in mind that your closure will add length to your bracelet and you don’t want it to be too big.
step 2Put glue along the edge of your woven band and place your closure on top of the glue.
Let dry.
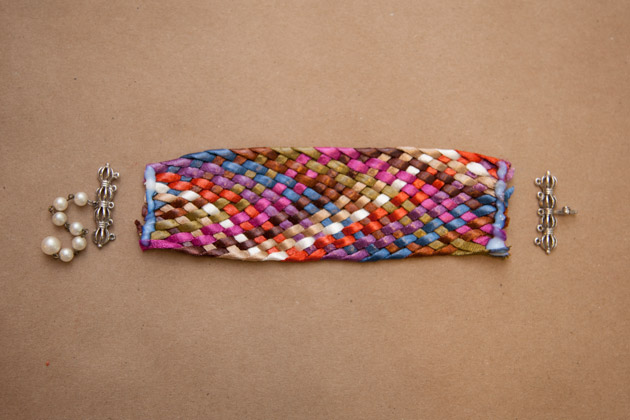
step 3When your glue is dry, use your needle and thread to sew your closure onto your woven band. This will add extra support to keep everything in place.
step 4Add your brooch.

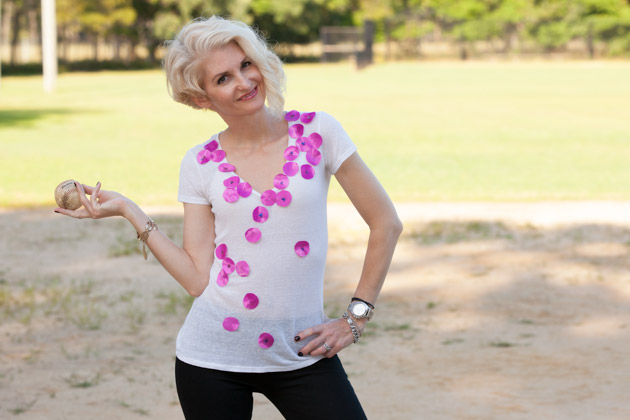
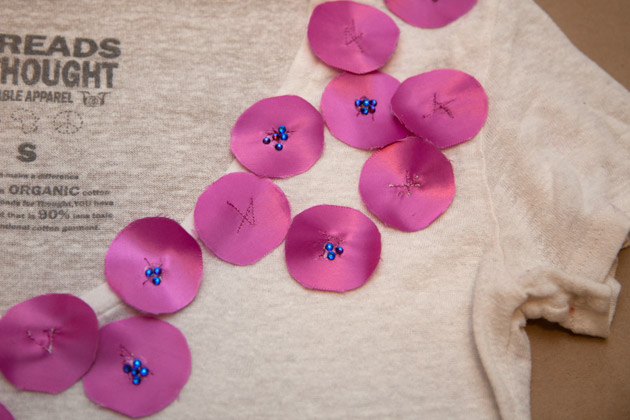
DIY T-SHIRT WITH RIBBON CIRCLES AND RHINESTONES
A different way to think about ribbon, try adding it in a different form with this DIY T-Shirt with Ribbon Circles and Rhinestones. Create texture and depth to a plain white t-shirt by sewing on ribbon circles with metallic thread and add rhinestones for sparkle and extra color.
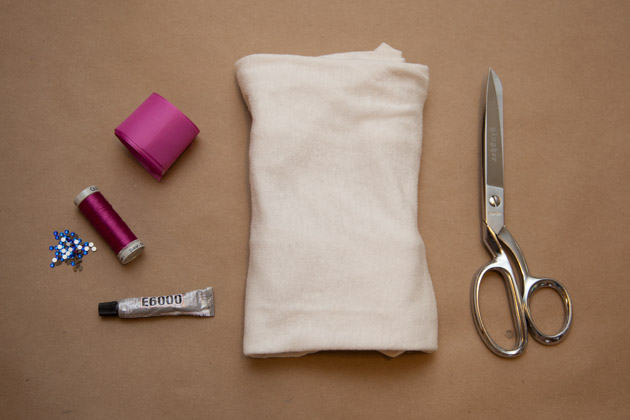
TOOLS & MATERIALS:
- Ribbon 1 yard
- T-shirt
- Fuchsia metallic thread
- Small rhinestones
- Sewing machine
- Pins
- Glue
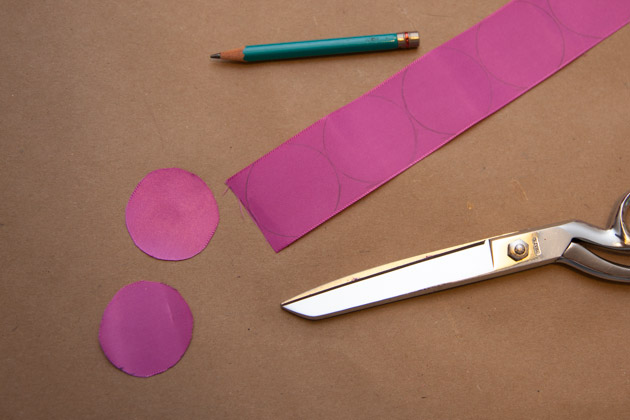
step 1Lay your ribbon out flat and trace circles onto the backside of your ribbon. Do this for the entire length of ribbon.
step 2Cut out your ribbon circles.
step 3Lay out your t-shirt on a flat surface and decide the placement for your ribbon circles.
When you have ribbon circles where you want them, pin them to your t-shirt.

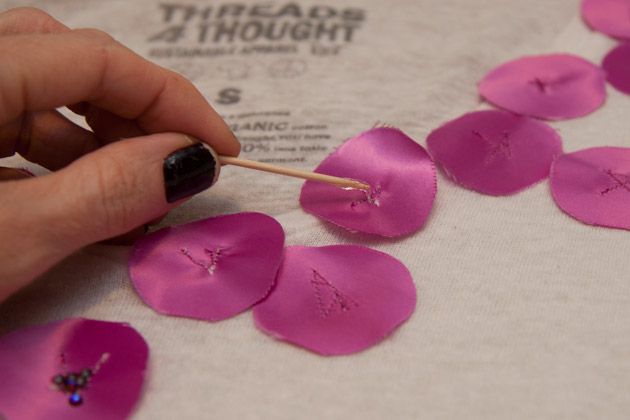
step 4Thread your fuchsia metallic thread through your sewing machine and sew your ribbon circles to your t-shirt.
Sew back and forth a few times to make a few straight lines across your ribbon circles.

step 5Once your ribbon circles are sewn onto your t-shirt you are ready to add your rhinestones.
I placed a few rhinestones randomly in the centers of some of the ribbon circles.
Add a small amount of glue to the center of the ribbon and then carefully place your rhinestones in the glue.
Let the glue dry.


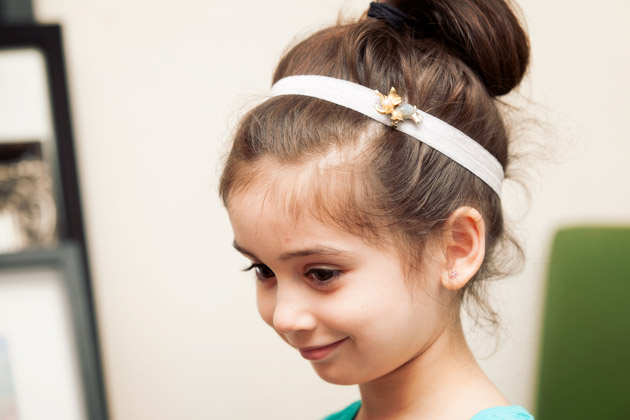
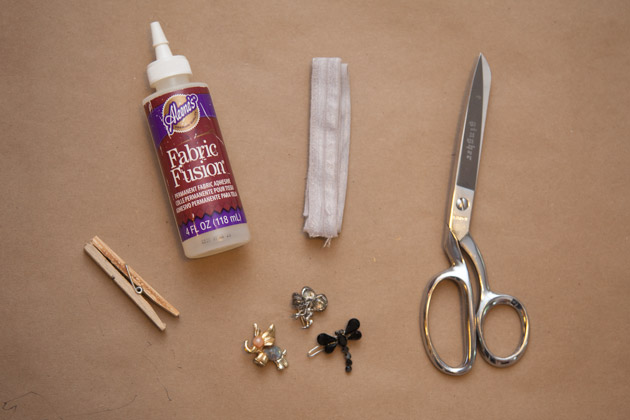
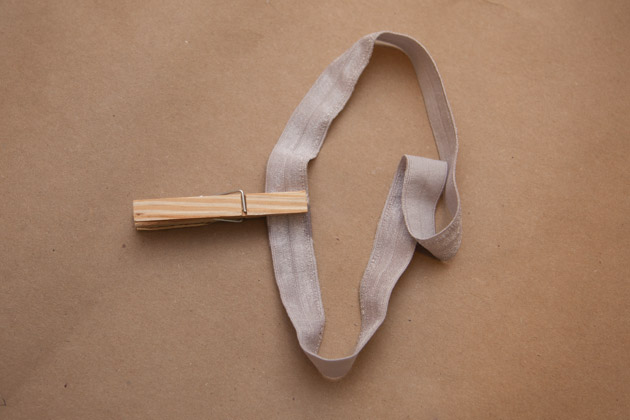
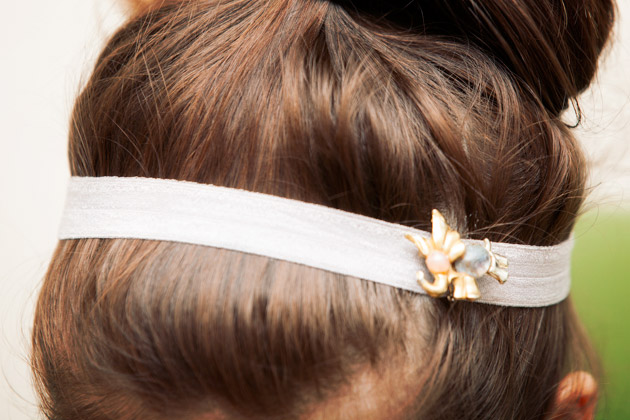
DIY ELASTIC HEADBAND WITH BROOCH
This simple no sew DIY Elastic Headband with Brooch is a quick solution to make a fun and on trend hair accessory.
TOOLS & MATERIALS:
- Light Gray Elastic
- Brooch
- Fabric glue
- Scissors
- Clothespin
step 1Measure around your head with the elastic, be sure to pull it a little tight, you don’t want it loose.
When you cut your elastic make sure you leave about an inch to overlap.
step 2Using your fabric glue, place a small amount on one end of your elastic and overlap your ends.
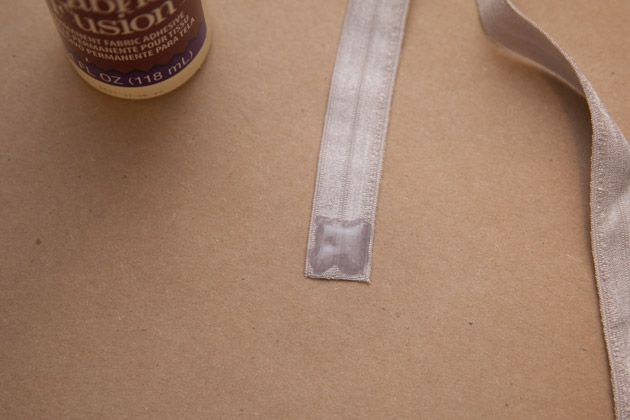
Use your clothespin to hold it while the glue dries.
step 3When your glue is dry place your brooch on the side and close to the top of your headband.

If you’d like to see more of my fashion DIY tutorials please check out my blog Trinkets in Bloom!
Thanks to M & J Trimming, this was such a fun DIY Challenge to be a part of and I’m so happy to have been included with such talented bloggers!
I LOVE EVERYTHING DONE HERE!
Even though all the diy’s were good I have to say these are the and most creative out of the bunch! Job well done!
WOW! I’m in love with all of her DIY’s! she’s amazing!!!!
xoxo Julieta
http://www.vjuliet.com
Great work Cathy! I love your projects!
Warm regards from Holland 🙂
Stunning!! I love all these DIYs.. I wish I had this Magic goodie box to try all these with my own fun ideas..
These are awesome!! I think the “love” shirt is my favorite. It’s so clean looking with the exact right amount of zing.