Tag: Tutorial

Leather Glove DIY Roundup

Leather gloves are definitely a high-fashion way to keep your digits from freezing off! But if basic leather gloves are a little boring, upgrade them with these fun DIY alternatives!

DSC_0378+web (1)Upgrade a basic pair of leather or faux-leather gloves with this fun Chanel-inspired DIY!

Final-11
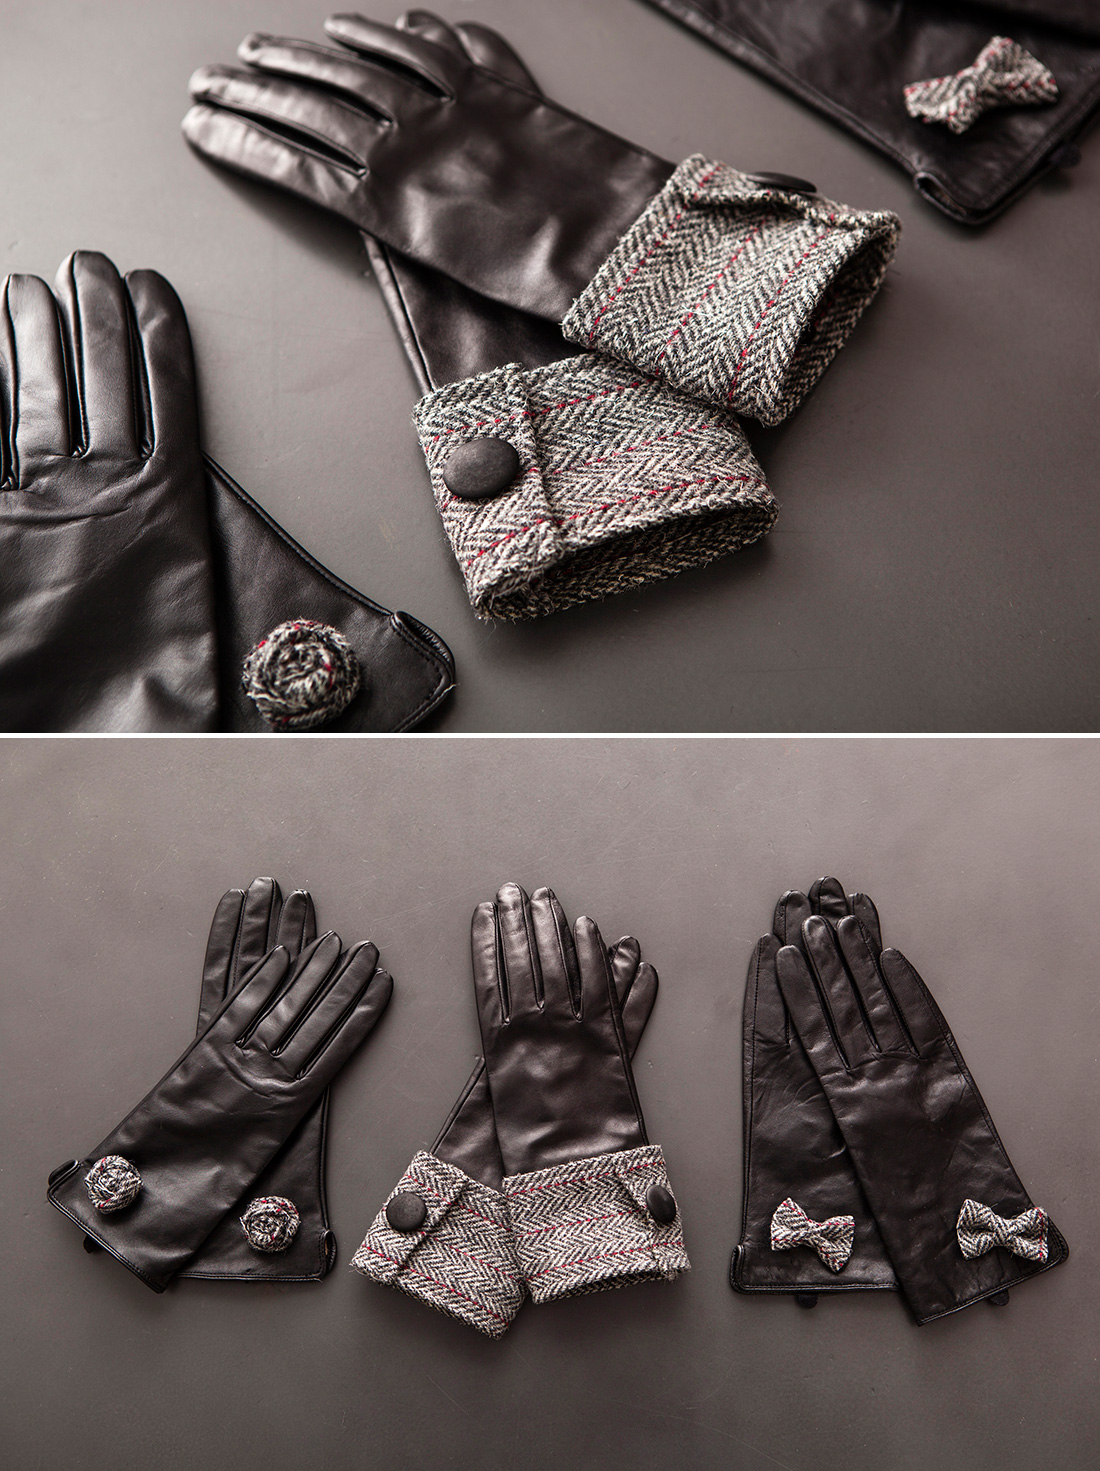
Brit+Co. gives us three luxe options for leather gloves!

Screen-Shot-2013-12-18-at-10.44.07-AM
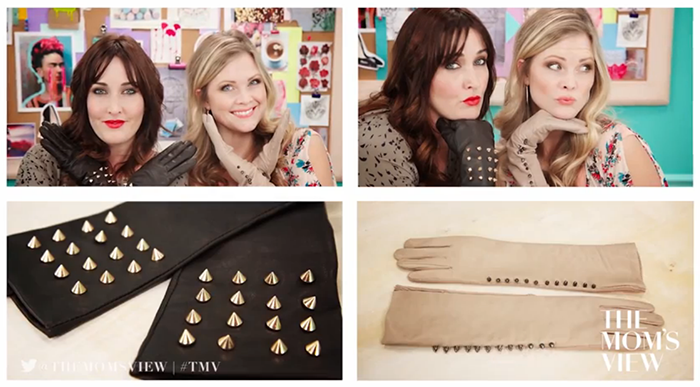
Here are two ways to add some edge to your leather with the addition of studs!

gloves2
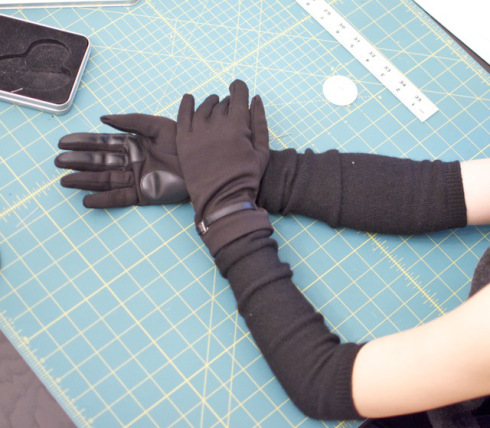
Need added warmth? Extend those gloves with a form-fitting sleeve!
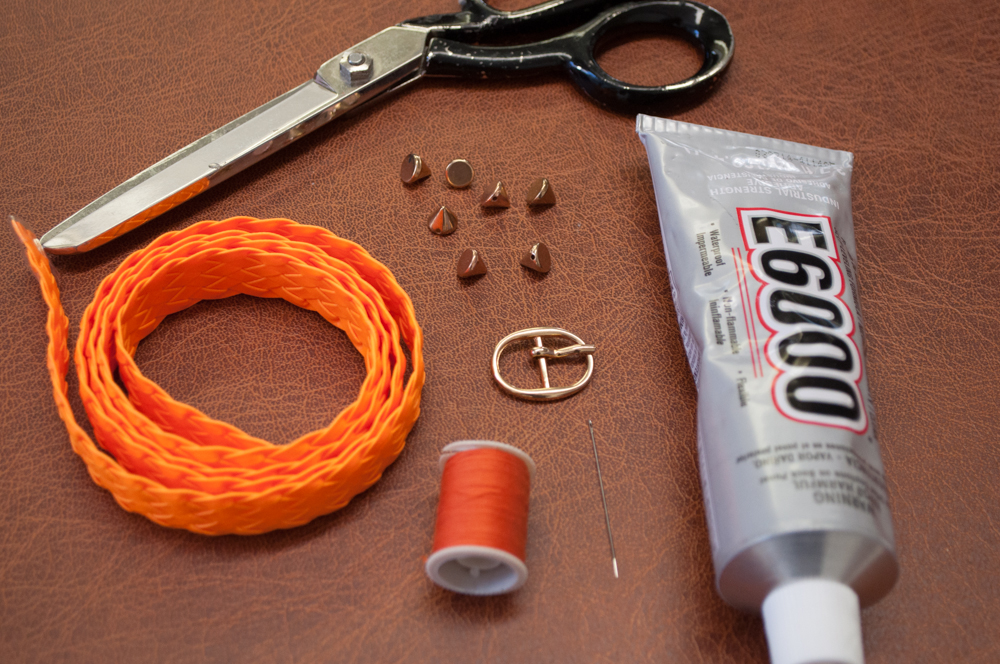
 

Canine Costume DIY Roundup

Do you celebrate every holiday with the furry friends in your life? Then Halloween should be no exception! These critter costume DIYs are just the thing to your best pal’s tail wagging on the scariest day of the year.

msd104948_sip_hal_09_nspiderdog_vert


Everyone has seen the viral video of the puppy in a spider costume scaring passersby. Well now you can make your own with Martha Stewart’s DIY spider costume!

Kitai_halloween_dog_costume_chia_petMake your pup another type of pet with this DIY Chia Pet costume from I Found the Place!

FP1SUGVH97JR1WU.MEDIUMIf your pet is king of the castle at home, why not make him king of the jungle for a day with an easy to make lion mane?

DIY-Dog-Pinata-Costume-600x399This piñata costume will make your pup the life of the party!

FV5090MGU4MC7OA.MEDIUMTake your dog to new depths with a walrus costume from instructables!

DIY: Tough Puppy Spiked Collar

Every puppy deserves a cool collar,and if you’re a crafty diyer you’ll love this neon spike collar that we’ve crafted just for Fido! Prepared to see a little more pep in your pooch’s step when you go for your morning walk!
DSC_0168What You’ll Need:

14mm Metal Buckle #21237

20mm Vinyl Braid #49140

8mm x 7mm Sew-on Mini Metallic Plastic Spike

Scissor

E6000

Needle

Thread

DSC_0169

1. Take your vinyl braid, and loop it through the buckle. Put the middle piece of the buckle through the vinyl so it is able to move back and forth. Push through the other end of the buckle and sew the end piece to the back.DSC_0179

2. Make sure to measure the collar around your pet to make sure the collar length is not too small or too big. Cut in place. Take the end and fold over and sew in place so the ends do not frill.DSC_0186

3. Lay out your vinyl collar and glue on spikes for embellishment.

photo 2

Espadrille Flats DIY

We love the look of canvas flats for warm weather, but sometimes they need a bit of an upgrade! We took a pair of basic flats and gave them a warm-weather makeover with some jute trim and colorful appliques!

DSC_0679

What You’ll Need:

 1/4” Jute Braid – Dark

2 2” Bullion Beaded Appliqué

Canvas Flats from Rainbow $12.99

E6000

Scissors

DSC_0681

1. Place glue around the bottom of the edge of your shoe platform.

DSC_0684

2. Glue a row of jute trim to the bottom of your shoe.

DSC_0688

3. Glue another row of jute above the first row of trim.

DSC_0695

4. Glue your applique onto the center of the front of the shoe, and let it dry. You can also sew your applique on for added security.

DSC_0702

Mother’s Day DIY Roundup

Mothers are the best. They’ve done it all and seen it all, all in the name of love and parenthood. This year, make that special lady in your life smile with something from the heart made by hand. Chalkboard Tray from Sensible SuggestionsTake your annual breakfast in bed idea up a notch this Mother’s Day, and bring it to her on a tray with a personalized message. It’s all about the little things, right? IMG_1417Nobody’s cooking is as good as Mom’s, right? This etched casserole dish will have your mom thinking of you every time she makes that famous green bean casserole! Jewelry Box DIY   Last year we created a modern jewelry box using sequins for sparkle, a great gift for your glam mom!   Floral Watering Cans Does your mom have a green thumb? These watering cans have a beautiful floral design on them, created with vintage flower illustrations and Mod Podge! Photo BookmarkIs Mom an avid reader? Take photos of kids or grandkids as if they’re holding onto a rope, and then cut out the developed photos and attach to a string or ribbon to make inventive bookmarks! Is your mom the sentimental type, or does she love a good laugh? What was your mom’s favorite Mother’s Day present, or if you’re a mom, what was yours?

Warm and Toasty DIY Roundup

These DIYs are perfect for those of us who want to make the best of this cold weather, and by the best we mean the coziest! Make these DIYs when you’re all bundled up this weekend, and then use them for further bundling! It’s like a never-ending cycle of coziness.

Crochet Socks from Kollabora user Magdalena LangaThese crochet socks from Kollabora user Magdalena Langa are so cozy looking! We love the super chunky tops and the contrast heel and toe!

Pom Pom Blanket from the Pleated Poppy

This Pom Pom Blanket from the Pleated Poppy is almost too cute to bear, and so simple to make!

DIY Sequin Sweater from Say Yes to Hoboken

Just because you’re staying in doesn’t mean you shouldn’t dress cute! Enter this sequined heart sweater from Say Yes to Hoboken. It’s perfect for going from the comfort of your couch to going out at night.

Needle Felted Blanket from a Beautiful Mess

Have you ever tried needle felting before? With results like the Swiss Cross Blanket from A Beautiful Mess, it’s hard not to want to give it a try! It’s also supposed to be pretty easy which is always a perk!

Slipper Boots from Drawings Under the Table

Slip on these DIY slippers from Drawings from Under the Table and feel your toes fall into blissful warmth and comfort.

So which DIY are you dying  to try on this blistering winter weekend?

DIY: Bejeweled Holiday Clutch

New Year’s Eve is the time for glitz and glam, and this year we’re pulling out all of the stops with a DIY accessory that’s sure to garner some attention. We’re making a bejeweled golden Holiday Clutch that’s perfect for that VIP New Year’s Eve party!

Bejeweled Holiday Clutch from M&J Trimming

What You’ll Need:

Antiqued 12mm X 10mm Rectangle With Setting

Antiqued 10MM X 6MM Pear With Setting

10mm X 5mm Navette Rhinestone with Setting 

10mm X 6mm Pear Rhinestone with Setting

10mm X 8mm Swarovski Crystal Oval Rhinestone with Setting

8mm X 6mm Oval Rhinestone with Setting

2” Large Rhinestone Leaf Trim

Glue

Glue Applicator Syringe

Scissors

Clutch

Cutting Rhinestone Trim M&J Trimming

1. Cut three sets of two leaves and one circle out of the rhinestone trim.

Bejeweled Holiday Clutch from M&J Trimming

2. Glue down each set so that they are mirroring each other. TIP: Use the applicator syringe so the glue does not get messy.

Bejeweled Holiday Clutch Sew-Ons from M&J Trimming

3. Create a colorful pattern with your sew-ons. Make sure that the pattern on one side matches the one on the other.

Bejeweled Holiday Clutch Rhinestone Sew-On from M&J Trimming

4. Glue the sew-ons down using that same syringe.

Bejeweled Holiday Clutch Rhinestone Sew-On from M&J Trimming

5. Allow the glue to dry for 24 hours.

Final Bejeweled Holiday Clutch

After the glue has set, your stunning holiday clutch is ready to follow you wherever the night takes you!

Holiday Decor DIY Roundup

If you would rather spend your money on gifts than decor, here are a few ways to decorate your house for the holidays without having to break the bank! All of these DIYs are easy to create, and will leave your guests impressed.
Ribbon Wreath from The 36th Avenue

This dazzling wreath by the 36th Avenue is the perfect addition to any doorway. You would think wrapping a wreath in one style of ribbon might look a little boring, but that’s obviously not the case when using a ribbon coated in glitter!

Christmas Star DIY from Vosges Paris

This rustic Christmas star is unassuming and quaint. It’s ideal for those who subscribe to the theory that less is more.

Bottle Brush Dye DIY

Some people use a limited color palette for the holidays: red and green, gold and silver, blue and white. If you don’t like limiting yourself to only two or three colors, take a look at the tutorial above to learn how to dye bottle brush trees!

Color Blocked Menorah Centerpiece from Confetti Pop

We love the bold pop of color on this disassembled menorah by Confetti Pop, and the assorted color blocking patterns create a mix-and-match look!

Gingerbread Centerpiece from Hanielas

Make your holidays sweet with a gingerbread centerpiece, and try thinking outside of the house. This Eiffel Tower centerpiece from Hanielas is simple, elegant and romantic. Perfect for a pair of Francophiles celebrating the season!

From wreaths to ornaments, this is the most decor heavy season of the year! What’s your holiday decoration strategy?

DIY: Gatsby Headband

For our second Halloween DIY installment, let’s take a journey back in time to the Roaring 20s. This style has taken the DIY world by storm after The Great Gatsby came out this spring. With the grandiose celebrations, chic fashions, and surplus of sparkles, it’s no wonder we’d love to channel the look into a DIY costume this year. Embrace your inner flapper with this amazing (and simple) Gatsby-inspired headband! Gatsby_Supplies

What You’ll Need:

3/4 yard of 18mm Foldover Elastic #25068

1 Curly Goose Feather Patch #42639

1 Beaded Pearl Fan Appliqué #41988

E6000 #46486

 Gatsy Headband Fitting

1. Use an elastic band to measure the distance around your head. Make sure it isn’t too loose or too tight! Create a half inch overlap, and cut off any excess.

DSC_6026

2. Place glue on that half inch end, and glue the ends together. Let it dry for an hour.

DSC_6033

3. Take your feather patch, and glue it over the seam you just created.

DSC_6038

4. Take your fan appliqué, and glue it over the feather patch.

DSC_6047

5. Make sure you allow your headband to dry for 24 hrs before wearing. You wouldn’t want the feathers to go flying while doing the Charleston!

DSC_6042

6. Place it delicately on your head to avoid disrupting those fabulous pin curls, and you’re all so set to go! Wear it out to your next party for a look that will make even Daisy Buchanan jealous!

Love the look, but want to make it your own? We’ve got you covered! Find all of the inspirational embellishments you need, from beaded trim to peacock feathers, at our Great Gatsby Inspiration Page!

DIY: Western Belt

Whether it’s the rough and tumble attire or the amazing use of leather, there’s something about the Old West that makes us go wild! That’s why our first Halloween DIY this year is featuring this classic theme, perfect for a cowgirl (or boy) costume. Our Western Belt DIY will transform you into a modern day Annie Oakley, and nobody messes with Annie Oakley! Western Belt DIY Supplies What You’ll Need:

1 Yard of Faux Leather Bias Binding #42143

1 Round Cowboy Buckle #30161

1 Pack of 7mm x  10mm Metal Spikes with Screw #57562

Revolving Leather Hole Punch #55264 Scissors #57470

E-6000

Marker

Leather Trim Western Belt DIY

1. Insert about an inch of the leather trim into the buckle opening, and wrap it around the metal fixture. Glue it down, and let dry it for an hour.

Marking Notch for Western Belt DIY

2. Wrap the leather trim around your waist to figure out where to place the notch in your belt. Mark the area to ensure correct placement!

Cutting Leather Trim for Western DIY

3. Once you know where the hole is going, cut off any excess trim.

Hole Punch for Western Belt DIY 4. Using a small hole punch, create a hole for the buckle closure.

Marking Holes for Western Belt DIY

5. Place the spikes or studs you want to use, and mark the spots as you had for the notch. Stud Placement for Western Belt DIY 
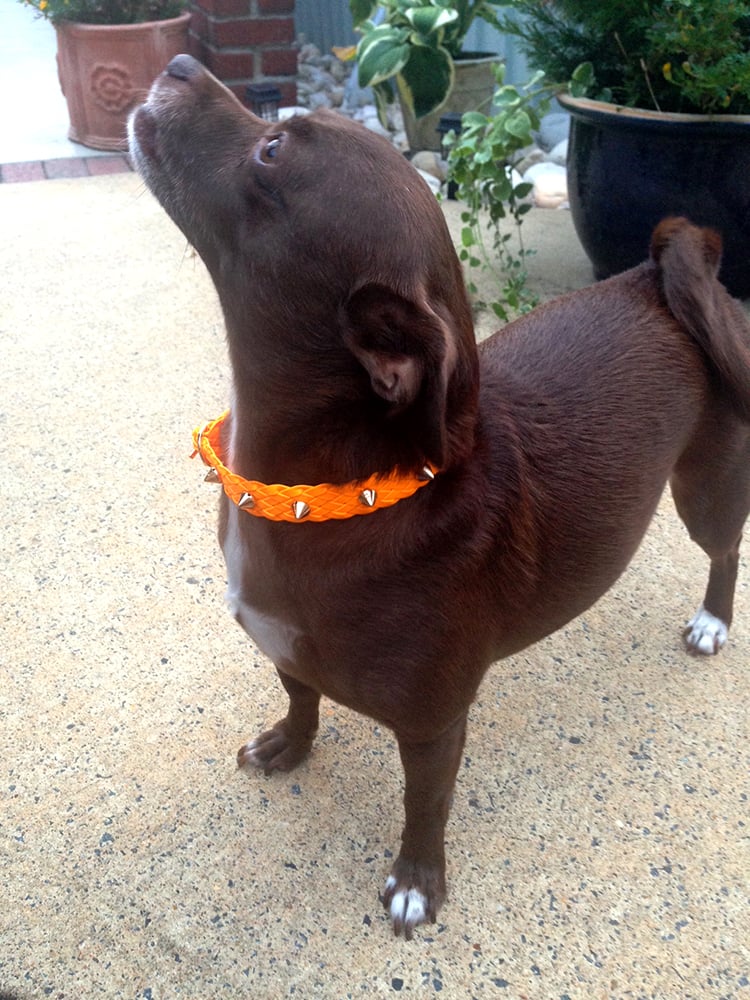
6. Then take out your hole punch to create holes where you want your spikes to go.

Metal Spikes in Leather Trim Belt

7. Twist the spikes into place.

Finished Western Belt DIY

8. Put on your finished belt, and prepare to be the chicest gal at the rodeo! Love the look but not feeling the buckle? Or maybe you’re looking for a different style of trim. Switch it out! Explore our Wild Wild West page to find all the Western-inspired materials to make a belt that reflects YOUR style.