Tag: Fashion

DIY: Floral Patched Shorts

Summer = Flowers

Summer = Shorts

So Shorts = Flowers!

That’s the formula for this super simple floral patched shorts that will make your summer outfit stand out, whether you’re at the beach or on a night out. Check out the video below to see how to make them and scroll down for more information:

Here’s what you’ll need:

A pair of shorts

Iron On Floral Patches like these

Scissors

Iron

1

I wanted to cut the patches so I can place half inside the pocket and half along the pocket. This is totally optional. You can get creative with this step by mixing in other patches or putting it on the back pocket instead.

2

Place the patch where you want it and using a teflon sheet or a thin cotton cloth (to protect the patch) press and hold down the iron (heat on high, no steam) for 20 seconds. Repeat if necessary.

3

Guess what? That’s it. Simplest formula and simplest DIY ever!

DIY: Lace Denim Shorts

Lace and denim just seem to go hand in hand don’t they? I personally think it’s girly in the nicest way. Check out how you can make these adorable shorts to complete your summer attire. Check out the video below to see how to make them and scroll down for more information:

Here’s what you’ll need:

A pair of denim shorts

Lace like these

Thread and Needles

1

Before I started, I cut two inches off the bottom of the shorts. I did this to accommodate the extra length the lace was going to add. This is optional but odd lengths on shorts can be extremely unflattering so I would suggest doing it.

2

I then started sewing the lacy about three inches in. I made small stitched every half inch or so along the top of the lace. I started and ended at the inner seam for a clean finish.

3

You need to around the whole leg and then repeat it with the other side.

That’s it!


Spring Summer 17 Trend Alert: Straw and Wicker

This summer’s latest trend is straw and wicker hats, bags and furniture. With Scandinavian influences, the trend embraces natural fibers and un-dyed, light colors. The pale shades of lemon yellow and creamy beige are light and sunny and will instantly turn any outfit into a summer look and any room into an airy oasis.

The original straw and wicker trendsetter is Jane Birkin, circa 1974 with her iconic basket bag but the upcoming trendsetter is you, circa now. So gather your looms and weaving materials, and come on a straw studded journey through this summer’s latest craze.

FRANCE – FEBRUARY 08: Jane Birkin Posing With Her Little 10 Month Old Daughter On The Boardwalk In Nice On September 9, 1972. The 28 Year Old Actress Was Then On The Set Of The Film Trop Jolies Pour Etre Honnetes, Directed By Roger Balducci. (Photo by Keystone-France/Gamma-Keystone via Getty Images)

First up, straw hats and bags with inspired verbiage like “do not disturb”, “beach please”, “out of office” and more. The large, script, playful letters in contrasting blues and reds make this style really pop and come to life. It’s great when your accessory can speak for you with a little message and it’s a whimsical look perfect for the beach or pool. 

Eugenia Kim’s Hats are so adorable (and so DIY-able) (Source)

In the home décor world, we have outdoor woven furniture. Rattan and wicker has returned and natural furniture pieces are making a comeback. Whether the piece is retro or modern, designers are foregoing all things heavy and dark for a refined “back to nature” look.

(Source)

This summer, drop your leather bags and hardwood and opt to accessorize with your new favorite materials.  The look may have started with the Scandinavians but it ends here with you.

DIY: Multicolor Lettered Clutch

I’m sure you’ve seen the graphic clutches on the runway the last couple of seasons, with everything from patches to embroidered letters. Now you can make your own.

Watch the video to see how to make it and scroll down for more detailed instructions.


What you’ll need:

A Clutch/ Flat bag

Markers

Iron On Letters like these

Iron

Tip: Use a teflon sheet or cotton cloth to cover the letters when you iron them.

Step 1: Color in the letters. This step is optional. I just wanted something more personalized. You can even dye them for a more uniform color.

Step 2: Place the letters how you want them.

Step 3: Covering the letters with a cotton cloth or teflon sheet, iron in sections, holding the iron down for 20 seconds at a time. Repeat if necessary.

Go on now, flaunt your new clutch.

DIY: Lettered Sweatshirt

Want an easy way to embroider words onto your sweatshirt or t shirt? Just use iron on chenille letters like we did. It’s an easy and fun way to make matching sweatshirts for an event or bachelorette. Watch this video to see how you make your own and scroll down for more detailed instructions.

Here’s what you’ll need: 

Sweatshirt (or whatever you’re ironing on – cotton works best)

Iron-On Chenille Letters – We used These

Iron-On Chenille Symbols – Like These

An Iron

Tip: We recommend also using a teflon sheet or a thin cotton fabric to cover the letters while ironing.

Step 1: Place the letters how you want them on the sweatshirt.


Step 2: Cover the letters with the teflon sheet or fabric and Iron over it, pressing down on each section for about 20 seconds. Repeat if necessary.

Step 3: Reverse the sweatshirt and iron on the back of where the letters are.

That’s it, you’re done!

DIY: Vintage Trim Cuffed Jeans

Have you ever wandered into a store and found a beautiful jacquard trim or a vintage trim, but didn’t know what you could use it for? Your jeans of course! This DIY is cool because of its semi-permanence. Cuff ’em and show of the trim or un-cuff ’em and have your jeans back and no one’s the wiser. Watch the video below to see how to make them and scroll down for more details.

What you’ll need:

A Pair of Jeans

A Vintage Trim/Jacquard Trim

E6000 Glue

Scissors

Step 1: Measure the bottom of your jeans. Add two inches to that and cut the trim to that measurement.

Step 2: Apply glue to the end of the trim and fold it over once at about an inch. This is to hide/seal the frayed end.

Step 3: Apply a line of glue to the jeans at the seam and at the top and bottom of the cuff. Start glueing the trim all around. E6000 takes some time to dry and it helps if you don’t jostle the fabric too much.

Step 4: Repeat Step 2 when you get to the end and glue down the end to the jeans.


That’s it, you’re done!

DIY: Rhinestone Hem Jeans

If minimalism is your style but you have a soft corner for some bling this DIY is for you. This easy tutorial will show you how to give your jeans a little glitz and glam. You can dress it up and dress it down as you please. Watch the video to see how to make them and scroll down for more detailed instructions.

What you’ll need:

A Pair of Jeans

Iron-0n Rhinestone Trim

Sew-on Jewels

Needle and Thread

Scissors

Iron

Step 1: Measure the bottom of your jeans and cut the rhinestone trim to that measurement, adding an extra inch.

Step 2: Iron on the trim slowly making sure you apply heat uniformly. You can use a cotton cloth over the trim to protect it from the heat. Do not iron on the steam setting. Add the second row.

Step 3: Using the sew on jewels, make a three petal flower at the center. Using a needle and thread, sew through the jewels till they feel secure.

That’s it, you’re done!

DIY: Decorated Graduation Caps

Graduation time is here! Nothing is more exciting than putting on your cap and gown and walking across the stage. But those plain cap and gowns they give you are a bit boring, now there is nothing wrong with being just another cap in the crowd. But if you want your family to be able to spot you from the bleachers, go out in style by decorating your cap. Here are two great ideas on how to stand out and show your individuality.

Cap #1: Decorate with Patches

Customize your cap with some of your favorite things, and what better way to show your style then with patches?

What You’ll Need:

  • Graduation Cap
  • Patches
  • Iron
  • Thin cotton cloth

NOTE: Make sure you know which is the front of your cap so your design sits properly.


Step 1:  Grab an assortment of patches in various sizes and play around with the layout until you’ve got it right.

Step 2: Iron the patches for 20 seconds each on high heat (no steam). Repeat if necessary.(Use a thin cotton cloth over the patches, to protect them)

Viola! You’re finished.


Cap#2: Decorate with Rhinestones

What You’ll Need:

  • Graduation Cap
  • Monogram print out
  • Rhinestones
  • Iron-On Rhinestone Trim (we used this one)
  • Iron safe transfer paper
  • Iron
  • Tweezers

NOTE: Make sure you know which is the front of your cap so your design sits properly.

Step 1: Choose the font and size you want your monogram (or quote) to be and then print it out . Make sure to print the “mirrored” version so it is the correct way once it is on your cap. For this we used the font Paduka Script

Step 2: Place your monogram under the transfer paper and peel back the protective layer to reveal the sticky side.


Step 2: Fill in your monogram with rhinestones. Put the rhinestones flat back up, jewel side down, so that the top of the jewel is on the sticky part of the transfer paper.

Step 3: Transfer to your cap. Carefully put your cap over the transfer paper and flip both over. Then position your monogram where you would like it to go.

Step 4: Iron on. Place a thin cotton sheet over the transfer paper and iron your monogram onto your cap. About 30 sec in each place then move around until its on there good.

Step 5: Lay out your trim. We cut this trim so it was a little thinner. Measure each side with the trim and make sure to account for any overlap in corners so that the trim lays flat all around.

Step 6: Iron on your trim. Just like with the rhinestones, place a thin cotton sheet over your trim and iron on. Holding for about 30 sec or until it is not loose.

That’s it, you’re all done!


 Now go strut your stuff across the stage and congratulations!

DIY: Gucci Inspired Studded Acid Wash Denim Jacket

Who would have thought these trends make a comeback! Studs on Acid Washed Denim! Gucci this Spring took these popular 80s trends, put them in a blender and out came this:

We thought we’d take this hot trend and turn it into a fun, easy DIY. We love recreating runway looks for those of who you love fashion but don’t want to break the bank. The first thing we did was hunt for the perfect denim jacket – something slightly oversized to match the current trending silhouette. We bought a classic blue Talbots denim jacket and headed back to HQ to get started on the project.

What You’ll Need:

Step 1: Remove all the buttons from the jacket. We wanted to replace the plastic buttons on the jacket with cool metal ones. This step is optional. If you like the current buttons on your jacket, skip this step.

Step 2: Fill a spray bottle with bleach. Make sure you wear rubber gloves to protect your skin. We advise that you work in a well-ventilated area when working with bleach. Keeping the bottle about 6 inches from the jacket, start spraying in random sections. Don’t spray too much! You’ll notice the color stripping away. Let it dry and then wash it.

Disclaimer: Bleach strips dye from fabric and sometimes reflects the undertones present in the dye. For example, you might see yellowish or pinkish tinges based on your denim’s original wash/dye.


Step 3: Start attaching the studs. For the studs with prongs, poke it through the fabric and use pliers to bend the prongs inward into the hollow of the stud. For the studs with screws, use a sharp tool (scissors/awl/X-Acto knife) to make a small hole and push the screw in. Then screw the stud onto the screw.

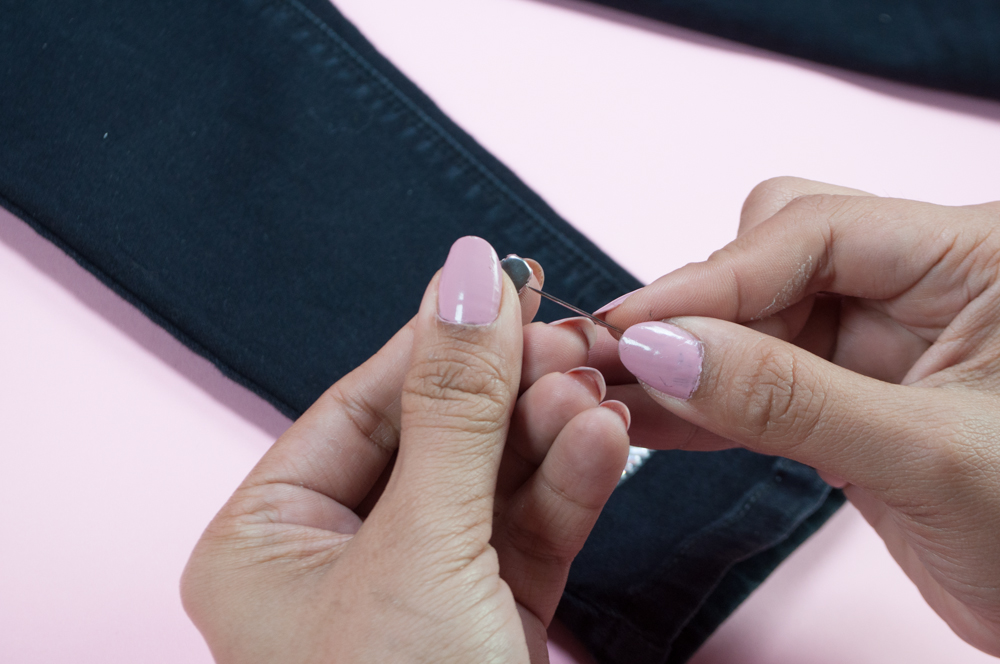
Starting at the shoulder, attach as many studs as you like.

Step 4: Sew on the new metal buttons. Again, this step is optional.

And you’re done! If you wanna buy this jacket go here. Hurry! There’s only one.


Studs used in our project:

Small Metal Spikes with Screw
Large Cone Spike with Screw
Medium Spike with Screw
Small Flat Nailheads
Cone Nailheads