Category: Home Decor

DIY: Faux Bee Embroidered Pillow

Ok, so we didn’t actually do the embroidery, hence the ‘faux’. But our way is better for those of you who don’t have the time or the skills to embroider something. Check out how to make this super cool bee embroidered throw pillow:


What you’ll need:

A pillow cover

Embroidered patches – We used this one

An iron


Yup, that’s it.

Step 1: Place the patches how you want them.

Step 2: Iron the patches for 20 seconds each on high heat (no steam). Repeat if necessary.

(Use a thin cotton cloth over the patches, to protect them)

And that’s it, you’re done. No joke.

Check out how to make this pillow and two others in this video:

DIY: Tassel Pillow

Have an old pillow you want to give some life to? Just grab a few tassels and add them all around. Tassels are a fun addition to a lot of home decor projects. Check out how we updated this pillow:

What you’ll need:

A pillow cover/pillow

Tassels

Needle and Thread

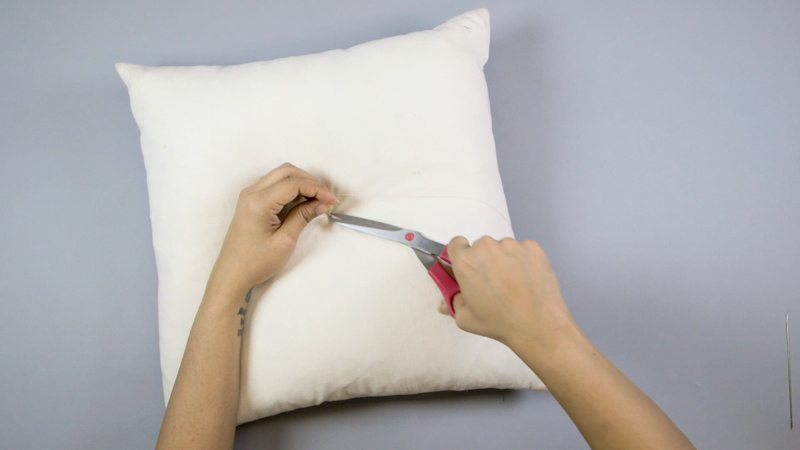
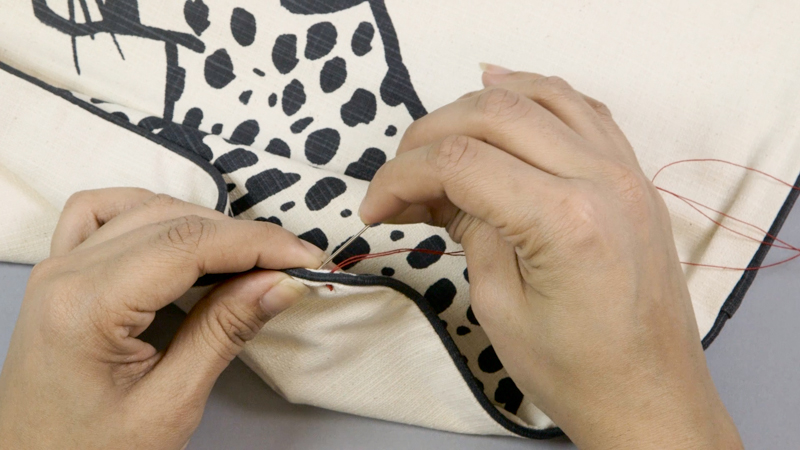
Step 1: Starting with a corner, sew a stitch from the back of the pillow and then sew it back through.

Step 2: Using the loop on the tassel, fasten it to the cover by repeating the first step.

Step 3: Just add more tassels all around the pillow.

And you’re done!

Check out this video for more ideas on making cool pillows:


DIY: Tufted Pillow

One of the easiest updates you can give a throw pillow is the classic tufted look. It looks complicated but it’s so simple to do. You can do this with armchairs, cushioned benches and pretty much anything with cushion/padding that you can tuft. Check out the video at the bottom of the page if you want a quick tutorial on how to tuft pillows.

Disclaimer: If you’re going to tuft something, it’s going to stay that way. So if you have a pillow with a cover and an insert, make sure you’re not going to want to change it in the near future.

What you’ll need:

Throw Pillow

5 Buttons of your choice – We used This One*

5 Small Buttons

Decorator’s Needle

Extra Strong Thread

Pencil

Step 1: Mark where you want the tufts.

Step 2: Tie a knot at the end of the thread. Pull the needle through to the other side (through your marking)

Step 3: Thread the needle through the button’s shank. Pull the needle through the pillow to the back.

>Make sure you pull the thread through as tightly as you can.

Step 4: Thread the needle through the smaller button that will anchor your main button.

And you’re done!

Check out the video to see how to make this pillow and two others:

*This item is currently unavailable. Check out our full selection of buttons.

DIY: Pom Pom Flowers

You know those DIY tutorials that are so simple you catch yourself asking, “Wait, what’s the catch?”. Well there is no catch! It’s just that simple to make these adorable pom pom flowers that you can use to brighten up a space. The best part is you can keep them simple or get creative and make some elaborate flowers with different sizes of pom poms.

What you’ll need:

Big Pom Poms

Glue Gun

Sticks or Thin Branches

Scissors

Step 1: Trim the sticks to the length you want. I cut mine about ten inches.

Step 2: Cut the pom poms from the trim.

Step 3: Add a some glue to the end of one stick with your glue gun and stick a pom pom on. Apply glue and add a couple of more pom poms to create a flower. I varied the number to make different shapes.

Aaaand *drum roll* you’re done.


DIY: Romantic Lace Candle Holder

Nothing sets the mood like candles. Update your plain glass candle holders with some gorgeous, sexy lace! Check out these simple steps:

RED LACE CANDLE HOLDER

What you need.jpg

What you’ll need: 

Glass Candle Holder

Hot Glue Gun

Scissors

Approximately 1 foot of red lace  (depends on the size of your holder)

Measure the lace.jpg

Step 1: Measure the amount of lace needed to wrap around your candle holder.

Cut to size.jpg

Step 2: Cut excess material, leaving a little extra for a neat finish.

DSC_0813.jpg

Step 3: With the hot glue gun, add a line of glue on the glass where the lace will begin.

DSC_0814.jpg

Step 4: Begin to wrap lace around the holder, sealing it at the end with another line of glue.

DSC_0816.jpg

Step 5: Complete by folding and glueing the end.

Put a white candle in it and light it up!

BLACK EYELET CANDLE HOLDER

What you need 2.jpg

What you’ll need: 

Glass Candle Holder

Hot Glue Gun

Scissors

1 foot of black eyelet

Apply a small amount of glue.jpg

Step 1: Starting at the bottom, add a pea size amount out of glue

Start by glueing.jpg

Step 2: Begin to wrap lace in upward motion, adding small amounts of glue throughout

Glue at the end.jpg

Step 3: Seal end with a pea size amount of glue.

Cut excess.jpg

Step 4: Cut excess lace.

Fill with a candle, light, and enjoy!

Pantone’s Colors of the 2016: Serenity and Rose Quartz

Every year color authority, Pantone, picks the reigning color for the upcoming year. This color then dictates home decor, fashion and beauty for the rest of the year. This year Pantone threw us a curveball by revealing two colors, Serenity and Rose Quartz, as the “it” colors for 2016. The best part about the pair? The duo work so well together that one can easily transition to the next with the ease of Sleeping Beauty’s ballroom gown. These soothing shades pair perfectly in home decor, fashion and wedding style. How will you be using Serenity and Rose Quartz this year? Do you prefer one over the other? Let us know in the comments!

Pastel Living Room
dc3003ca5ead7ab9c4b84af7af7b5ccd

0690af548c283ceb5100c987aa88698e

dbf9cde249bb2cbe15df519806a735b9 (1)

0269dc13f5da824ea64125c214669ffe

Rustic Holiday Decor Inspiration

Everyone has their own way to decorate for the holidays, and while we’re obviously huge fans of sparkle and  sparkle we also appreciate the simpler things in life. We’ve gathered some of our favorite ways to display holiday cheer with a rustic twist. The key to rustic holiday decorating is sticking to a neutral color palette, using natural elements like pine cones and branches, and featuring simple textures like burlap. How do you decorate for the holidays?
Rustic Holiday Mantel

Christmas Nook

Kinfolk Natural Home and Holiday Decor, Studio Choo with Another Feather

Branch and Bottle Brush Wreath

Rustic Christmas Tree

Going Batty Halloween Decor Inspiration

This Halloween we’re planning on featuring one of our favorite flying mammals: bats. These tiny flyers are synonymous with all things sinister including vampires, blood and the spookiest night of the year! Here are a few easy ways to add bats to your decor this season.
Bat Branches Home Decor - M&J TrimmingThese decorative bat branches are so simple to recreate. Just tie black satin ribbon to branches, and boom! Halloween decorations that are easier than tying your shoes.

Bat Mobile - M&J Trimming

Nothing like the “bat mobile” we’re familiar with, this awesome decoration is perfect for your next party!

Halloween Cloche - M&J Trimming This Halloween cloche is the perfect decoration for those who like a little glitter and sparkle around the holidays.

Bat Wing Fan - M&J Trimming

This subtle DIY may go unnoticed until guests peek at the ceiling, but once they do, prepare for awe and wonderment.


Bat Door - M&J Trimming

Simple yet sinister, this DIY features a flurry of bats swarming onto a doorway. Only the brave will knock on this door.


DIY: Embroidered Pumpkin

If you’re looking for an easy DIY that will instantly make your doorstep more festive for your favorite frightening holiday, Halloween, this is it! Instead of going the traditional carving route, we decided to make use of our leather cord to create a unique embroidered effect. We also used a craft foam pumpkin for this DIY so that it can last multiple seasons, but you can swap it out for the real thing too!M&J Trimming: Embellished Pumpkin DIY

What You’ll Need:

Scissors

Spooky Image of Your Choice

Pins

1mm Round Leather Cord

Pumpkin

DSC_01481. Cut out your image.

DSC_01492. Pin paper cut-out to pumpkin.

DSC_01523. Cut out top of pumpkin. If you’re using a real pumpkin you’ll want to clean out the insides.

DSC_01534. Make a knot at the base of the leather cord.

DSC_01545. Either drill or puncture  small holes into the pumpkin using your cutout as a guide.

DSC_01596. Start weaving your leather cord through all of the holes. Make sure every hole has a complementary hole close by.

DSC_01617. Continue weaving until the image is complete. For small areas you can tie a knot and weave back through one hole, as we did with the spider fangs.

DSC_0188

Fall Home Decor Inspiration

Fall is finally here, meaning is time to bring out those fall home decorations. If you’re bored with the same old decorations each year, try something new to place in your home. Here’s a round-up of some pretty cool DIY’s to autumn-up your home for 2015. Try a new project with some pastel colors, or create a new center piece when having big dinners. The ideas are endless!  M&J Trimming - Fall Jars

Pastel colors for the fall? Why not! Lace and burlap is always a great combination.

M&J Trimming - Fall Center Piece

Awesome center piece! The pine cones are a very nice touch.

M&J Trimming - Cool Colors for Fall

These are some beautiful cool colors for the fall.

M&J Trimming - Ombre Vase

Some cool ombre vases. Such a fun looking project to do, and so simple.

M&J Trimming - Fall Table Tray

A beautiful tray with autumn touches. The pumpkin is a great addition!